 Speed up your innovation with Glows.ai, Scale up your large model training
 Glows.ai Team User Guide
Glows.ai Team enables team collaboration, centralized resource management, flexible quota allocation, and secure sharing mechanisms—designed to meet enterprise-level requirements for shared cloud resource utilization.
Glows.ai Team brings teams together with unified resource management, dynamic quota control, and secure data sharing. It is built for effortless collaboration across shared cloud environments.
This guide includes:
Owner Guide
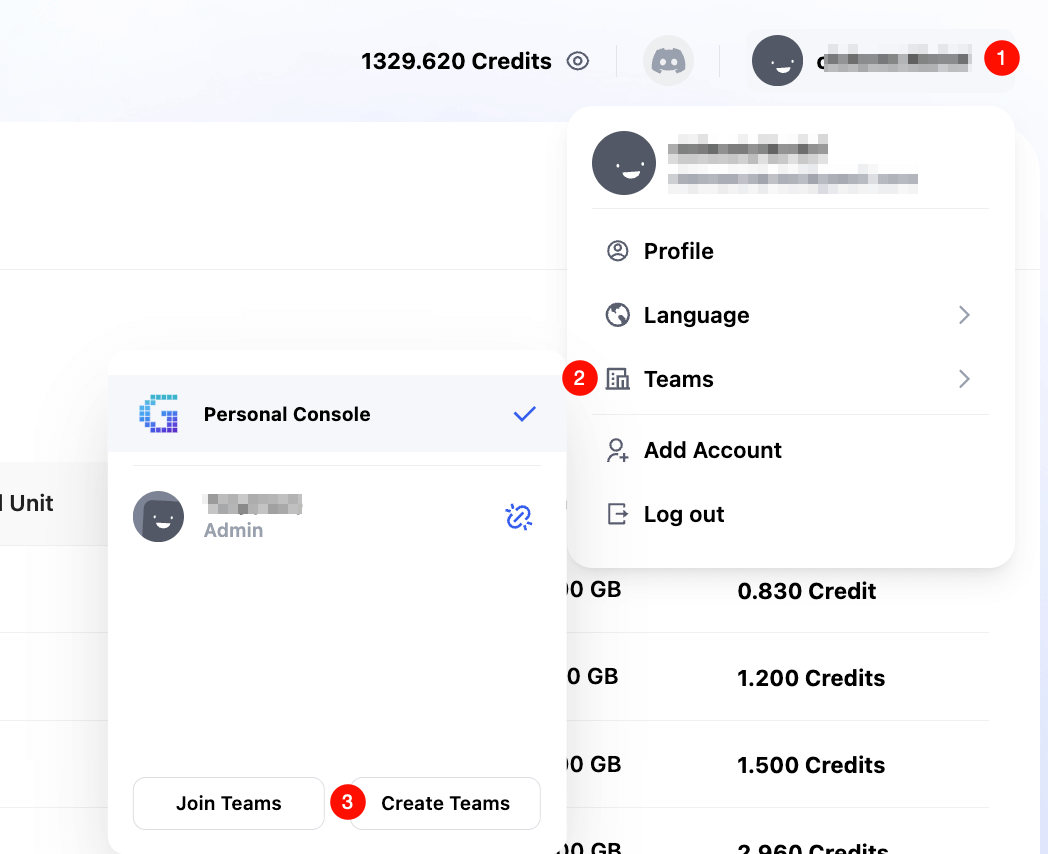
Create a Team
After logging into the Glows.ai platform, click on your personal information in the top right corner, then click Teams in the pop-up window. Next, click Create Teams to enter the team creation process.
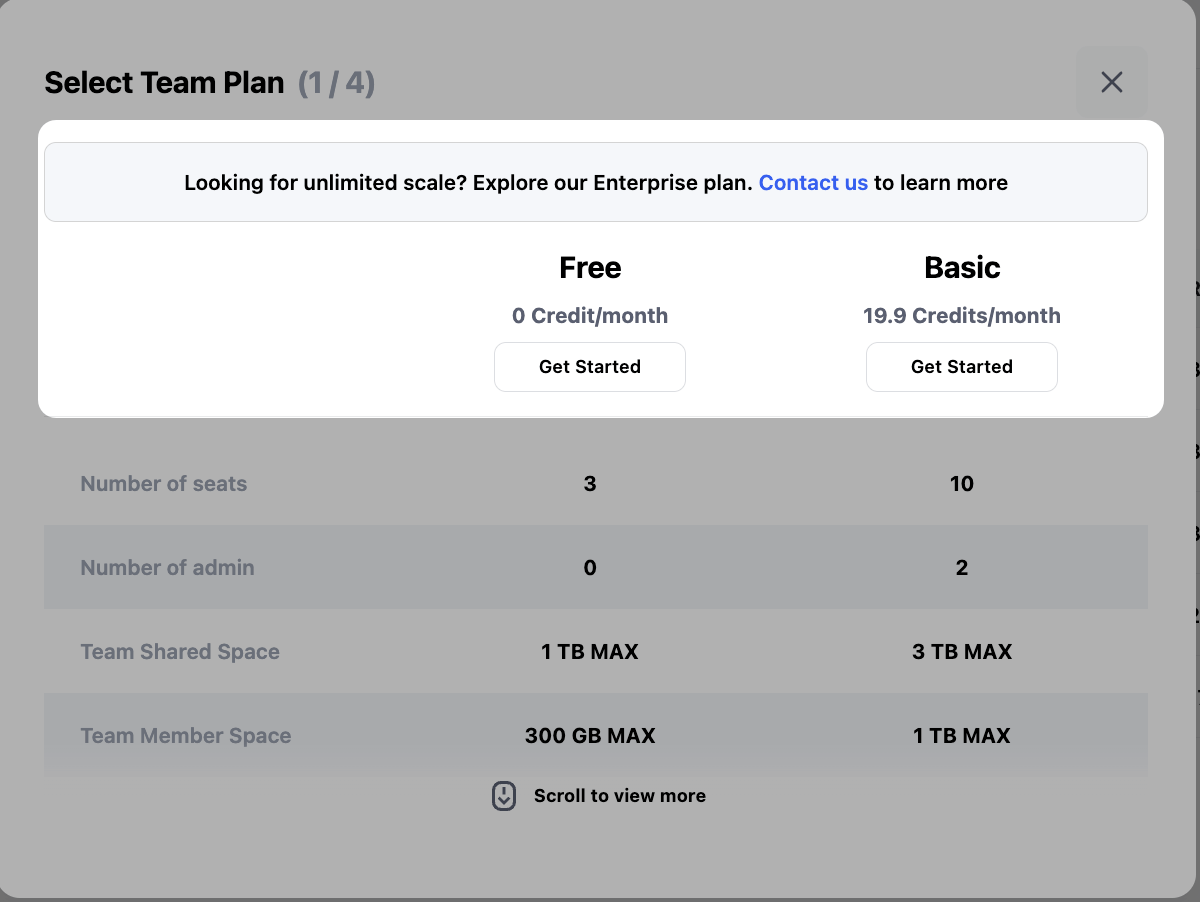
Currently, there are two versions: Free and Basic. You can choose the appropriate version based on your team's project needs. If you have more advanced requirements, you can click Contact us to reach out for customized development.
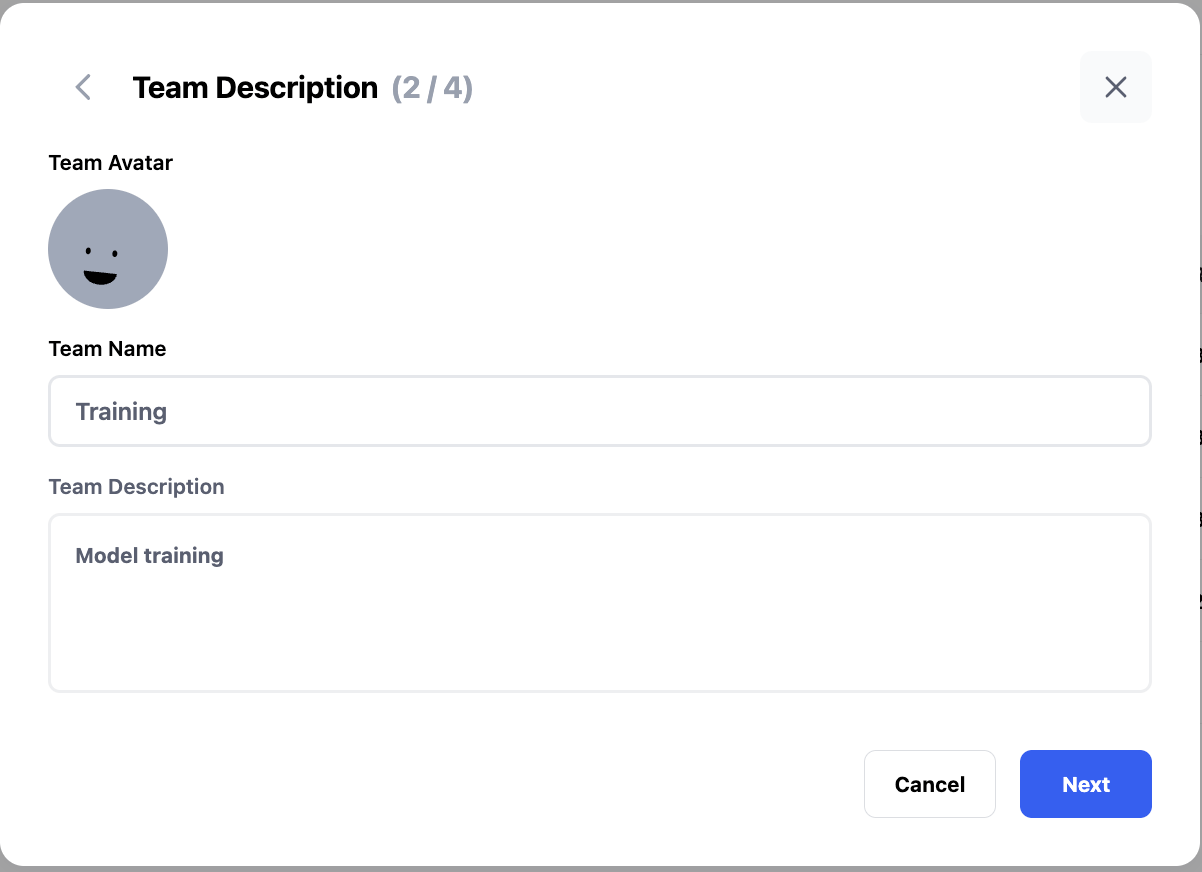
After selecting the team package type, you can proceed to set the team name and description.
Select the package purchase duration. You can renew manually later, and then click Next.

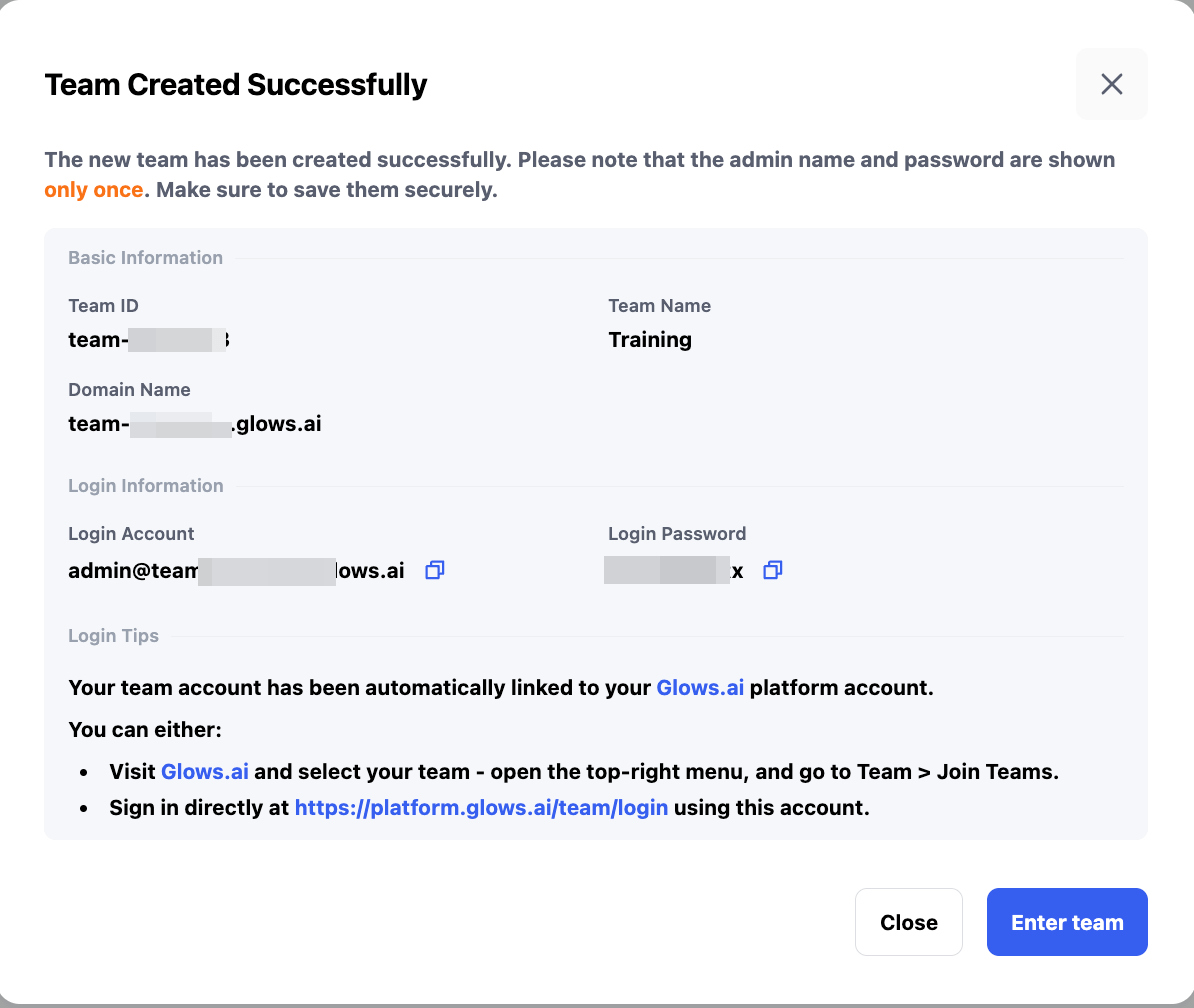
Once you confirm that the information is correct, click Create Team to complete the team creation.

After successful creation, you will see the team's basic information. A default team creator account will be assigned, and it will be automatically bound to your main account.
Switch to Glows.ai Team Workspace
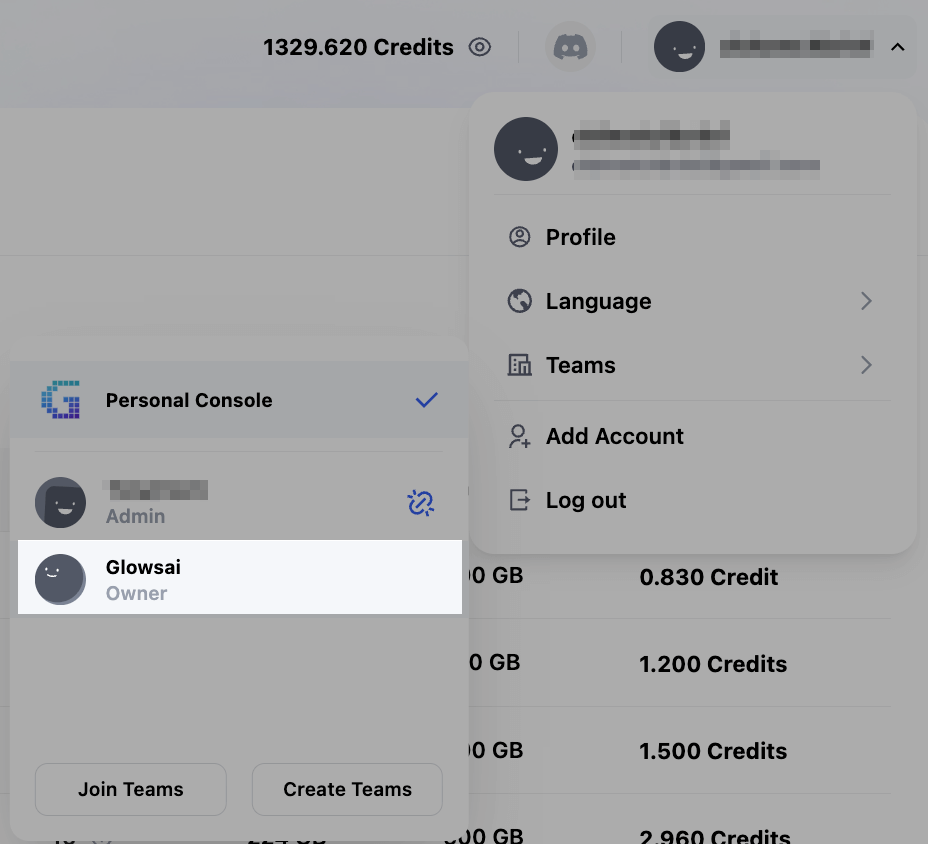
As a team owner, you can switch from your Glows.ai account to Glows.ai team workspace.
Click your profile at the top right, select Teams, and then click on the team you wish to enter.
Member Management
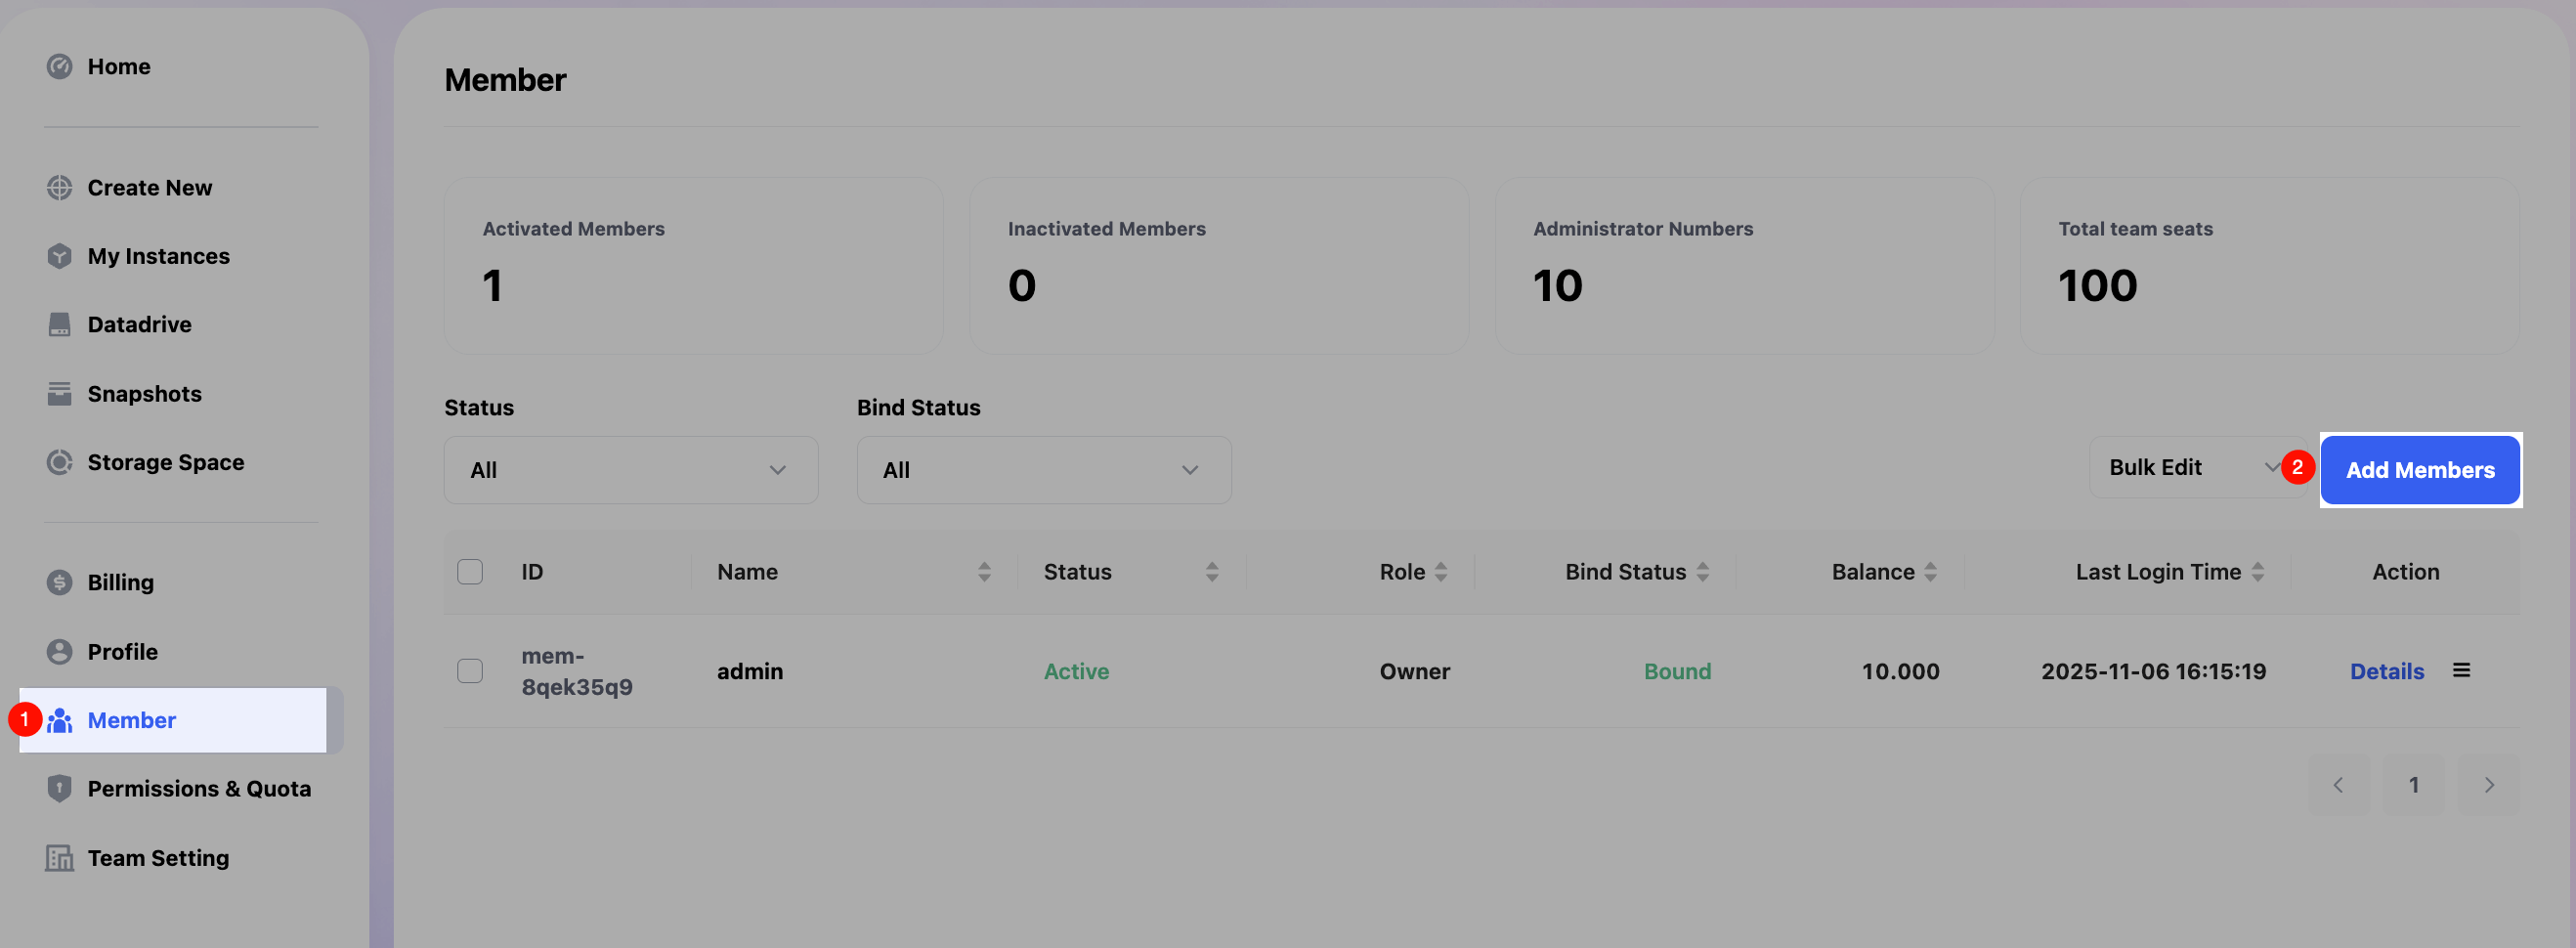
Owners or administrators can access the Member in the sidebar to manage team members.
Supported features include: Add Members, Assign credits, Permission & Quota, editing member info, and managing instances.
Add Members
Click Add Members in the Member section to start adding team members.
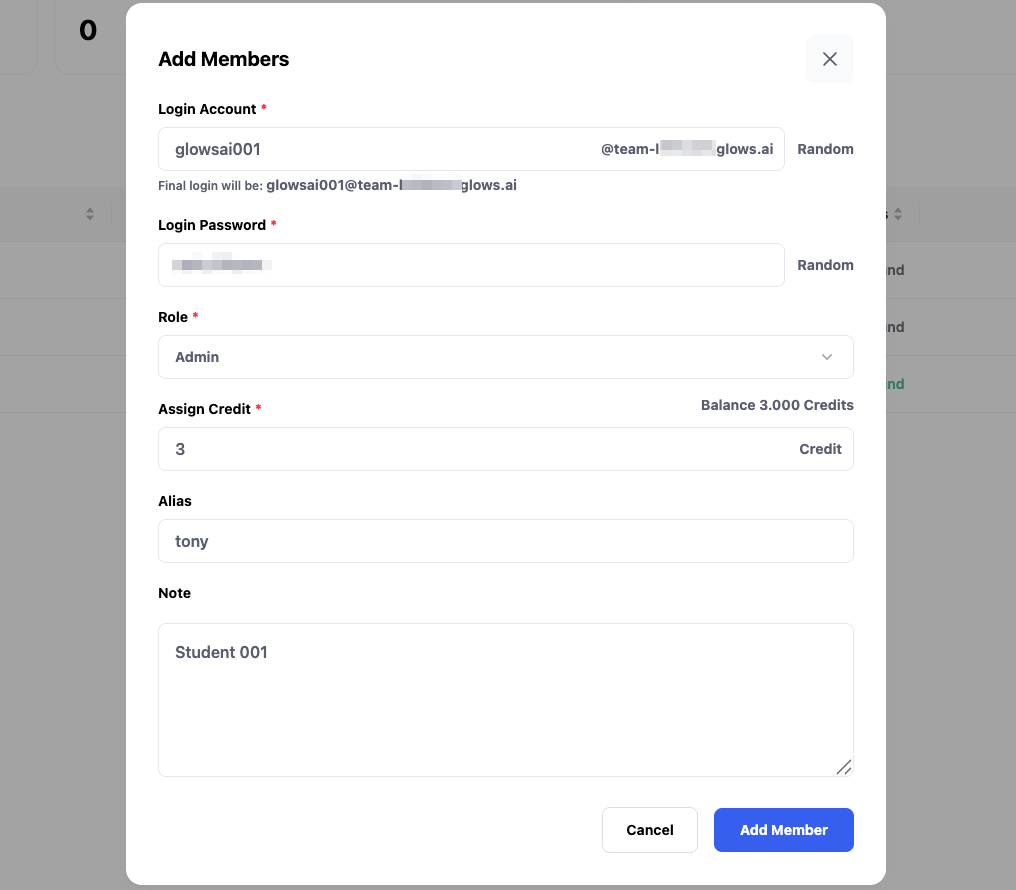
For each new member, you can define:
- Login Account
- Login Password
- Role
- Initial Credits
- Alias
- Note
After configuration, click Add Member to create the account.
The Role field currently supports two options: Admin (administrator) and Member (standard member).
Assign Credits allows you to give members initial credits for platform usage. These credits can be used to rent machines or buy storage, and you can also adjust or allocate them after the member is created.
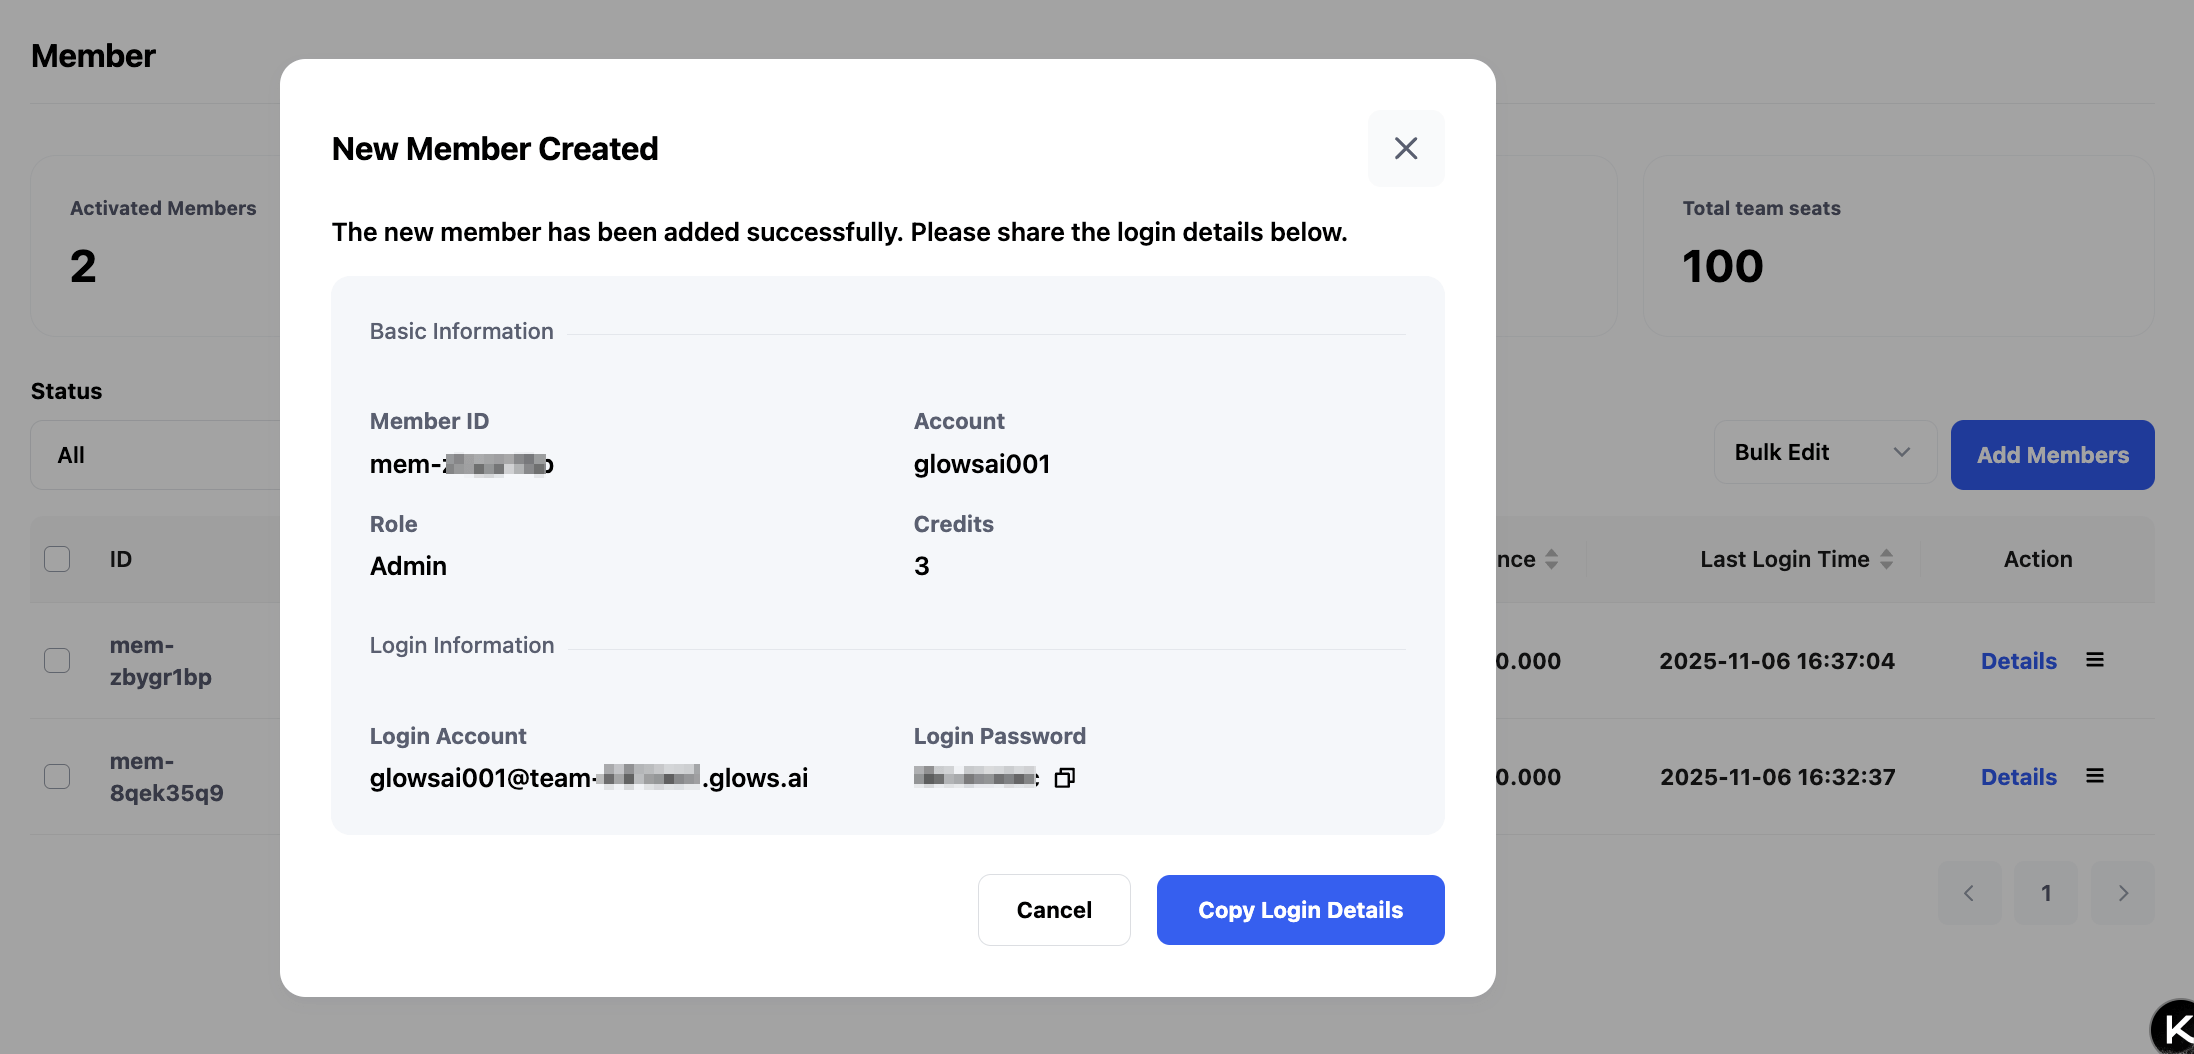
After creation, click Copy Login Details to retrieve the new member's credentials and share them with them.
Refer to Member Login Guide for login instructions.
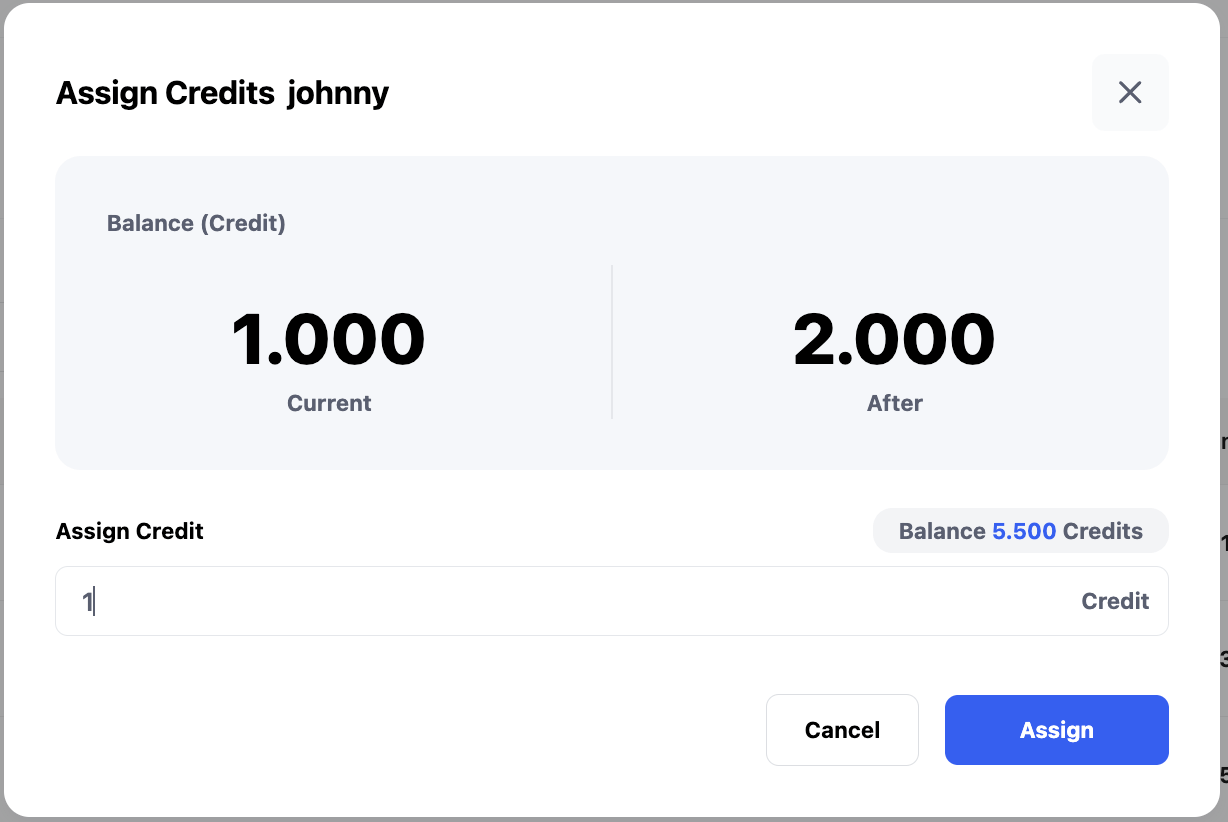
Assign Credits
In Member, click the Action button next to a member and choose Assign Credits.
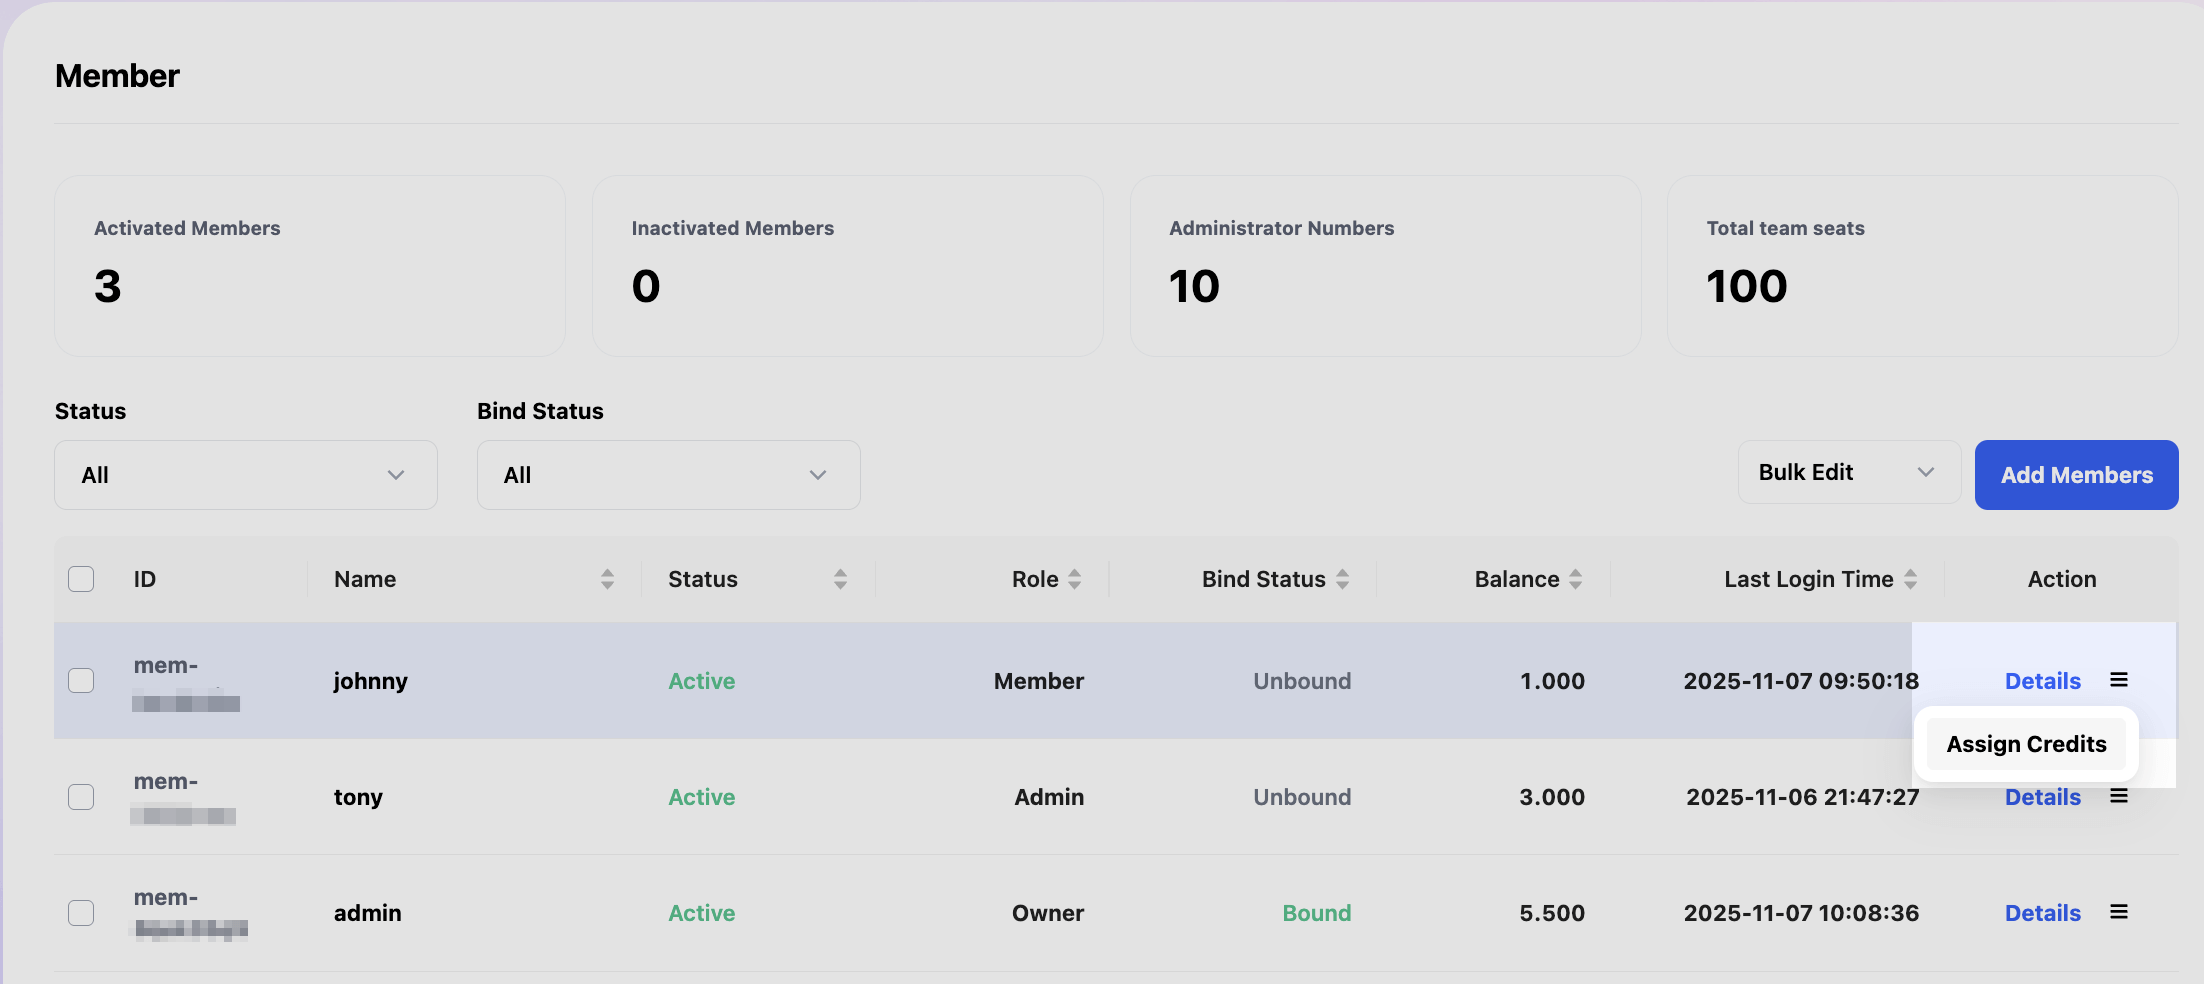
Enter the credit amount and click Assign to confirm.
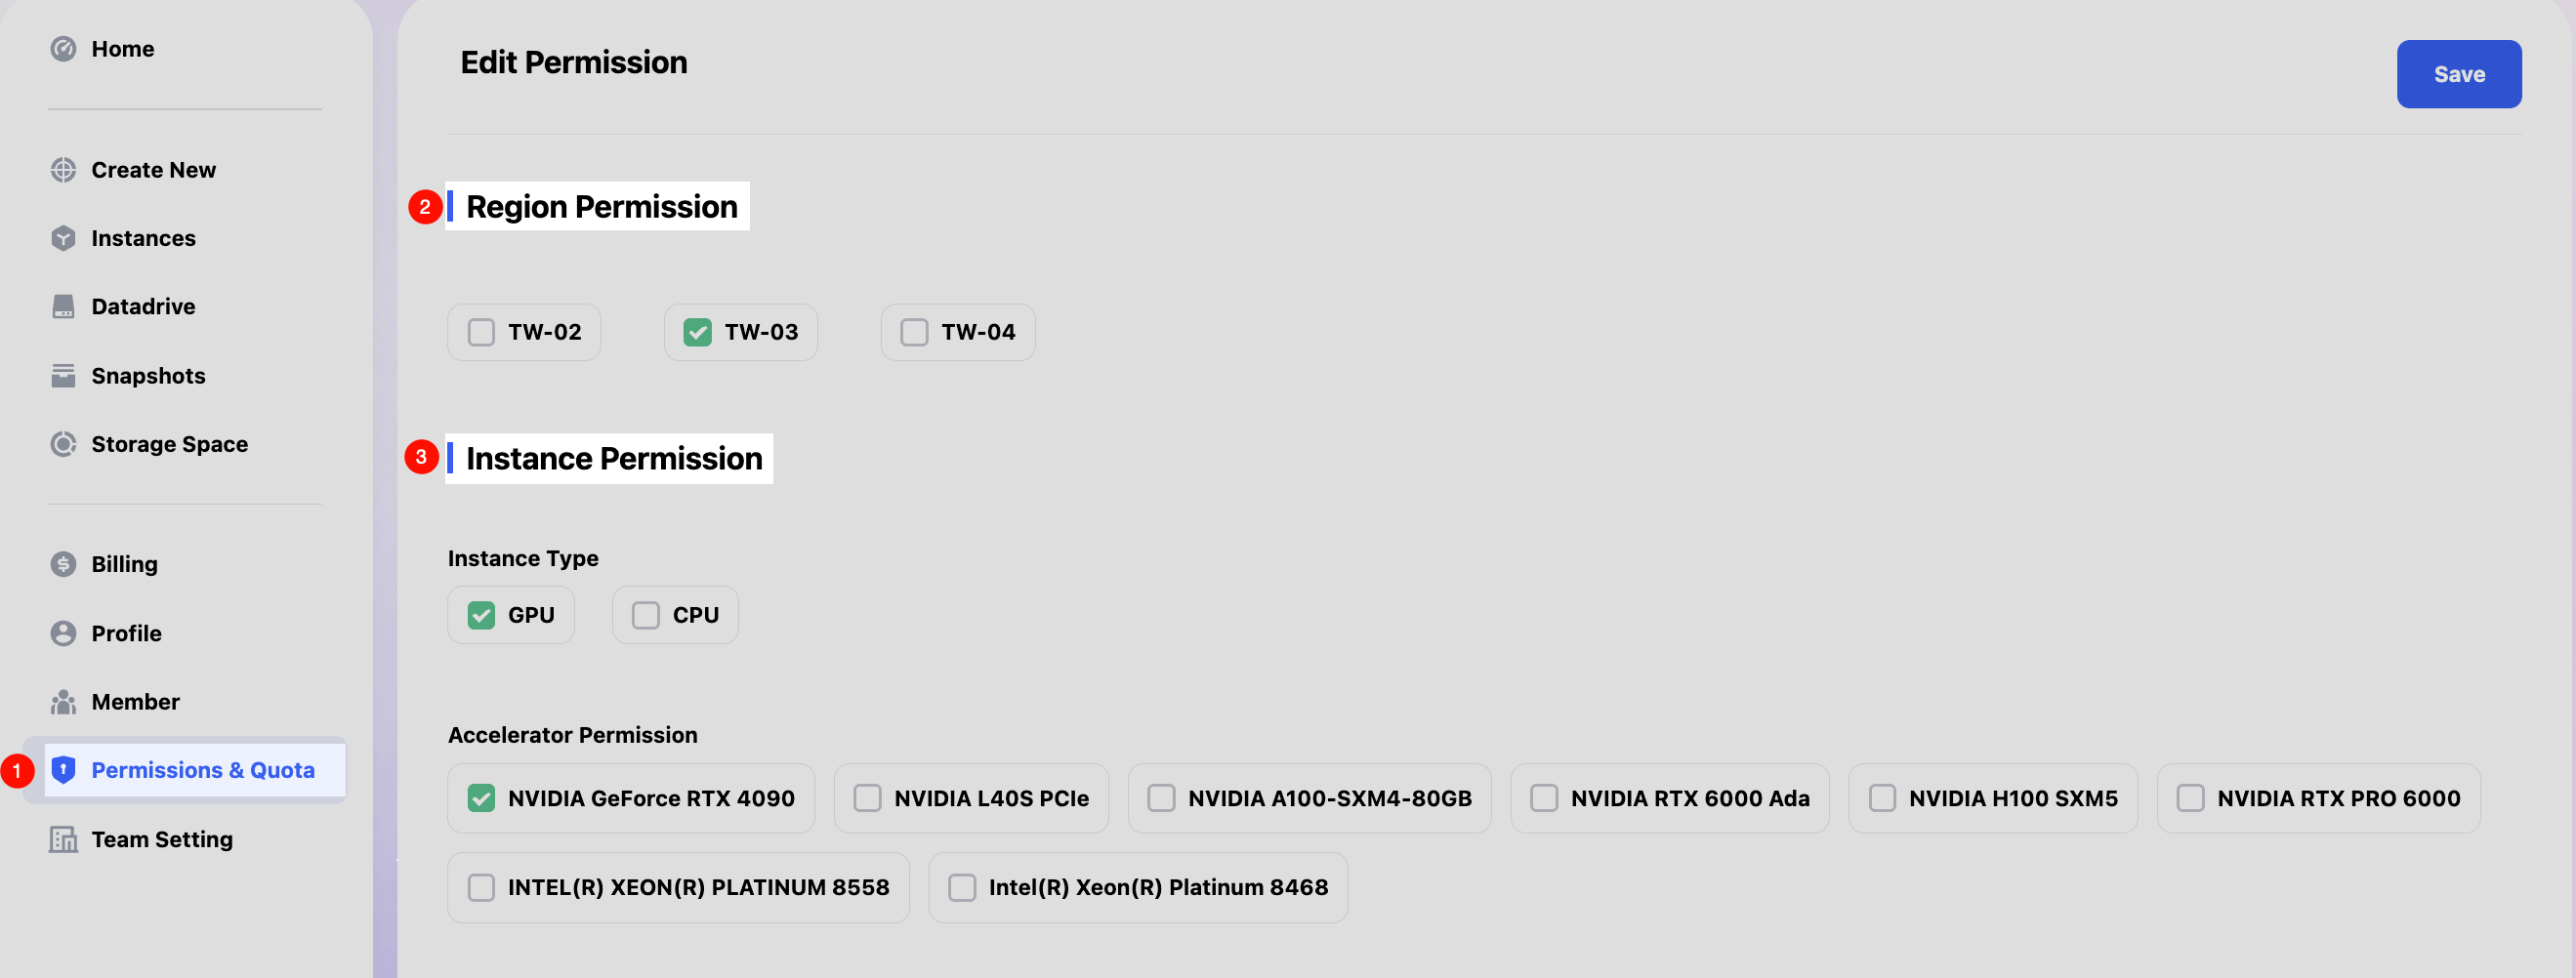
Permission & Quota
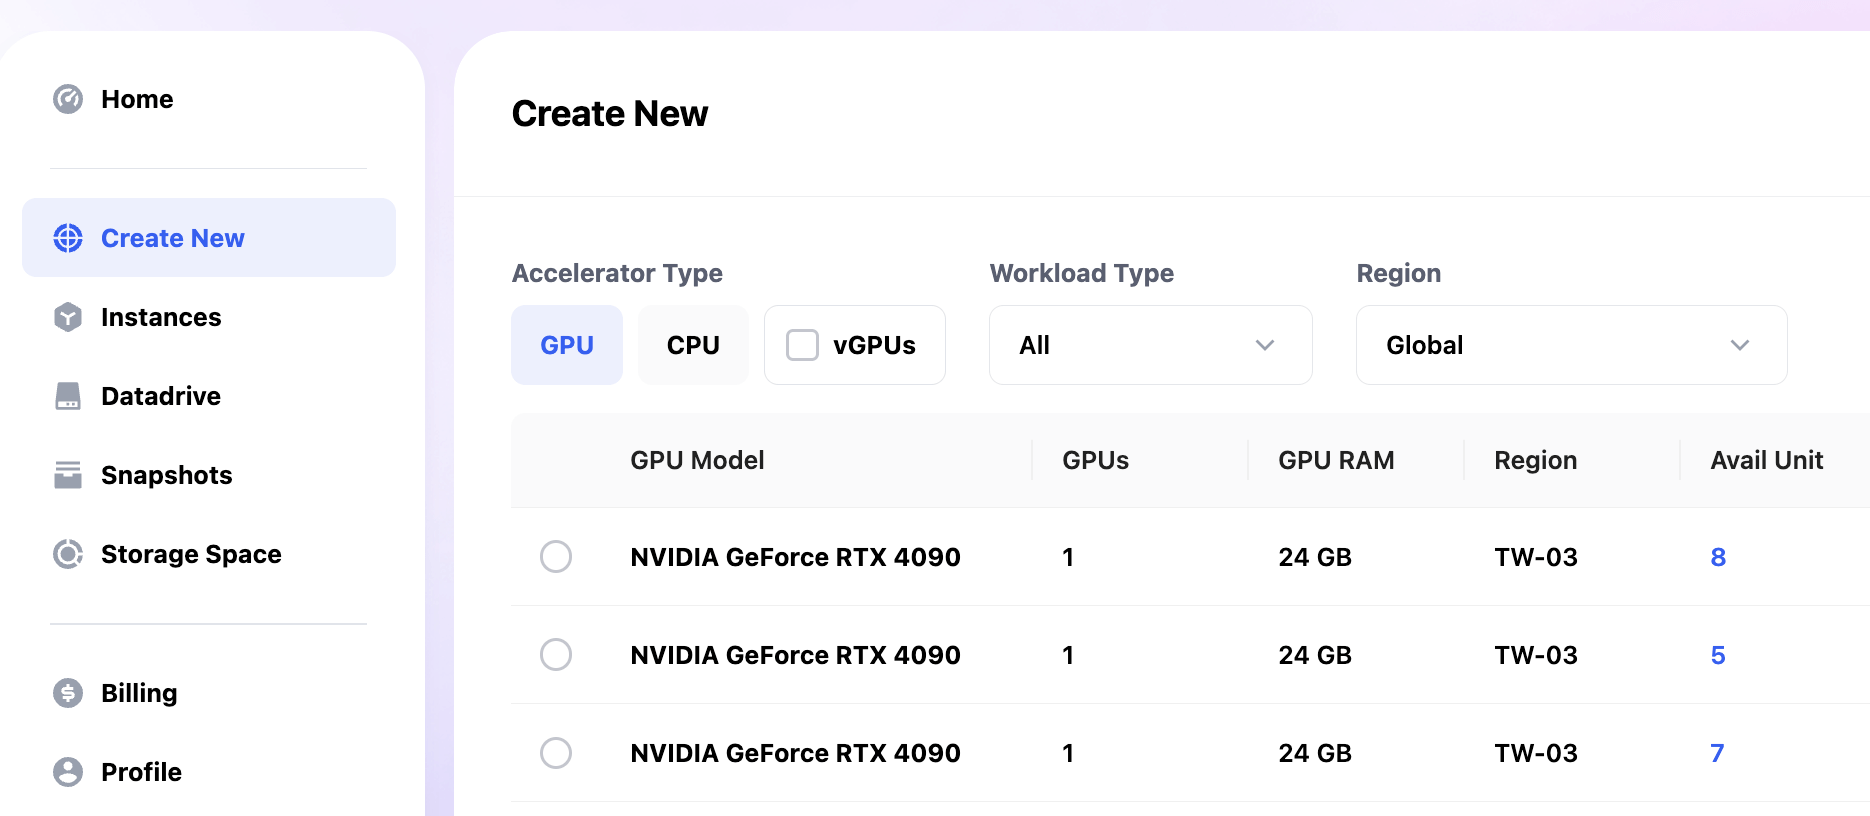
In Permissions & Quota, you can define what team members are allowed to see, including available GPUs, images, total instances, and total storage.
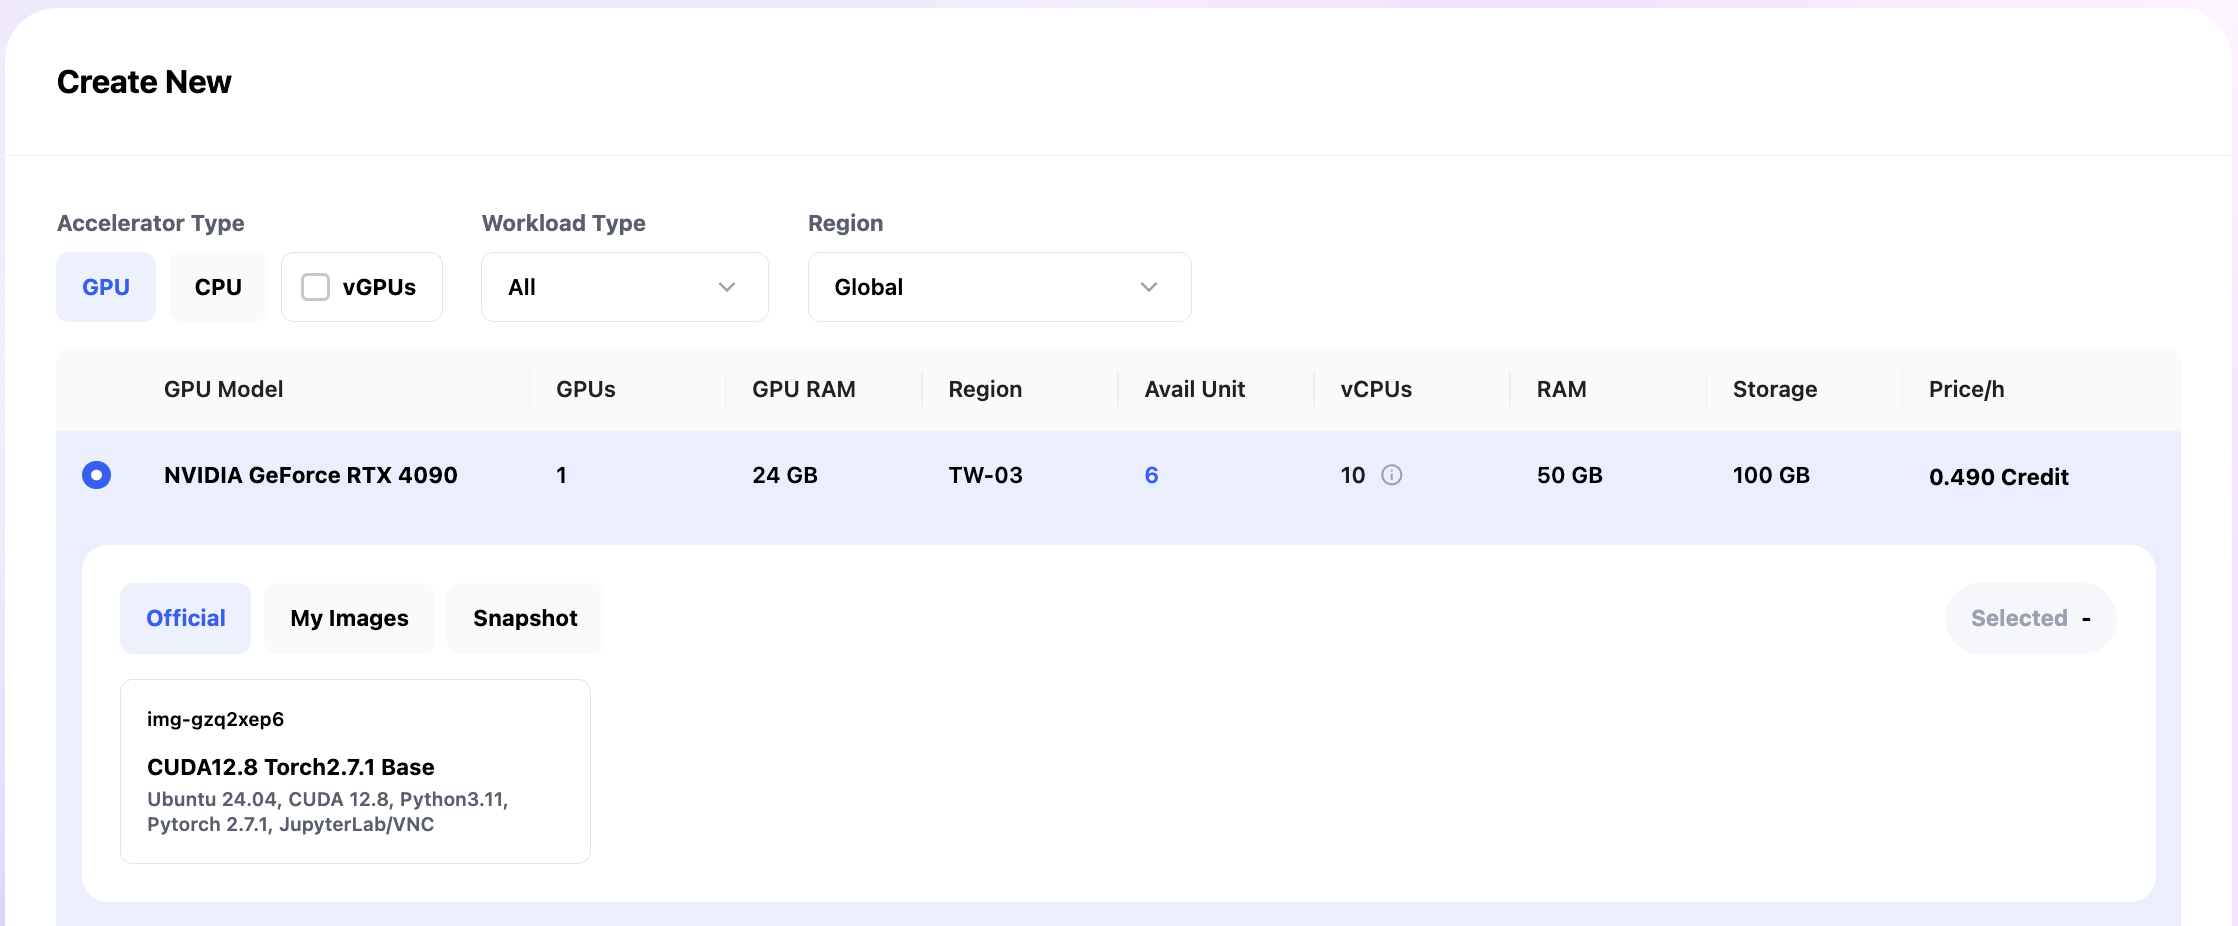
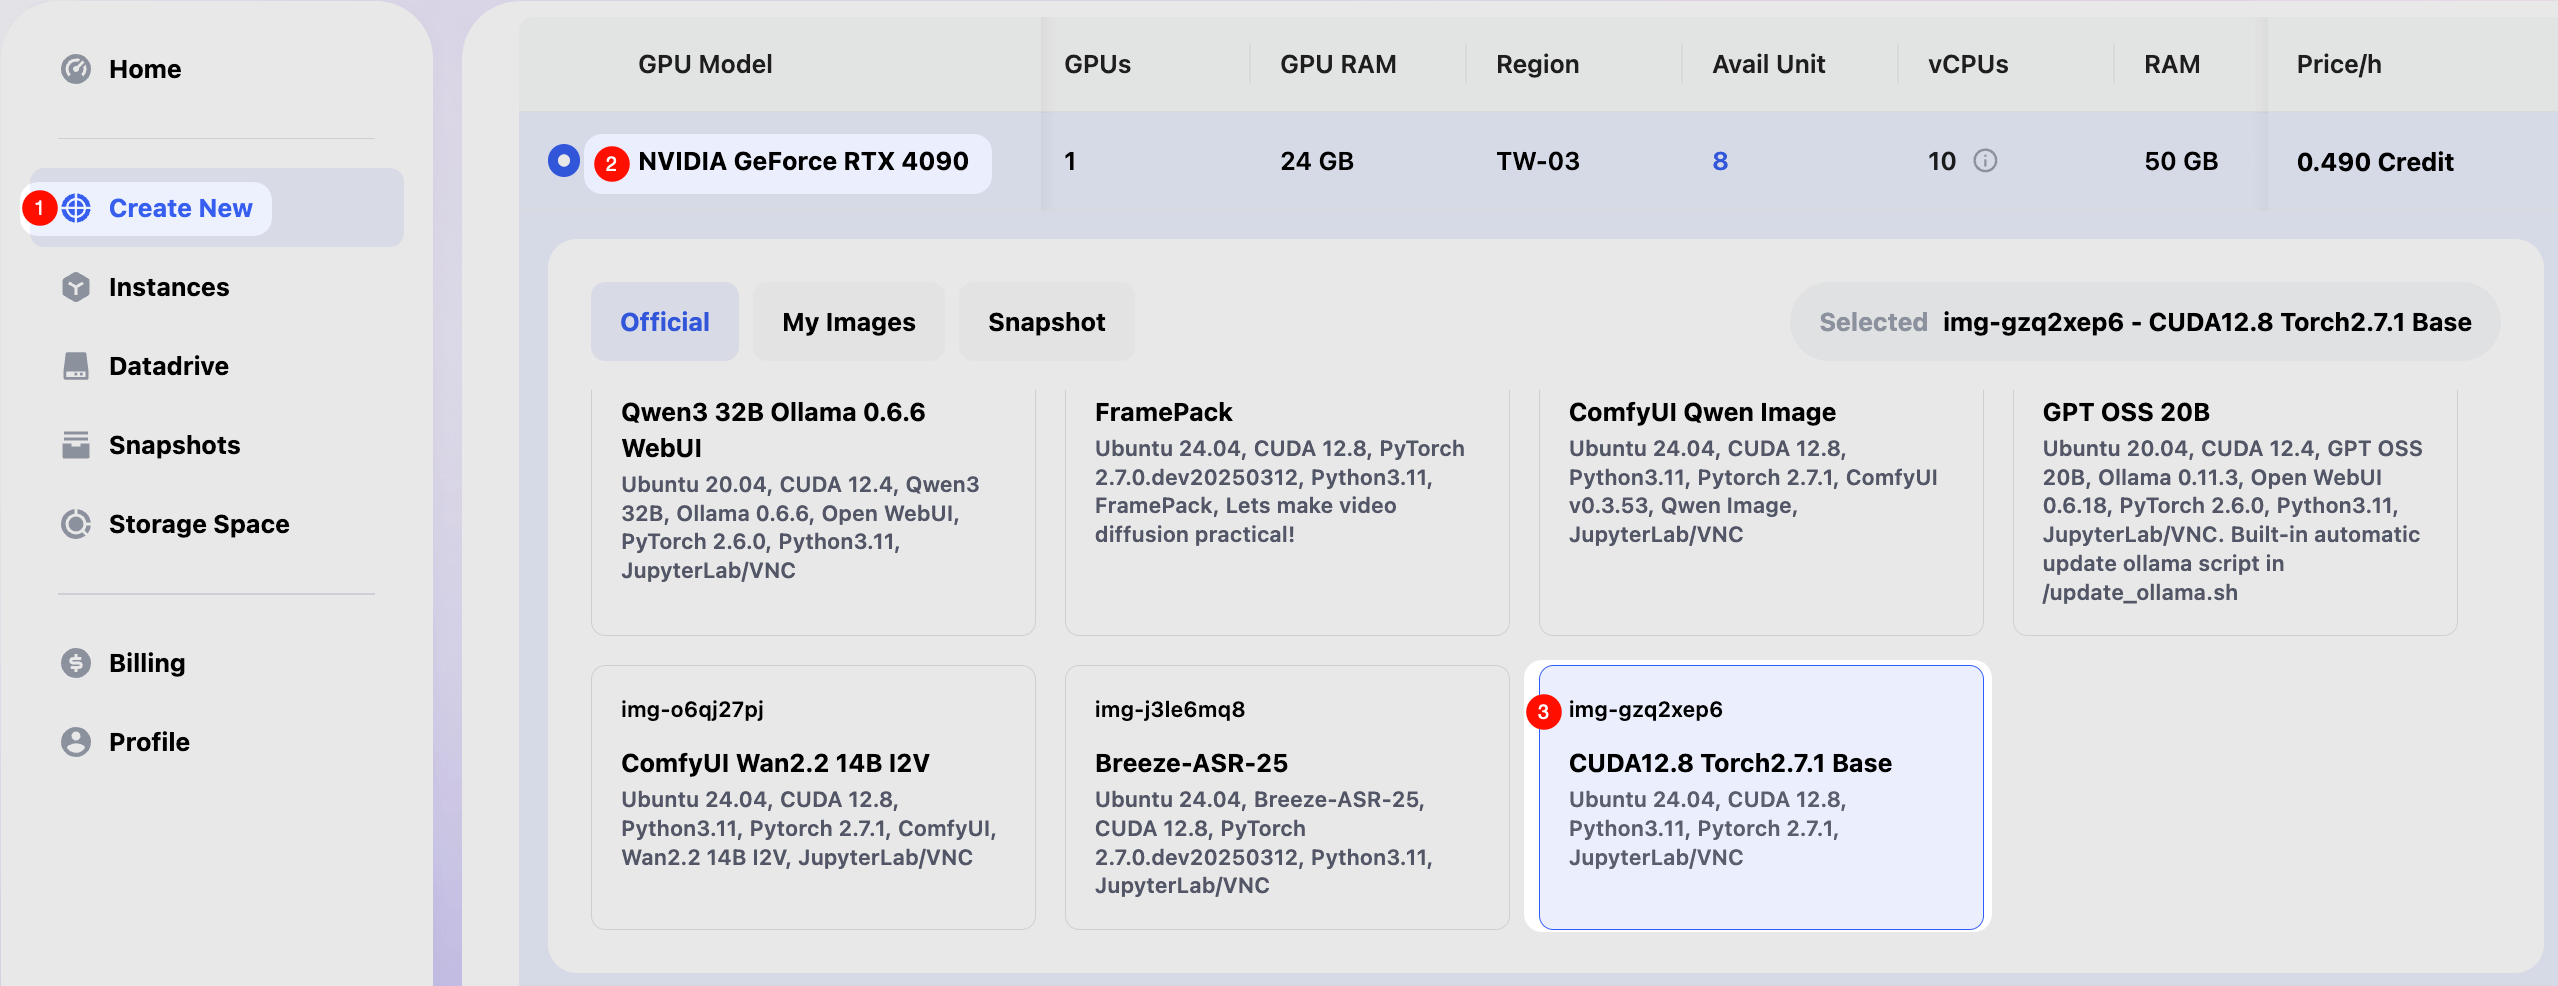
By clicking Permissions & Quota, you can access the permissions settings interface, where you control the compute resources visible to team members—such as Region Permission, Instance Type, and Accelerator Permission.
For example, in the screenshot below, team members can only use NVIDIA GeForce RTX 4090 in the TW-03 region.
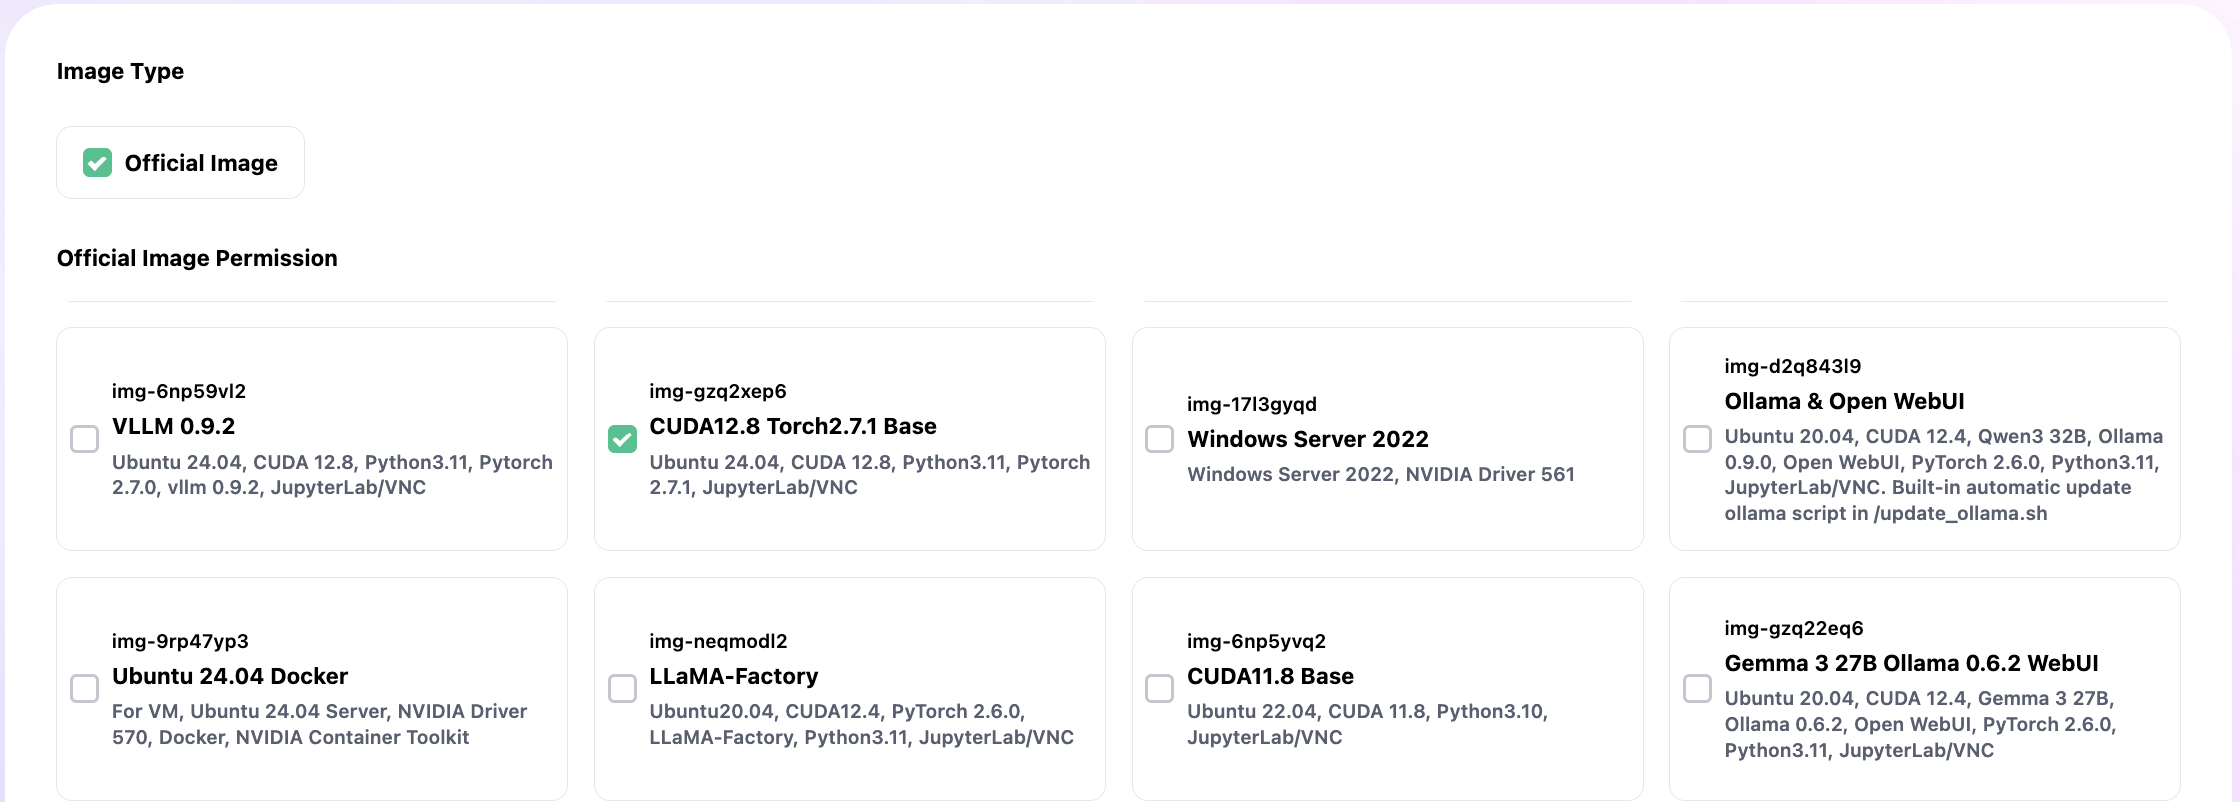
Scroll down to configure visible base images. For instance, you can limit members to use CUDA12.8 Torch2.7.1 Base only.
You can also configure members’ Snapshots Quota, Network Group Quota, and Storage Space Quota.
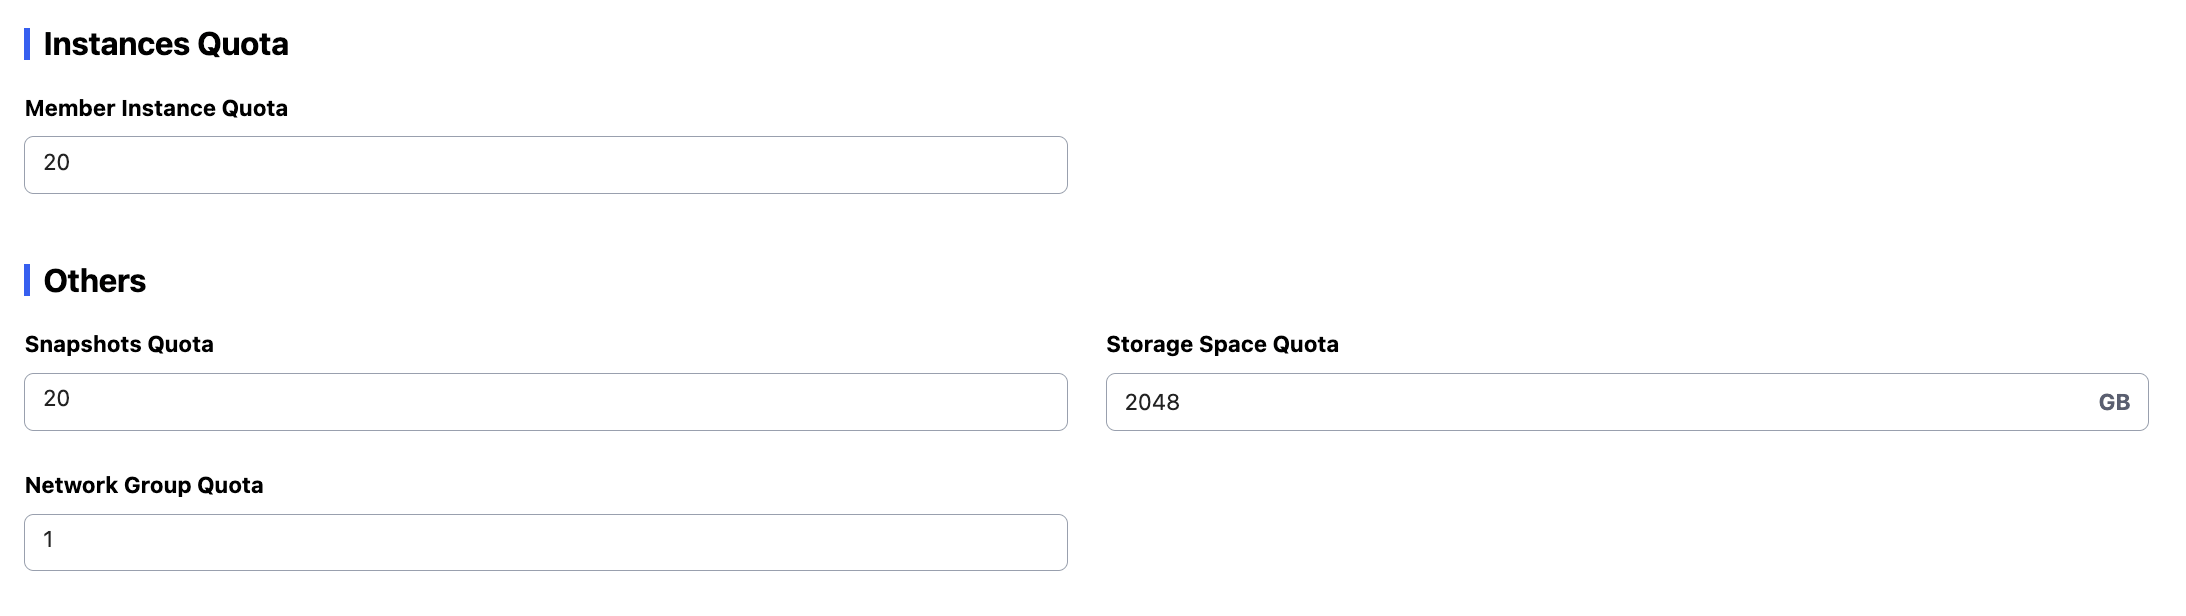
Click Save at the top right to apply settings. Members will only be able to select predefined hardware and environments in the Create New interface.
Modify Member Info
Click Details beside a member to modify information related to the team member.
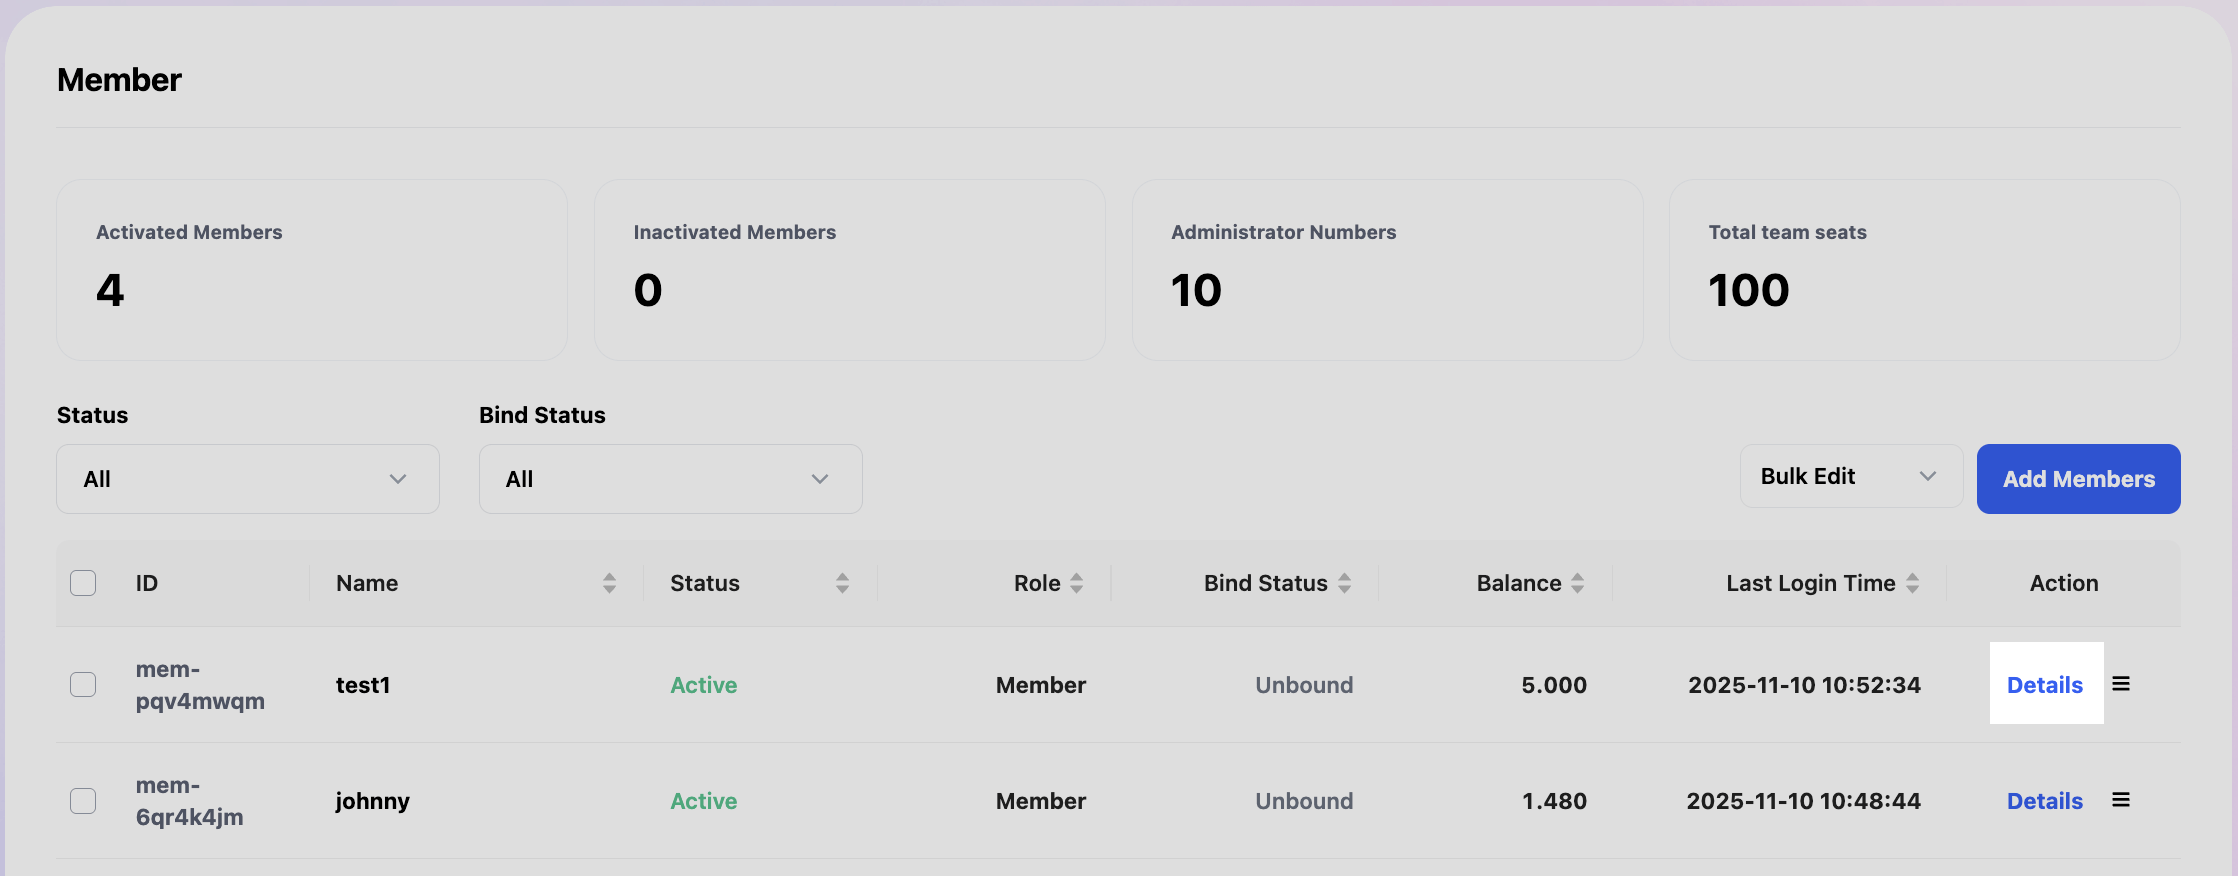
You can modify Name, Role, Account Balance, Note, and Login Password. You can also view usage details, including Balance, Total Spending, Instance count, and Storage Space.
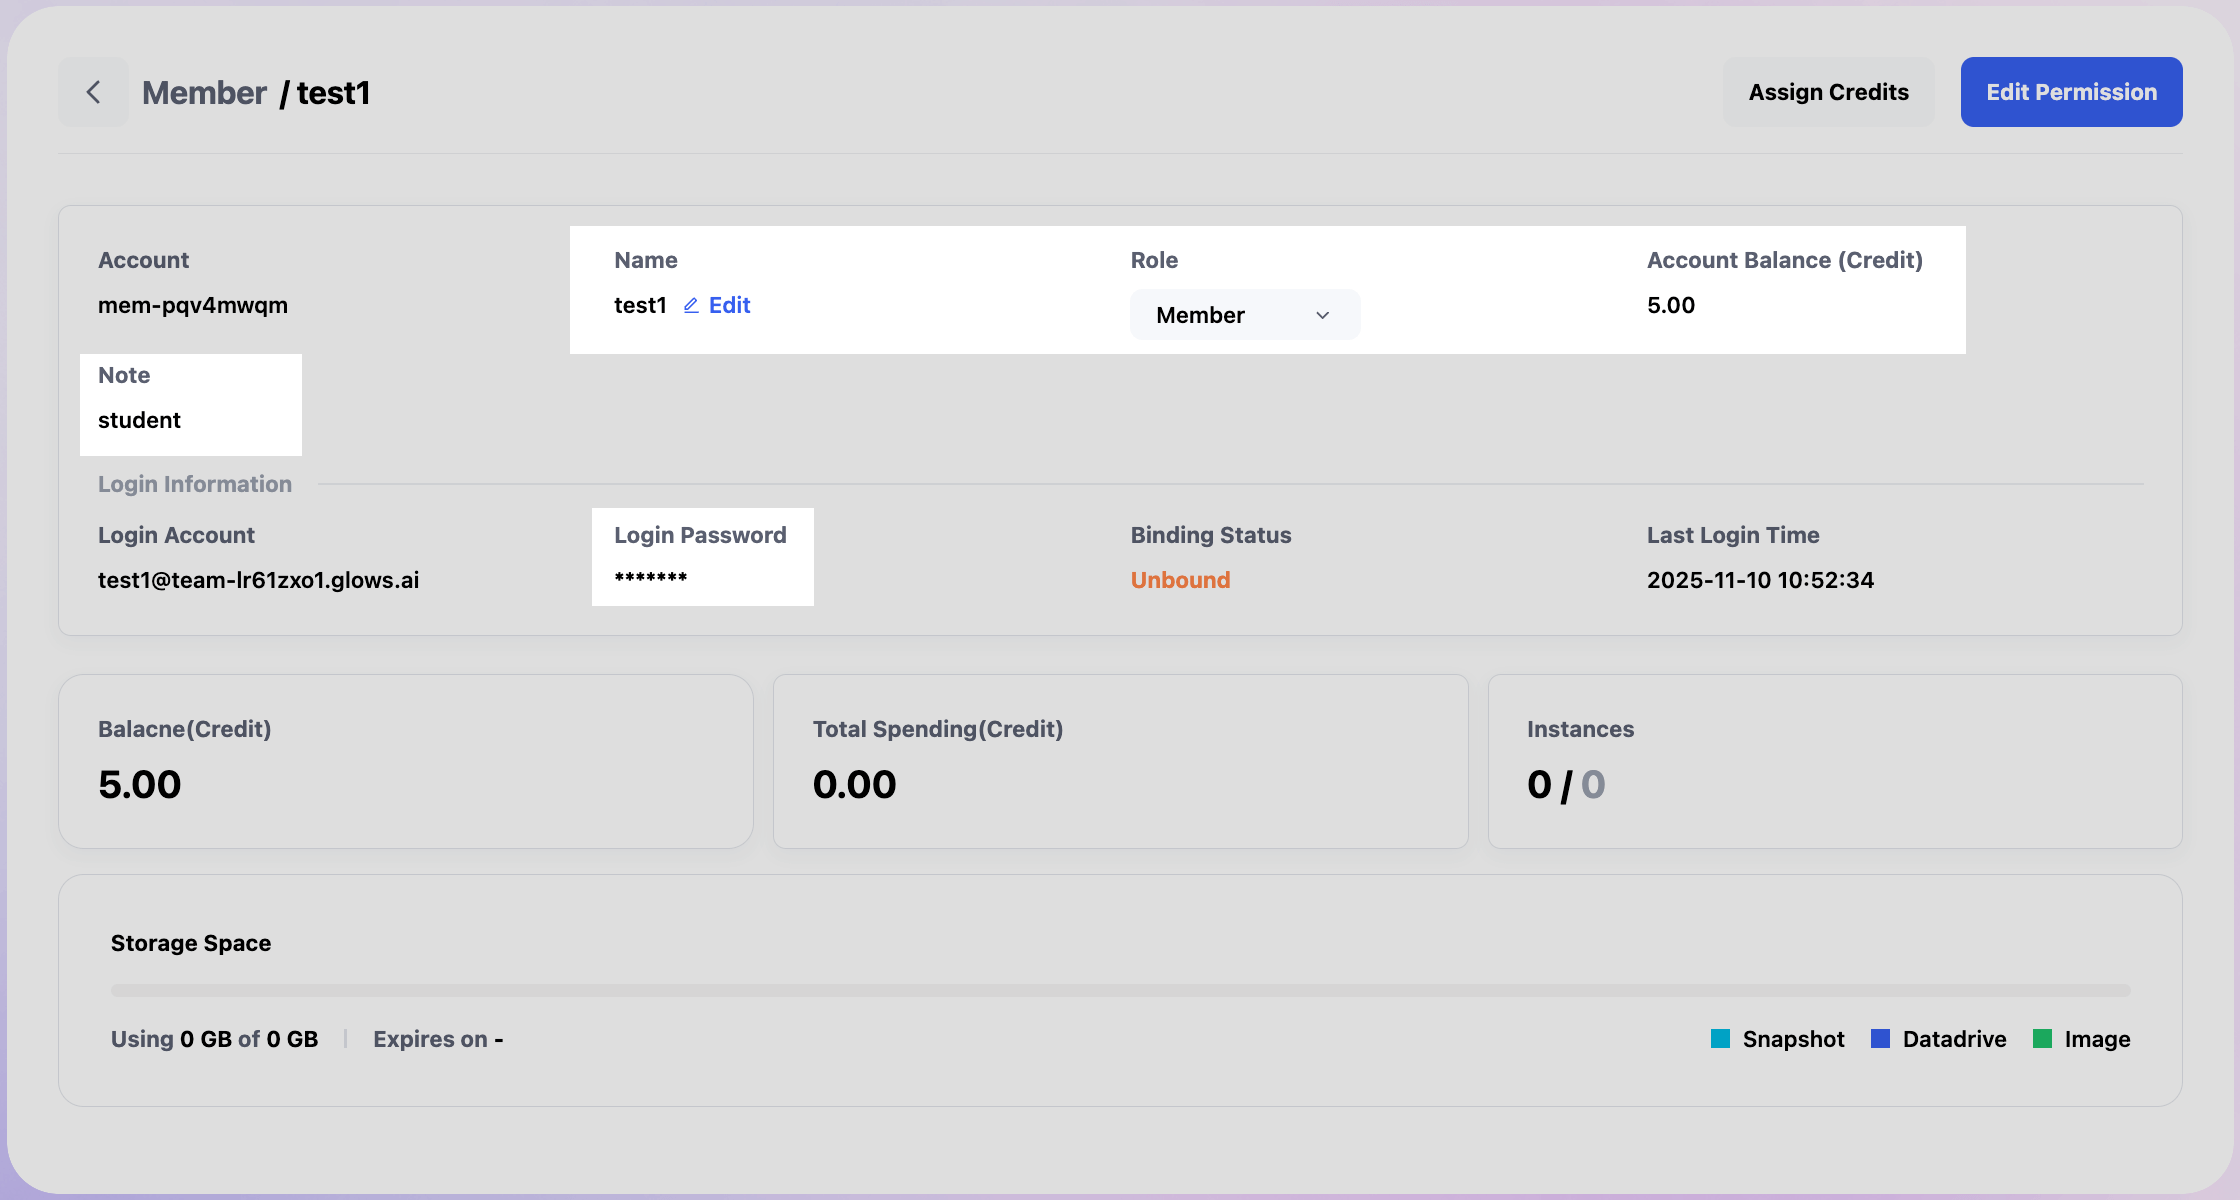
Click Edit Permission to customize resource visibility for individual members, allowing each to see GPU or image resources differently.
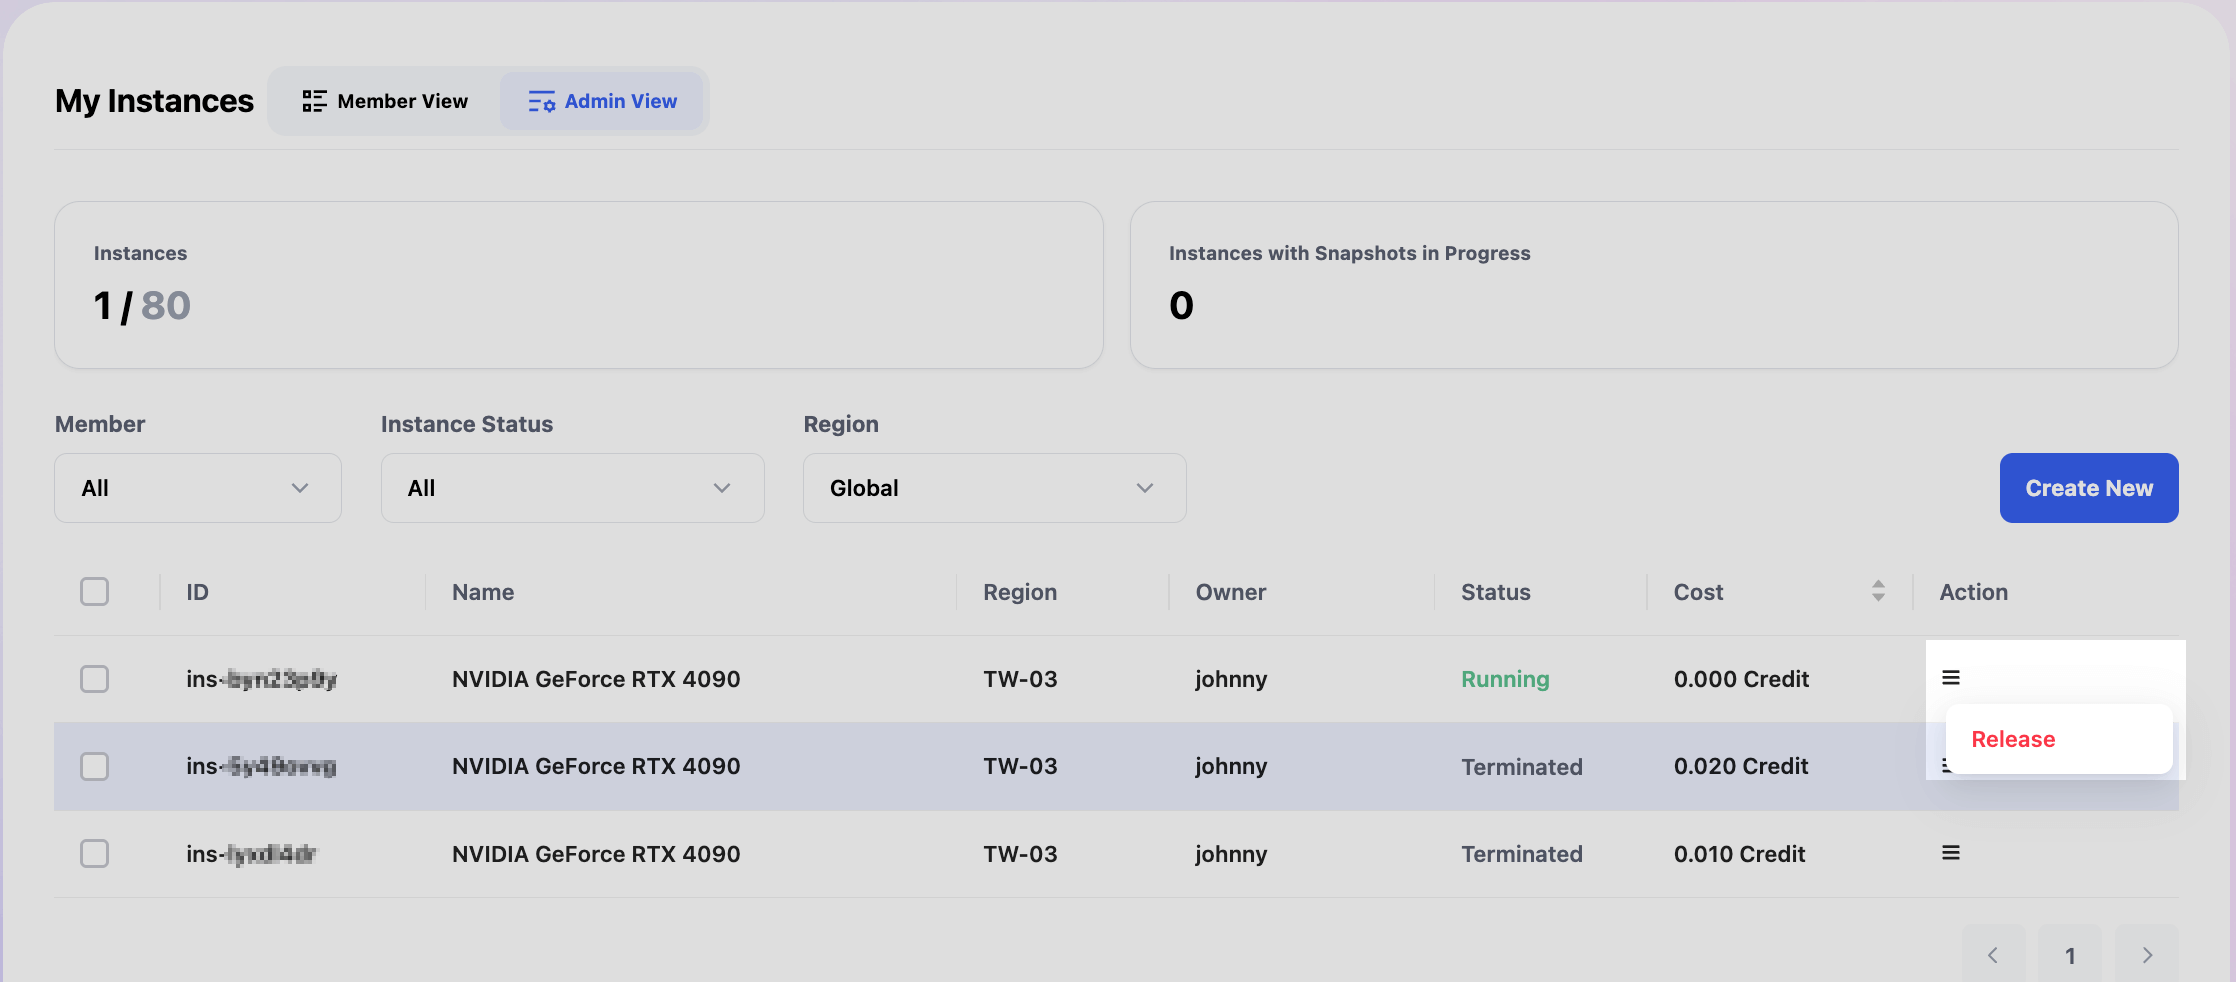
Manage Instances for Team Member
In Instances, select Admin View to monitor all members’ instances and status.
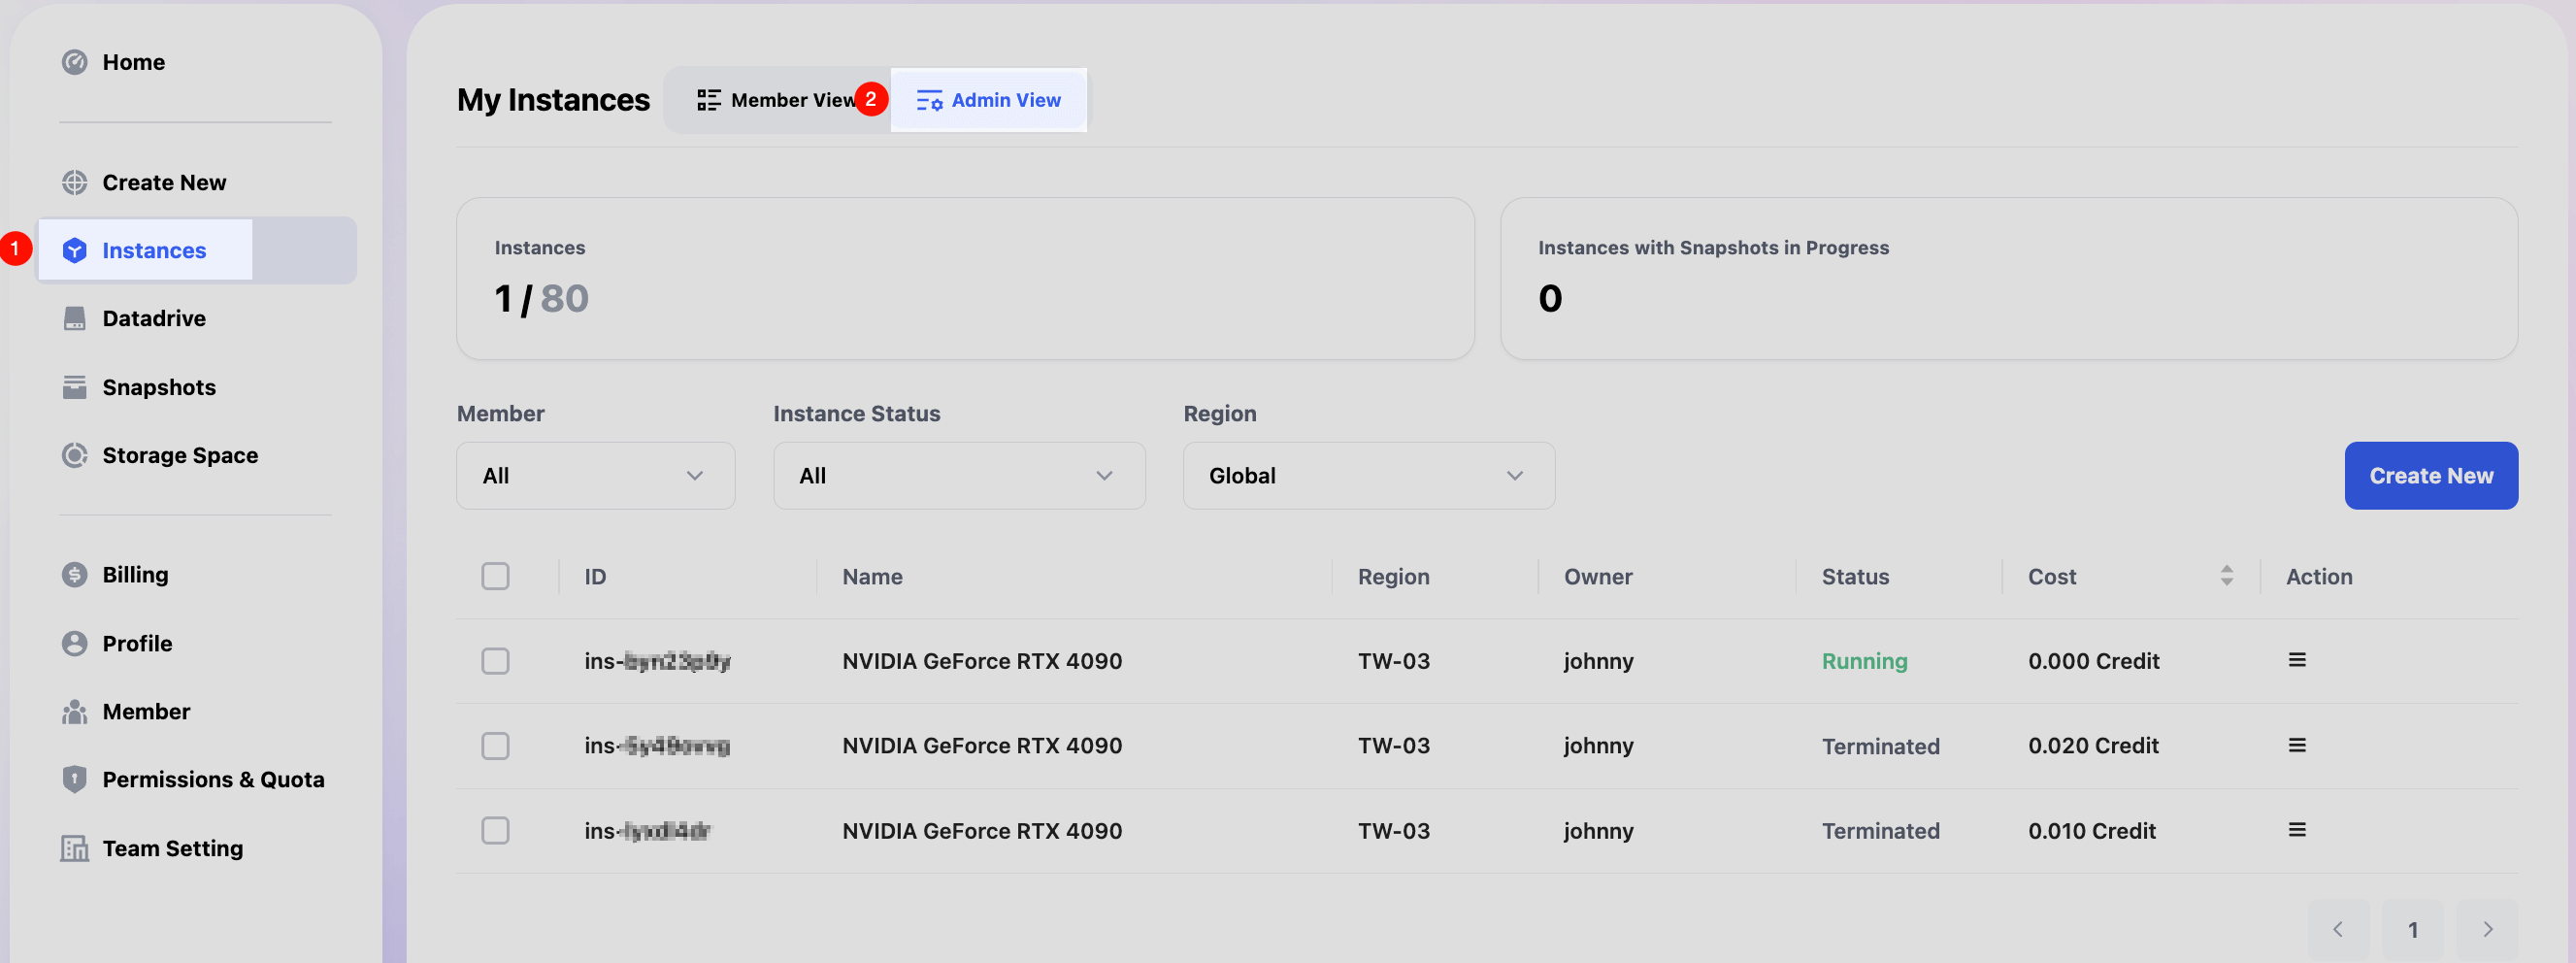
Click Action and then Release to release a member’s instance.
Storage Management
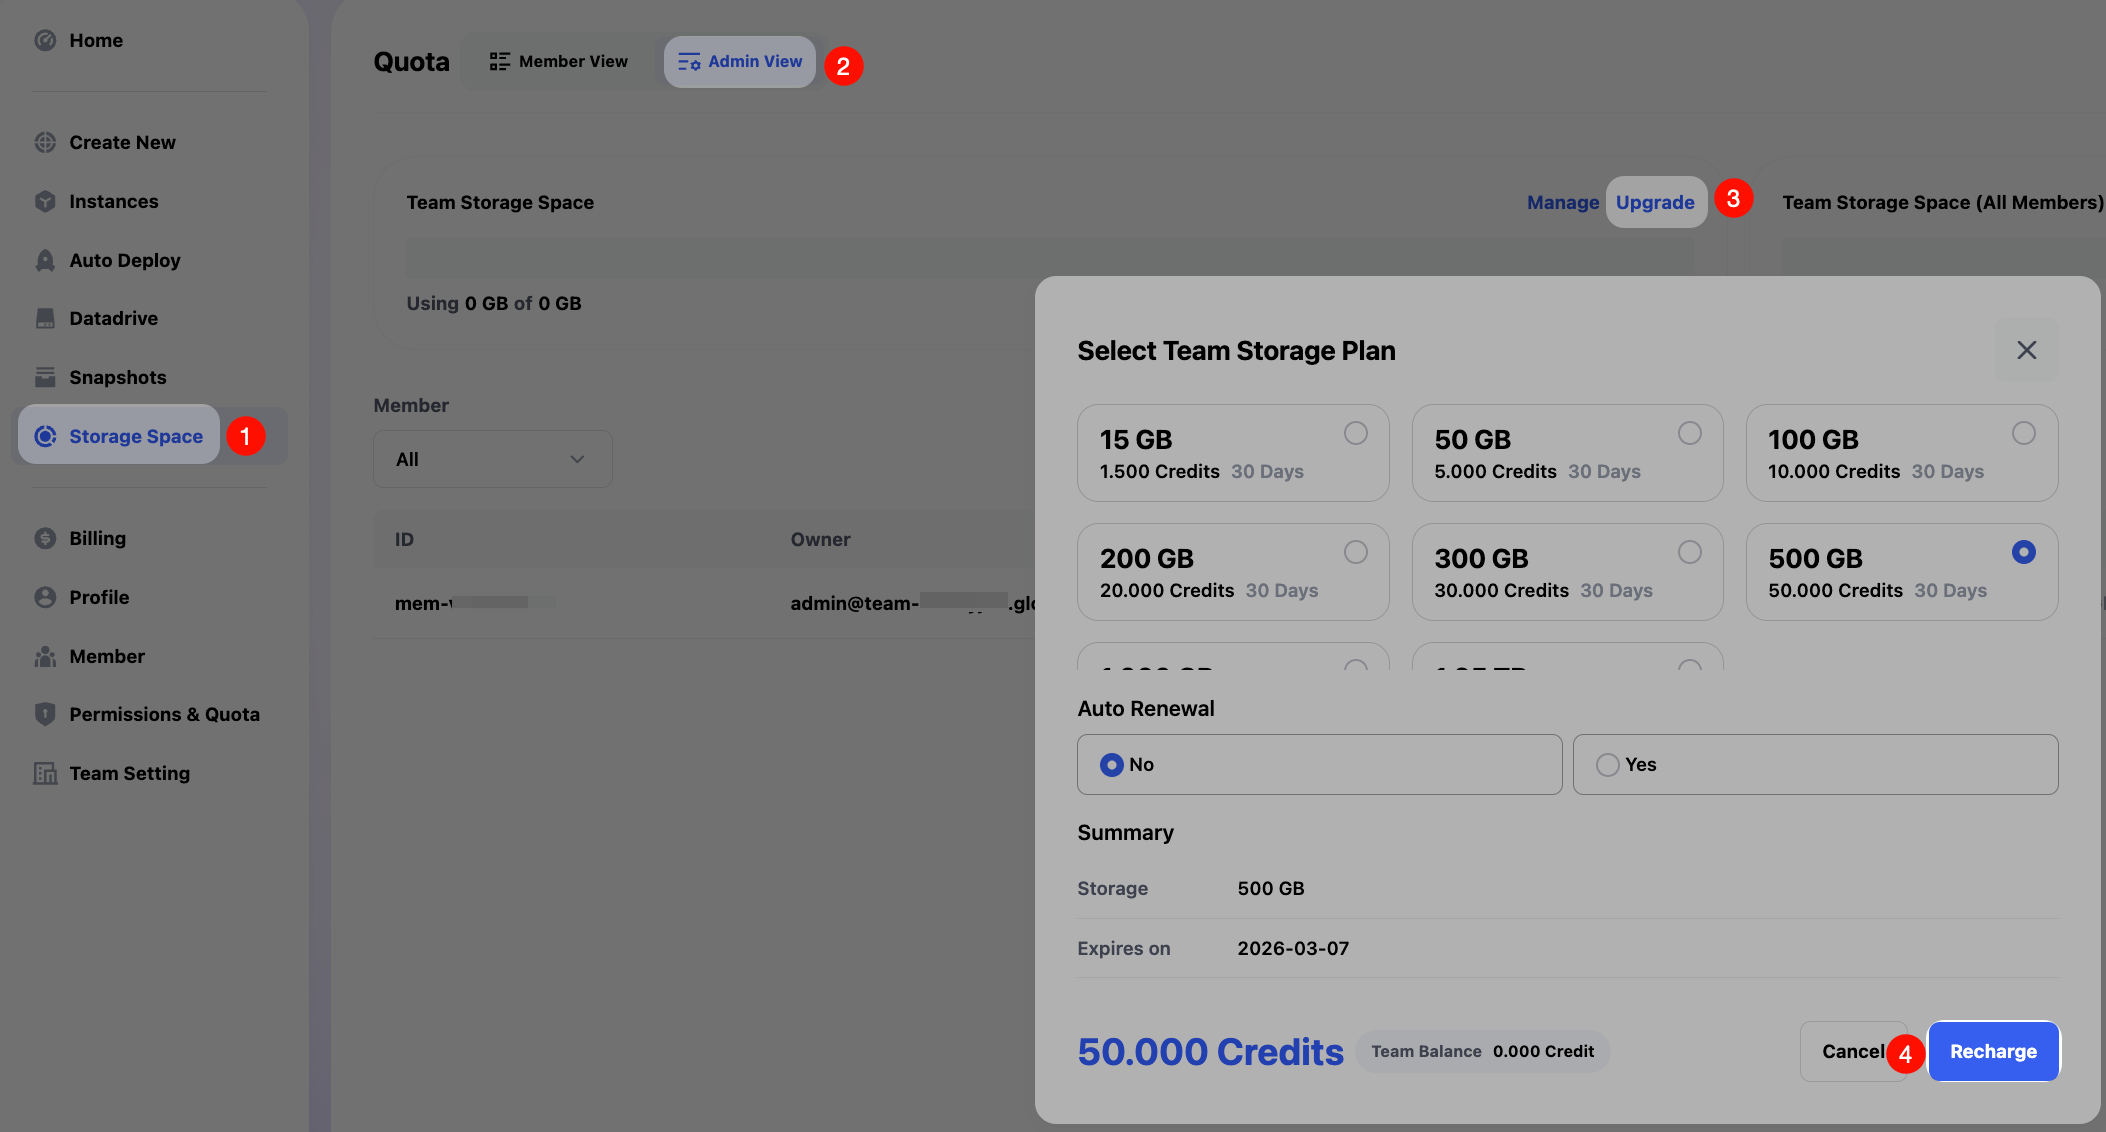
Purchase Storage
On the Storage Space page, switch to Admin View, then click the Upgrade button to select the required plan. After that, click Recharge to complete the Storage purchase.
Note: To enable team Storage, you must first switch to Admin View as shown. If you purchase Storage under Member View, it will be personal Storage, not team Storage.
Allocate Storage
In Storage Space, switch to Admin View to see overall and per-member storage usage.
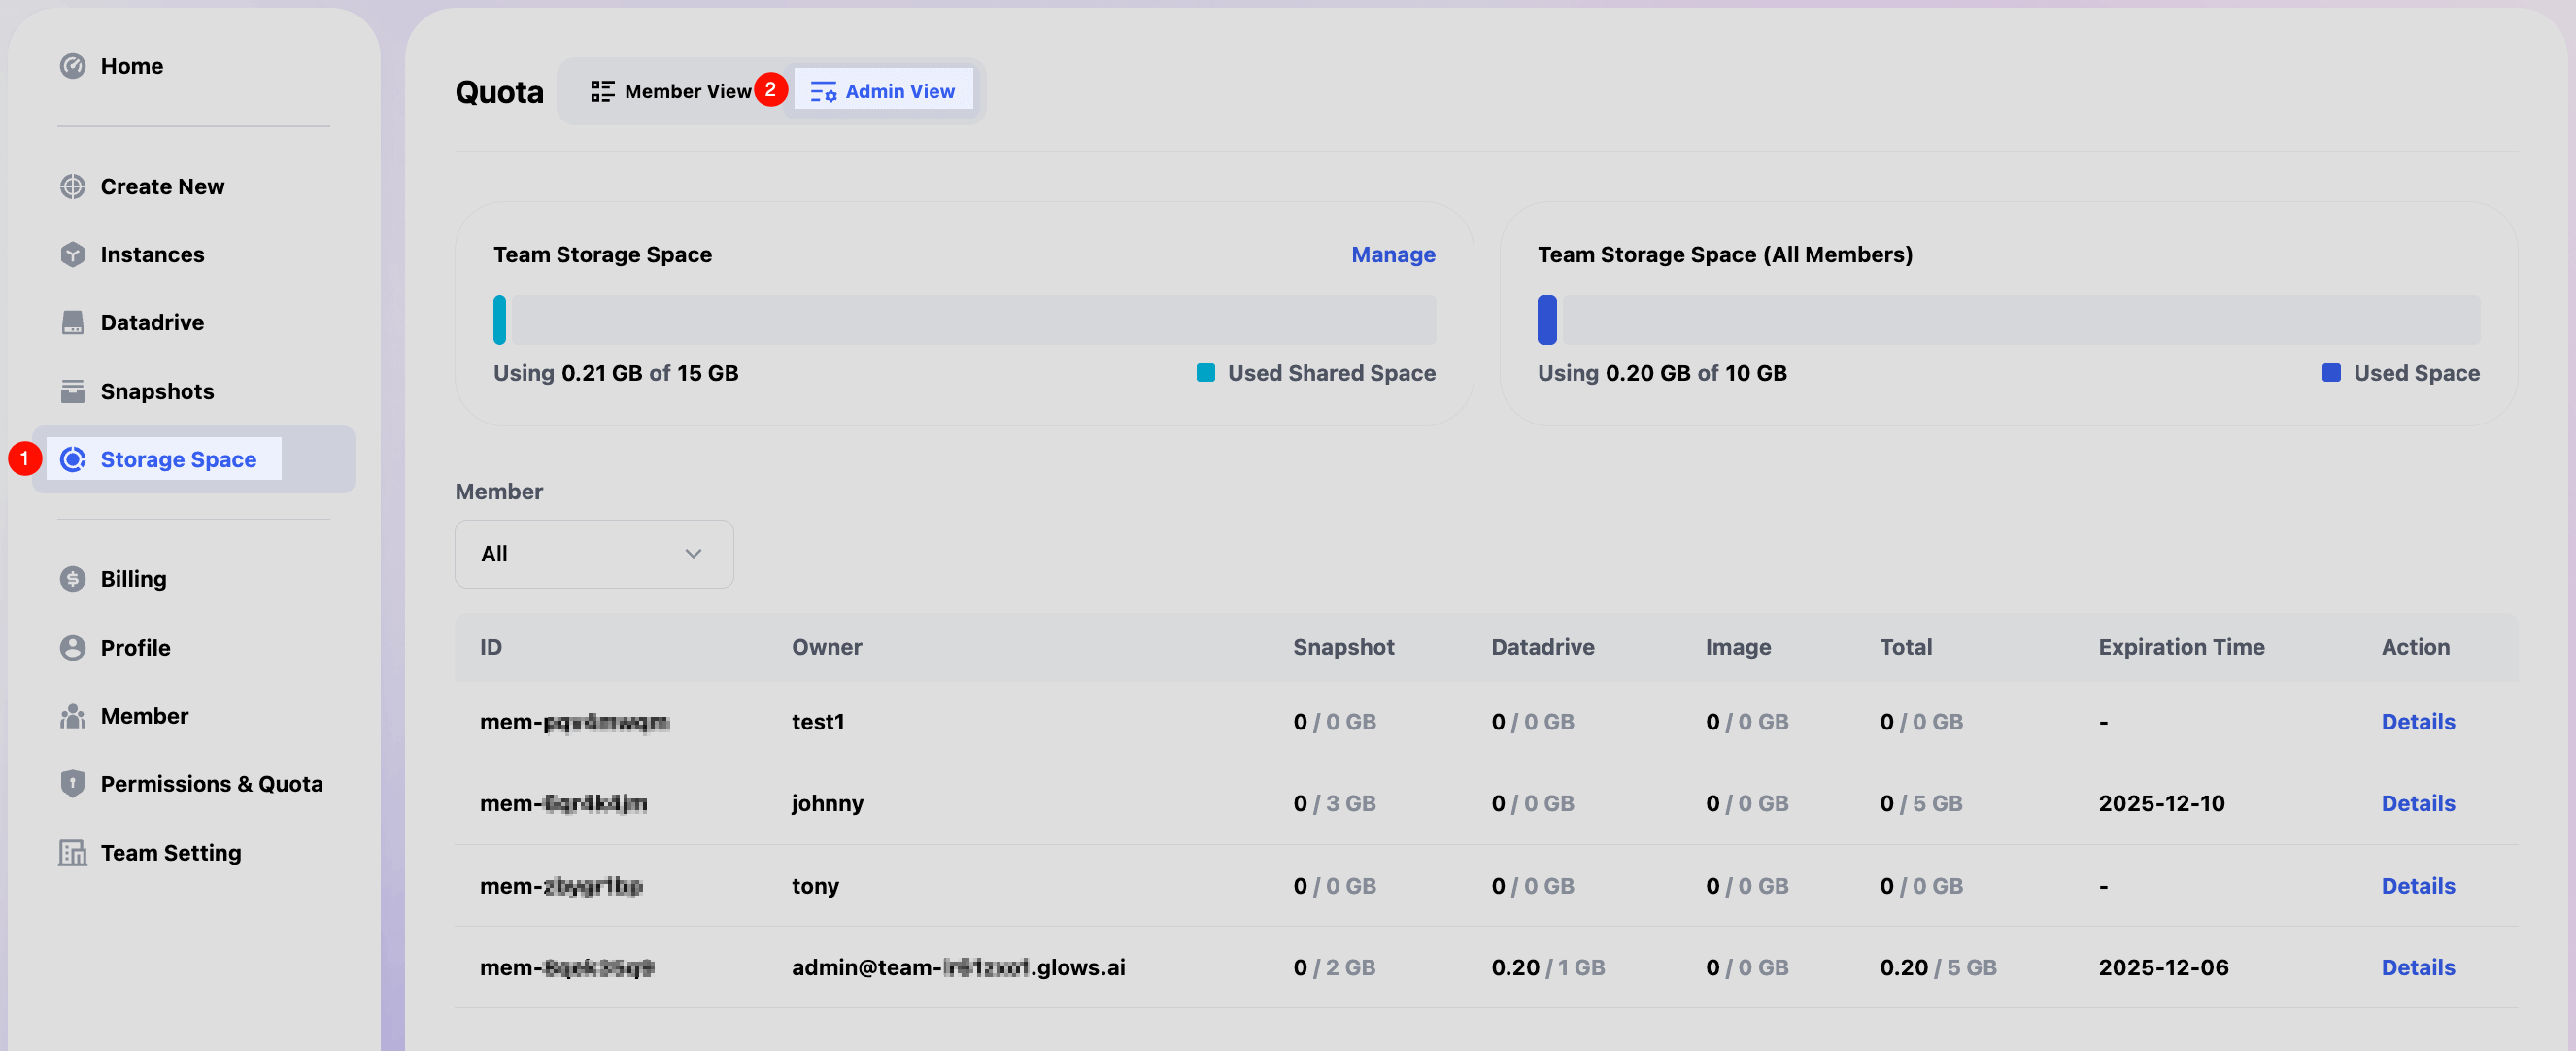
Click Manage under Team Storage Space to modify Datadrive and Snapshot quotas, then click Update to save.
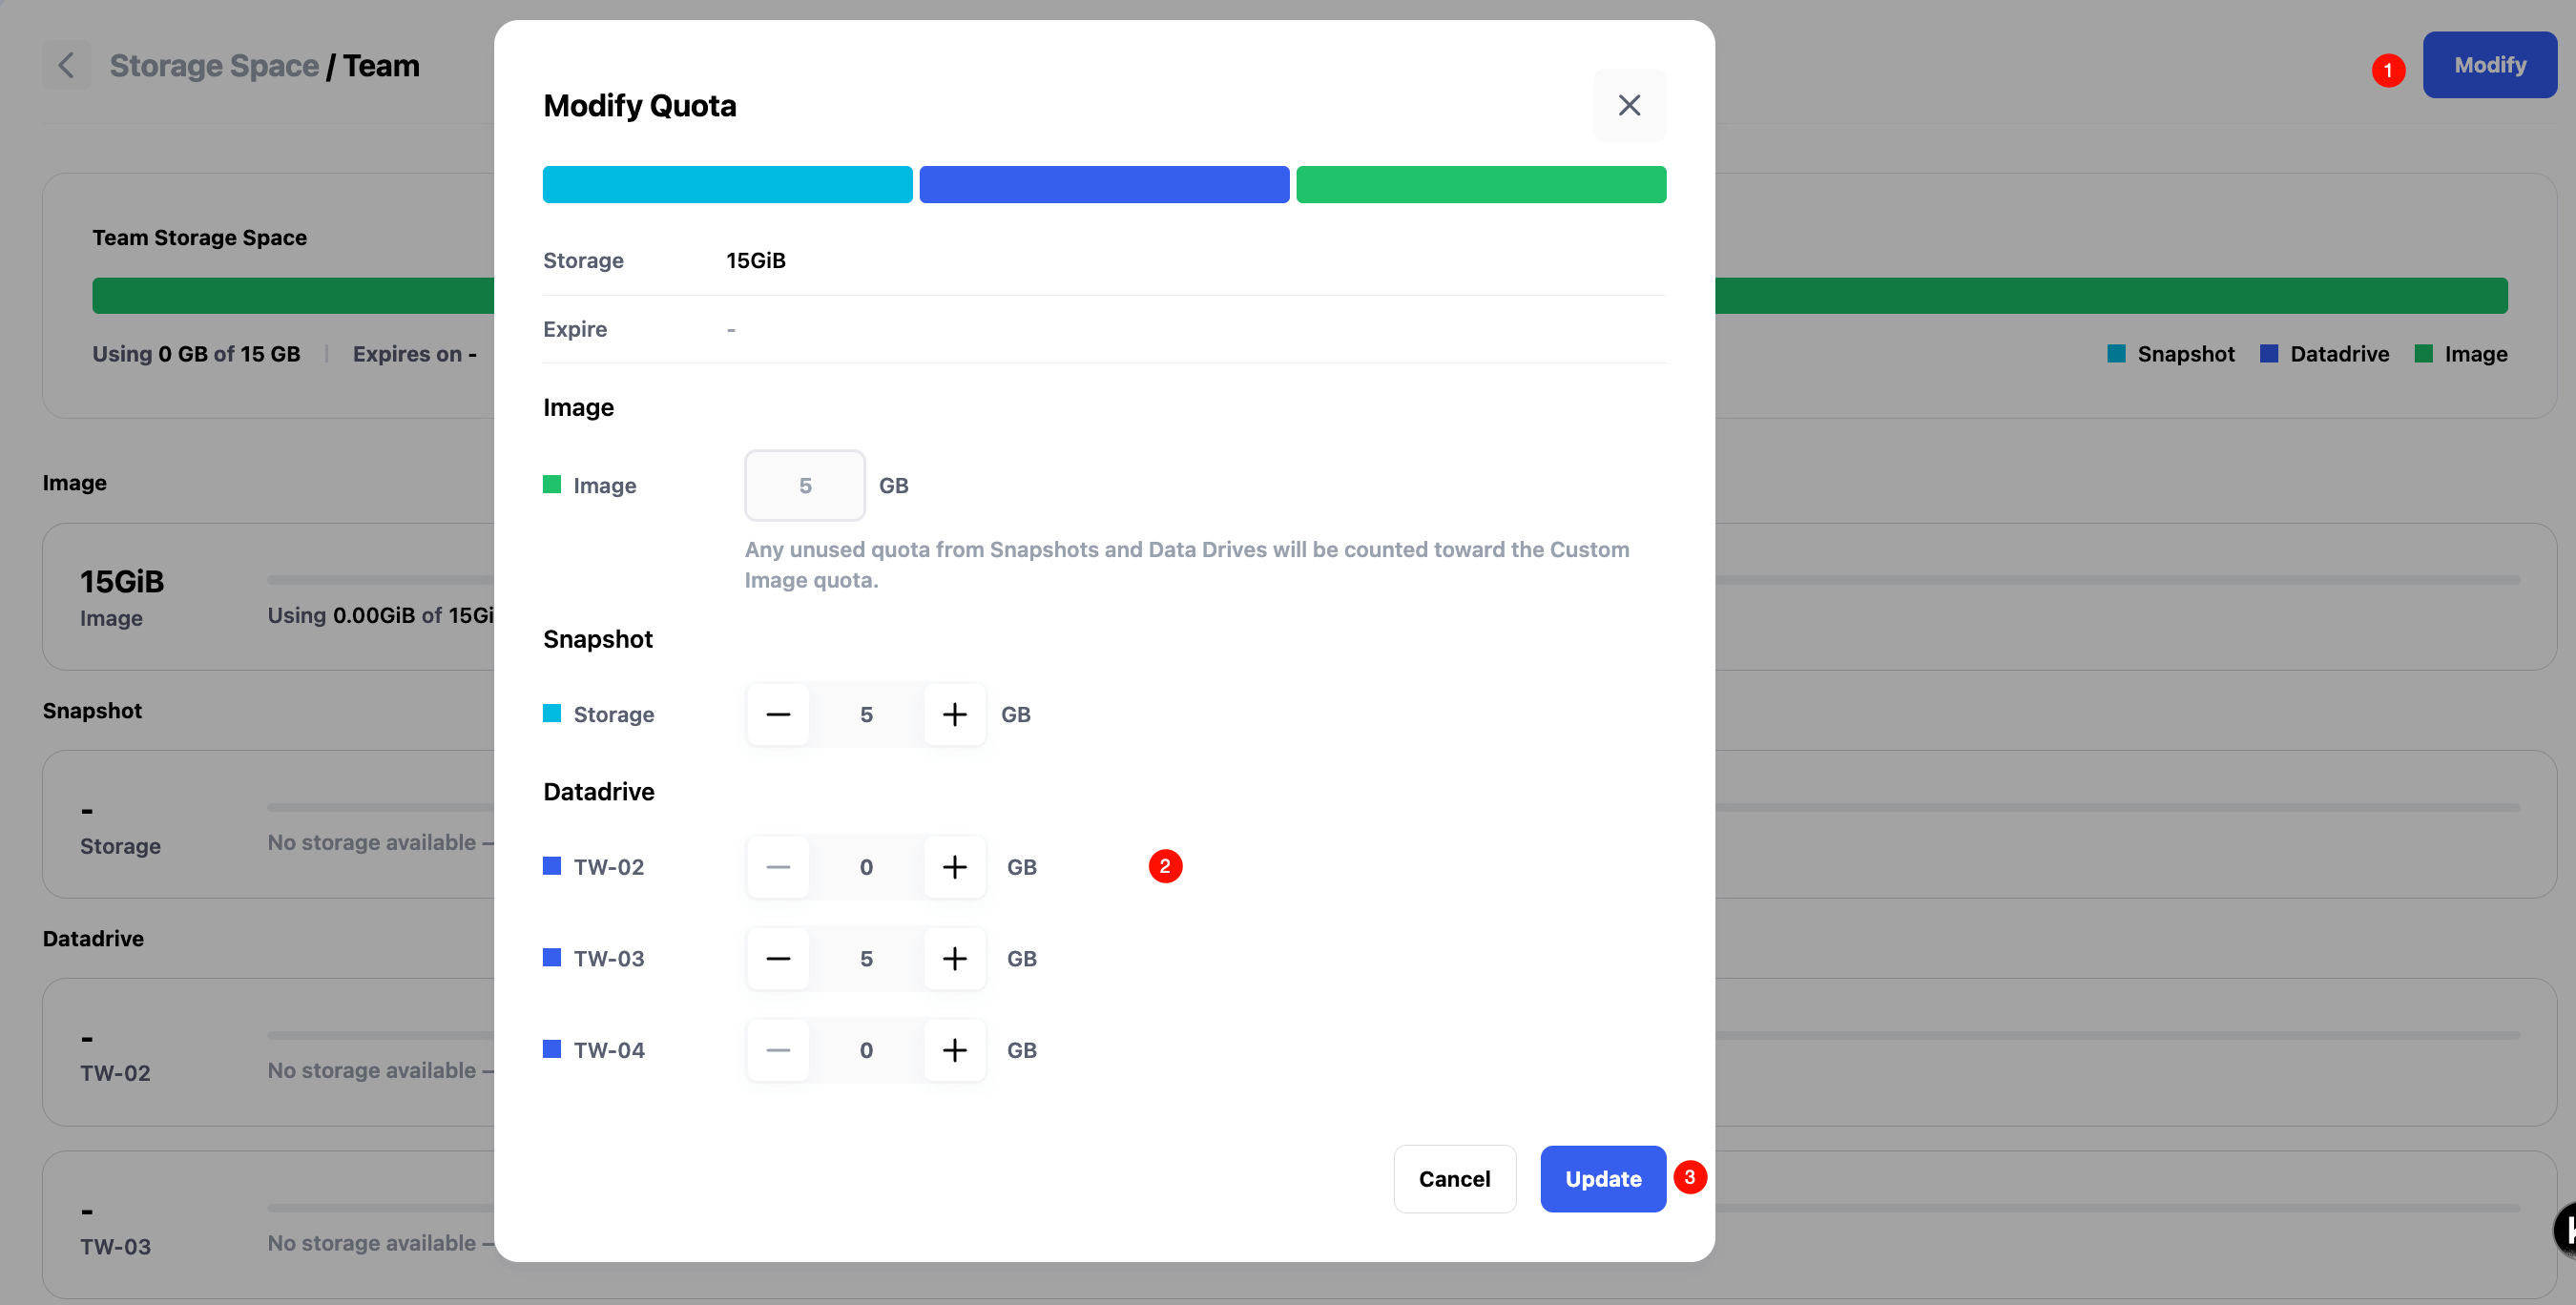
Datadrive Management
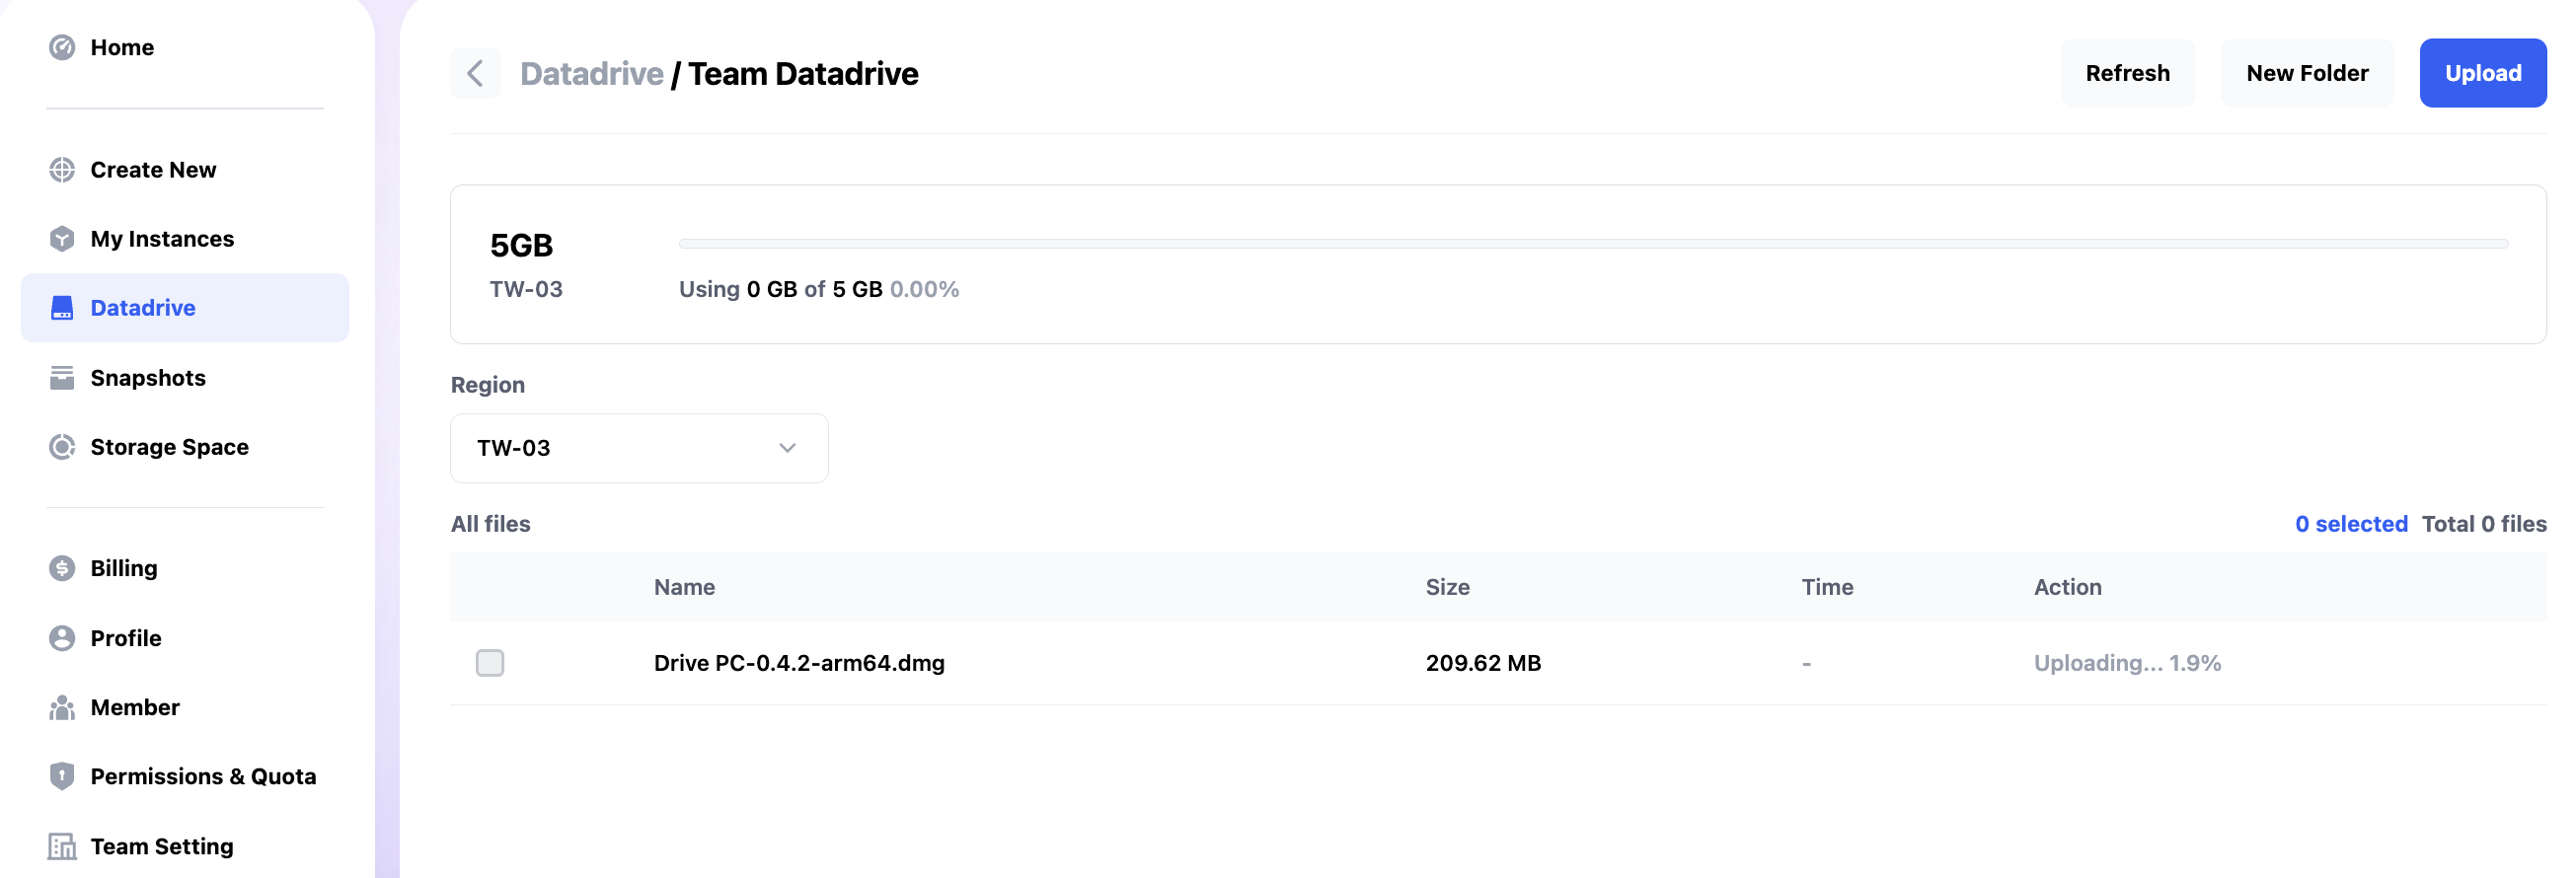
In Datadrive select Admin View, you can view and manage Datadrive usage for the entire team and each member.
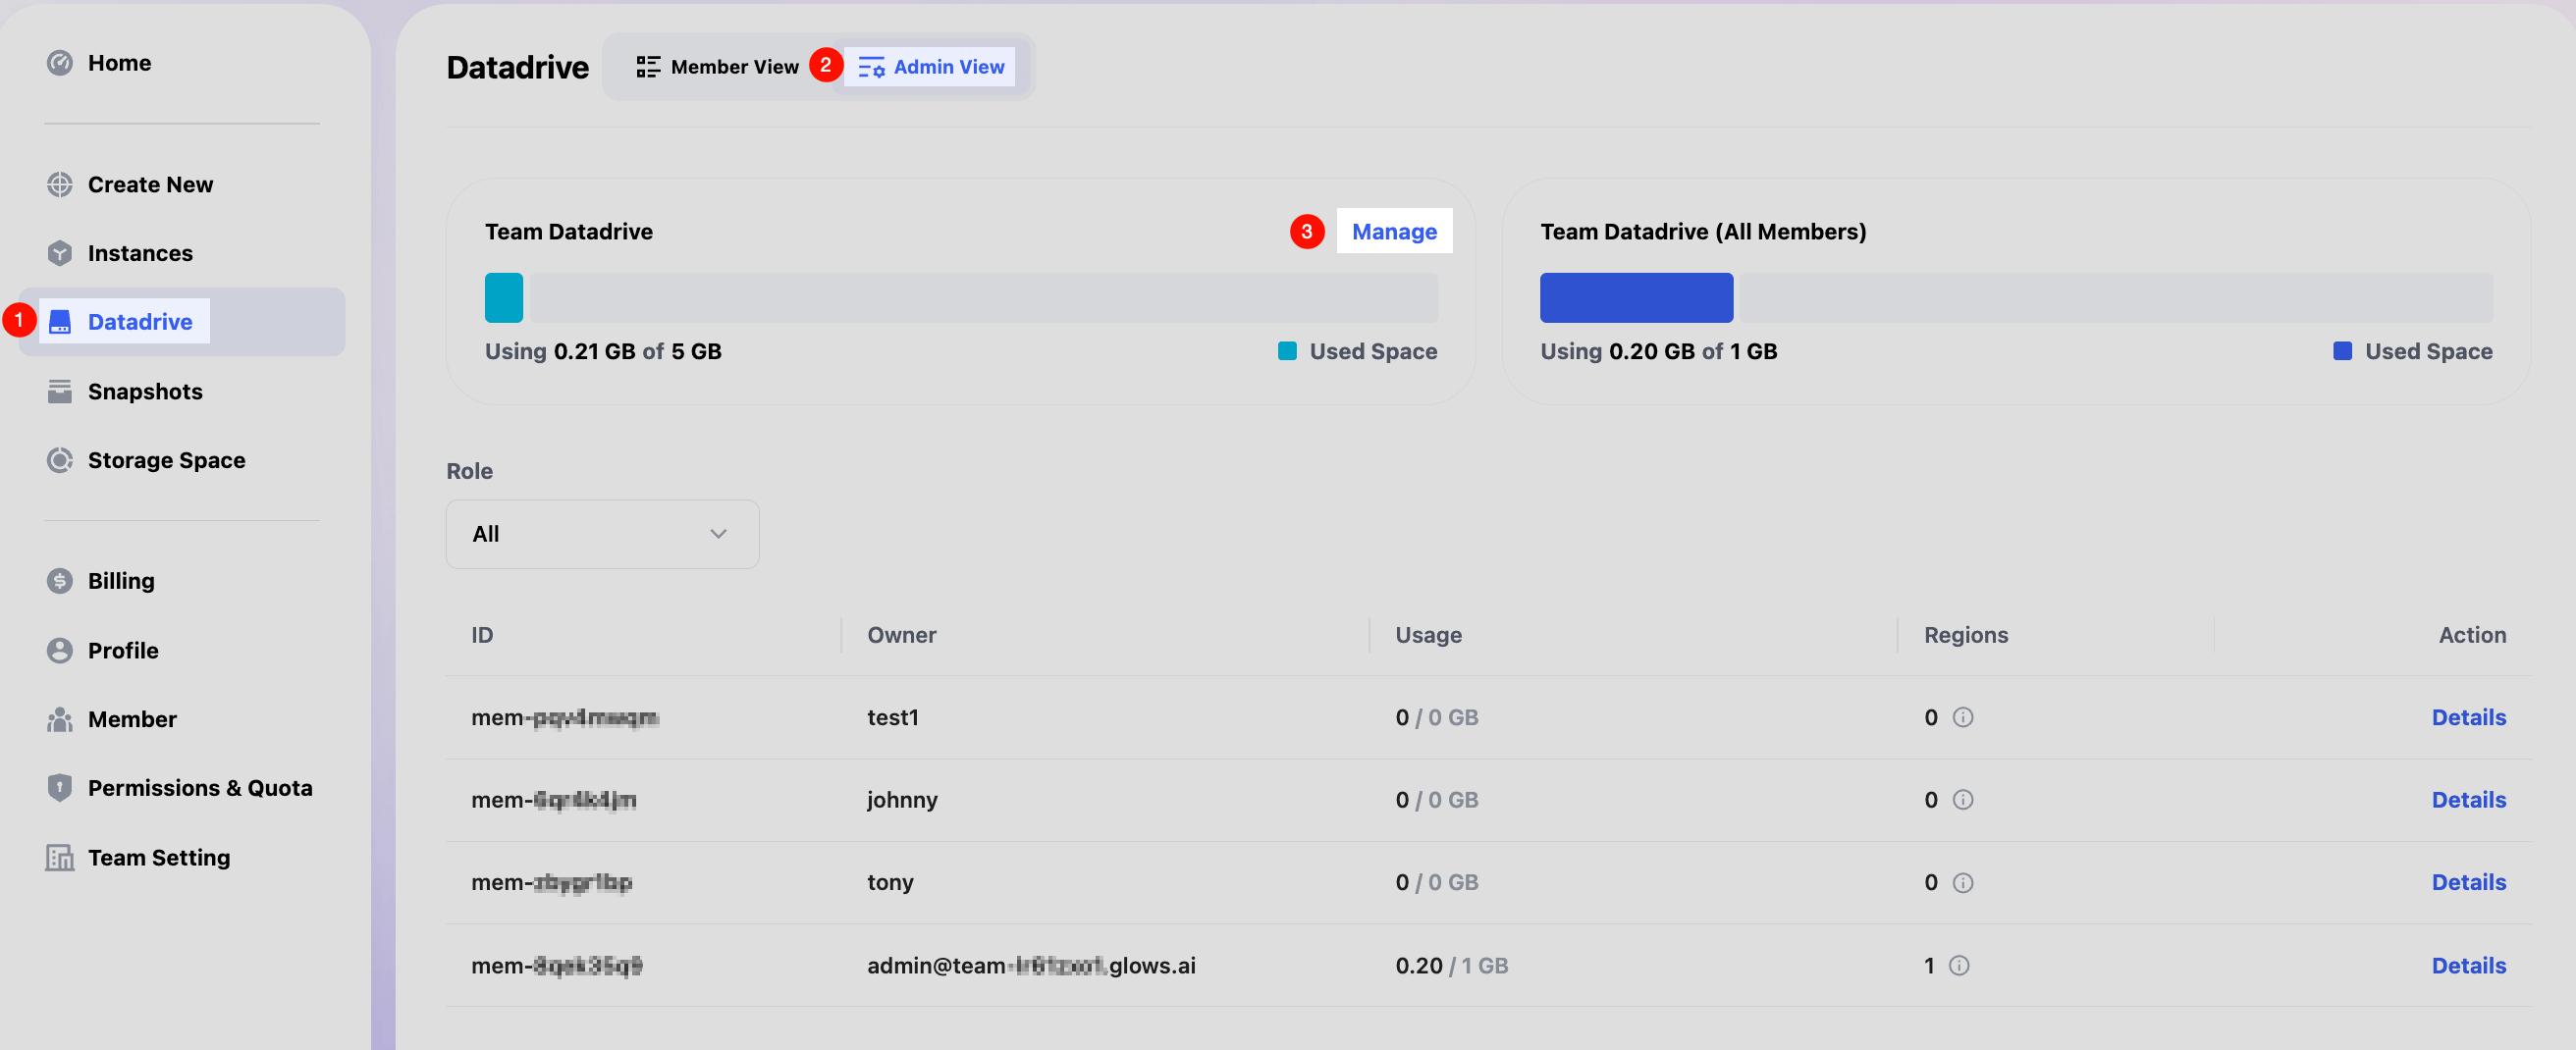
In Team Datadrive, click Manage to manage team Datadrive. Only the owner and admins can upload or delete data in the Team Datadrive.
When creating instances, members automatically mount the team drive at /team_data.
Members have read-only access, while owner and admins have read/write permissions.
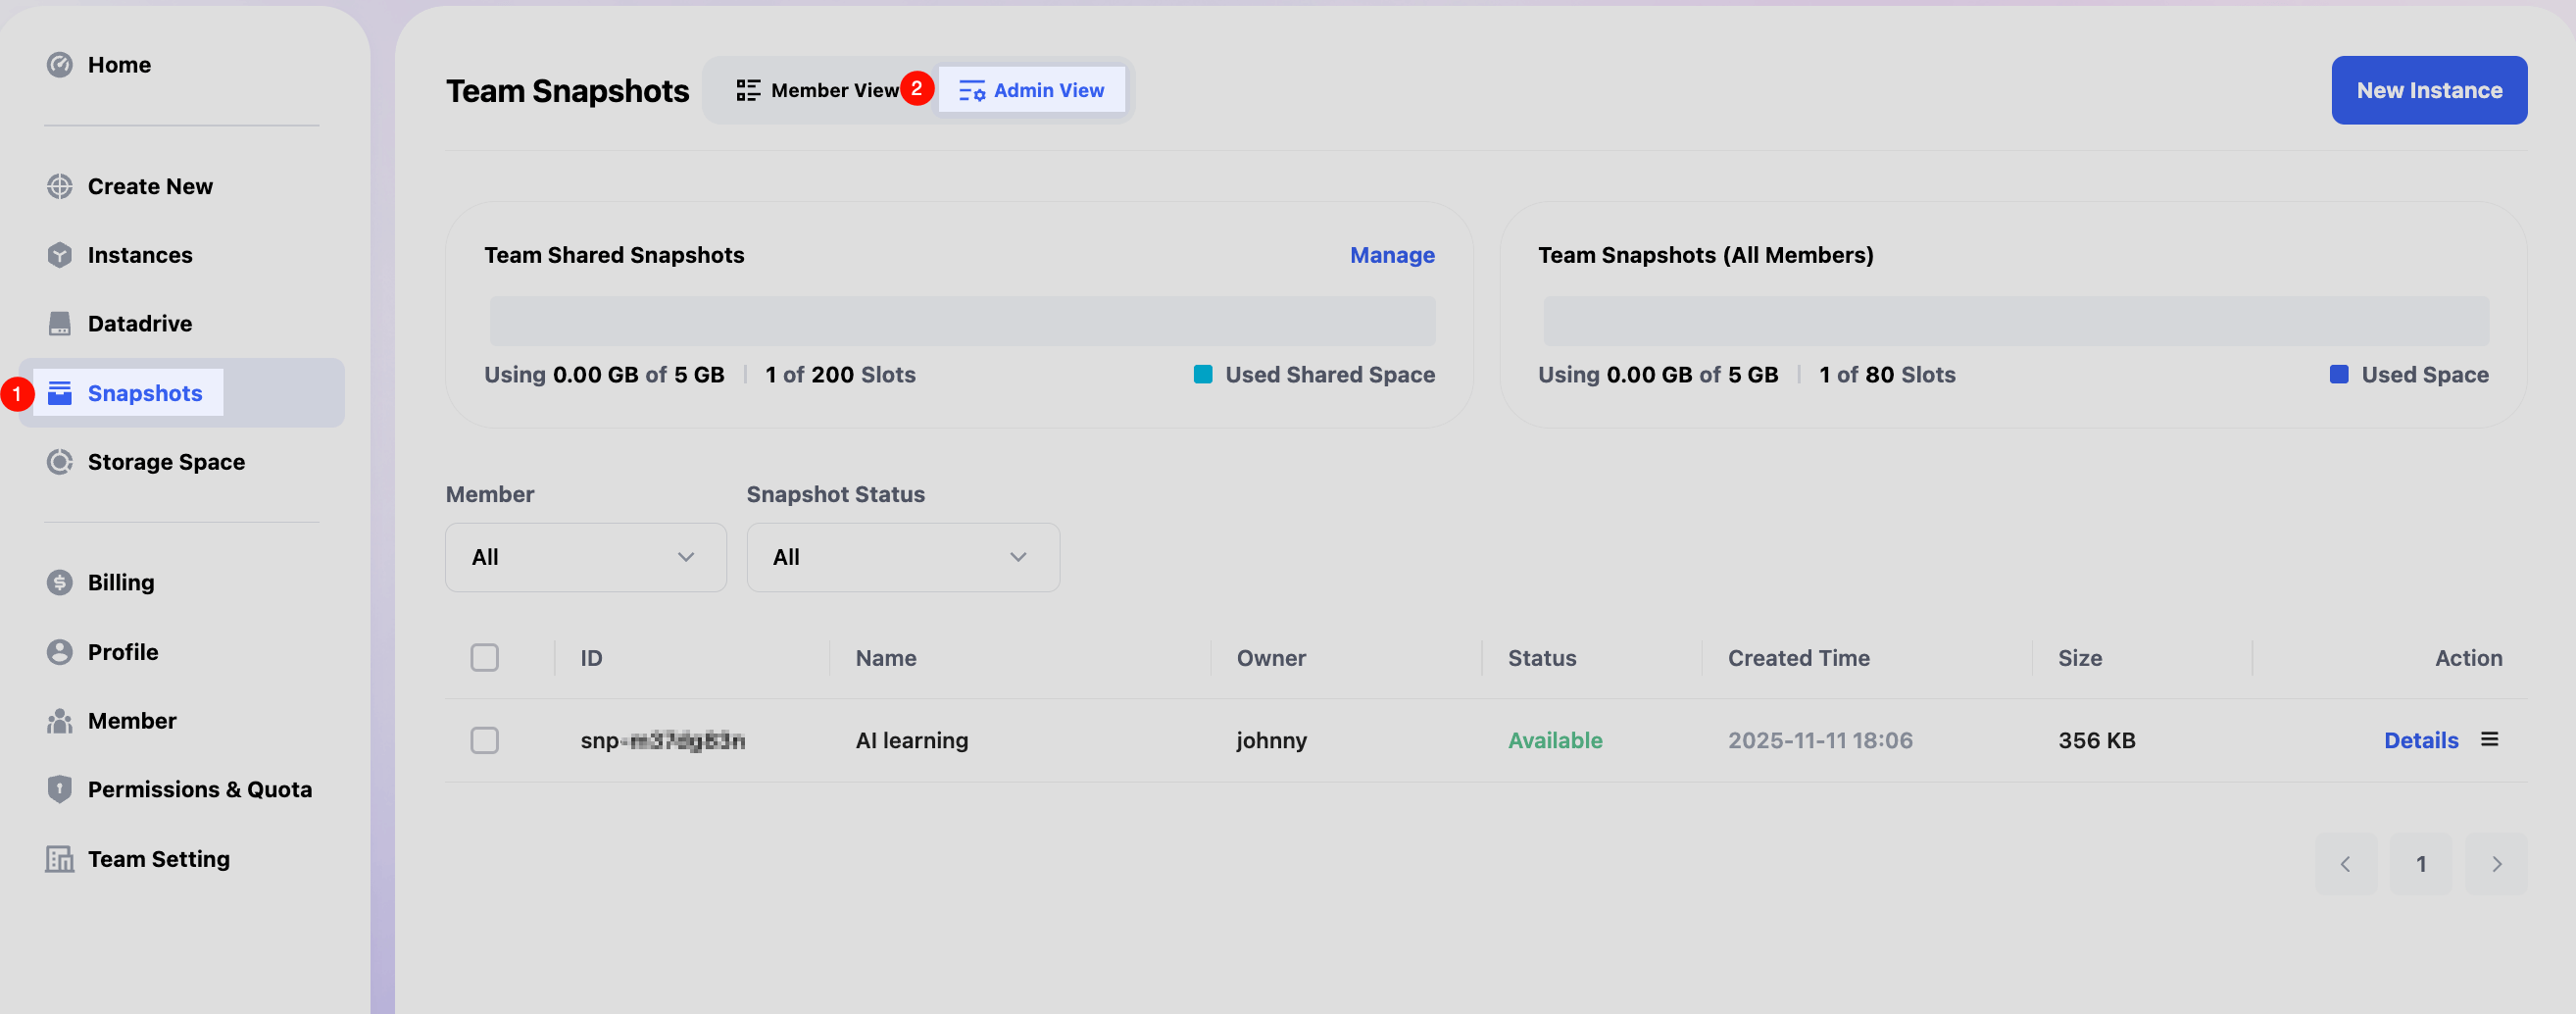
Snapshot Management
In Snapshots, select Admin View, you can view all team and individual snapshots.
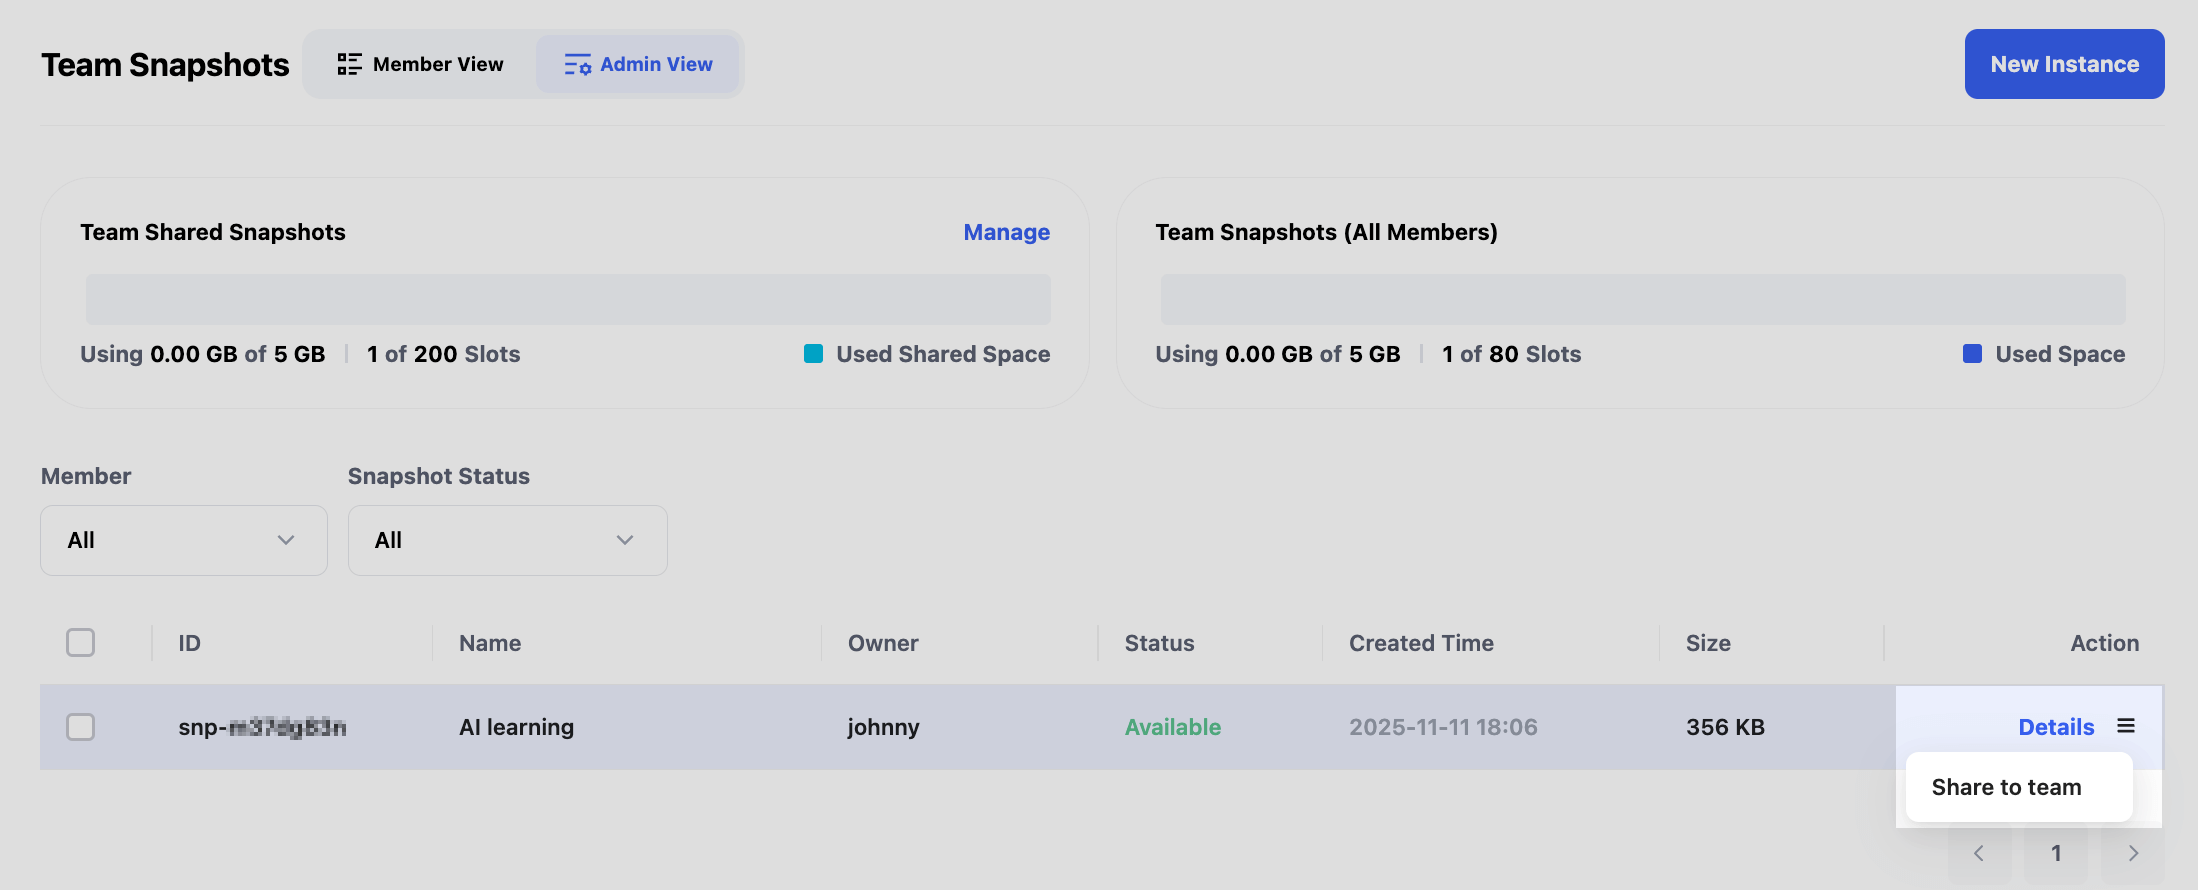
Share Team Snapshots
To make a member-created snapshot available to the team, select Detail for the target snapshot and then choose Share to Team.
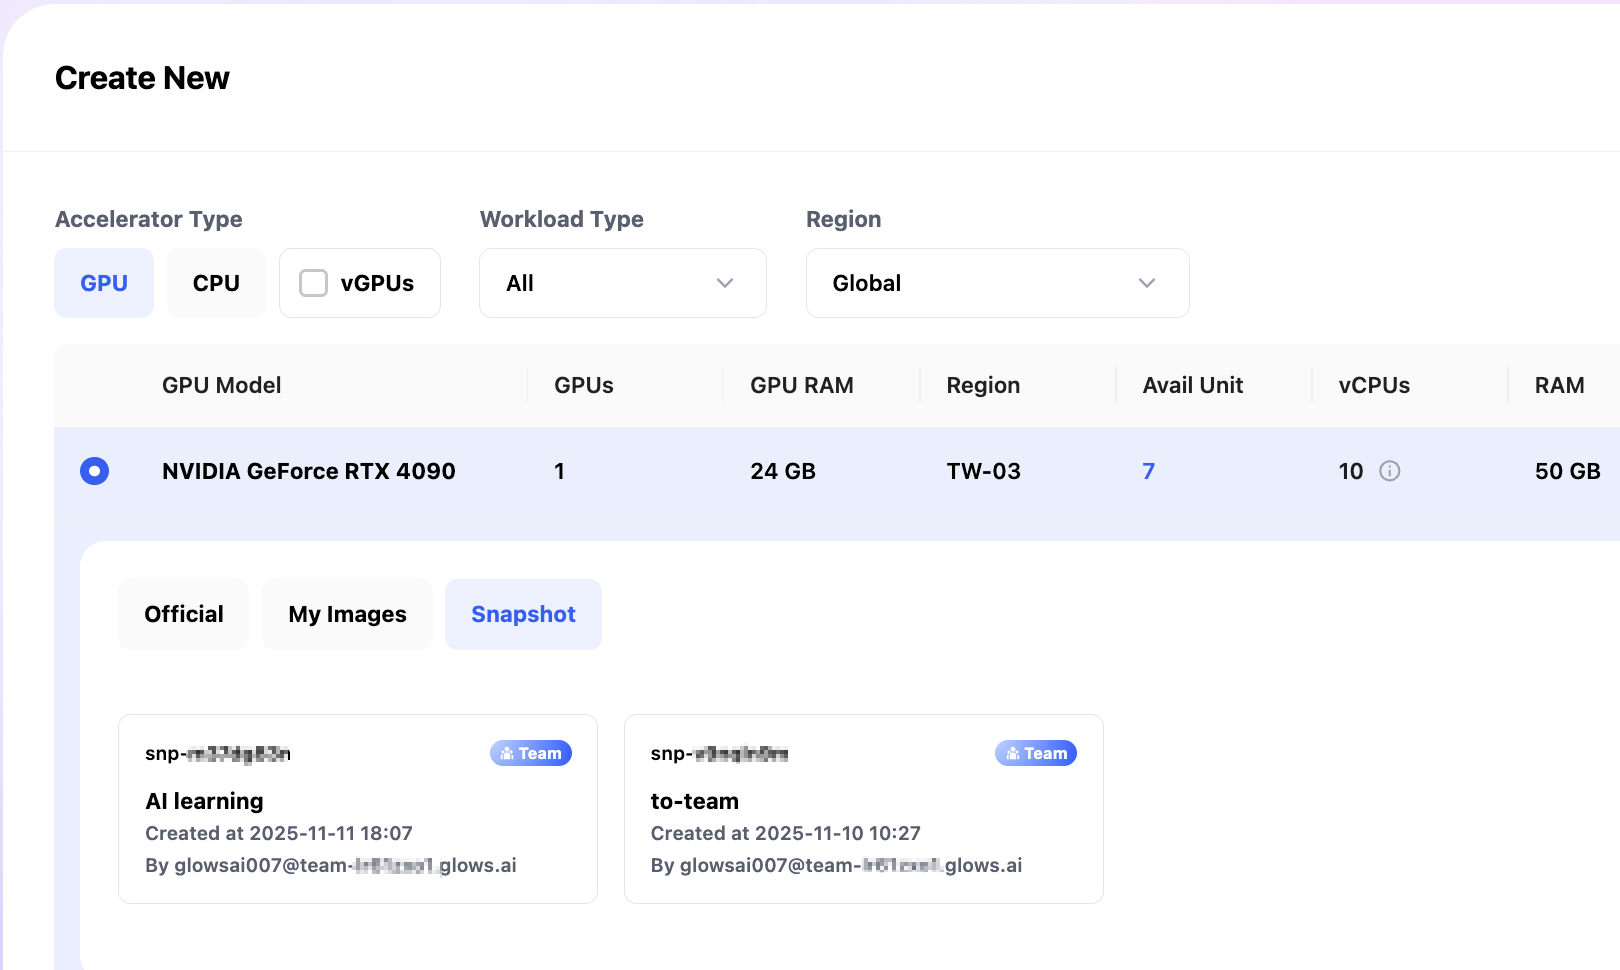
Use Team Snapshots
When creating a new instance, you can find team snapshots under Snapshot, marked with a Team label.
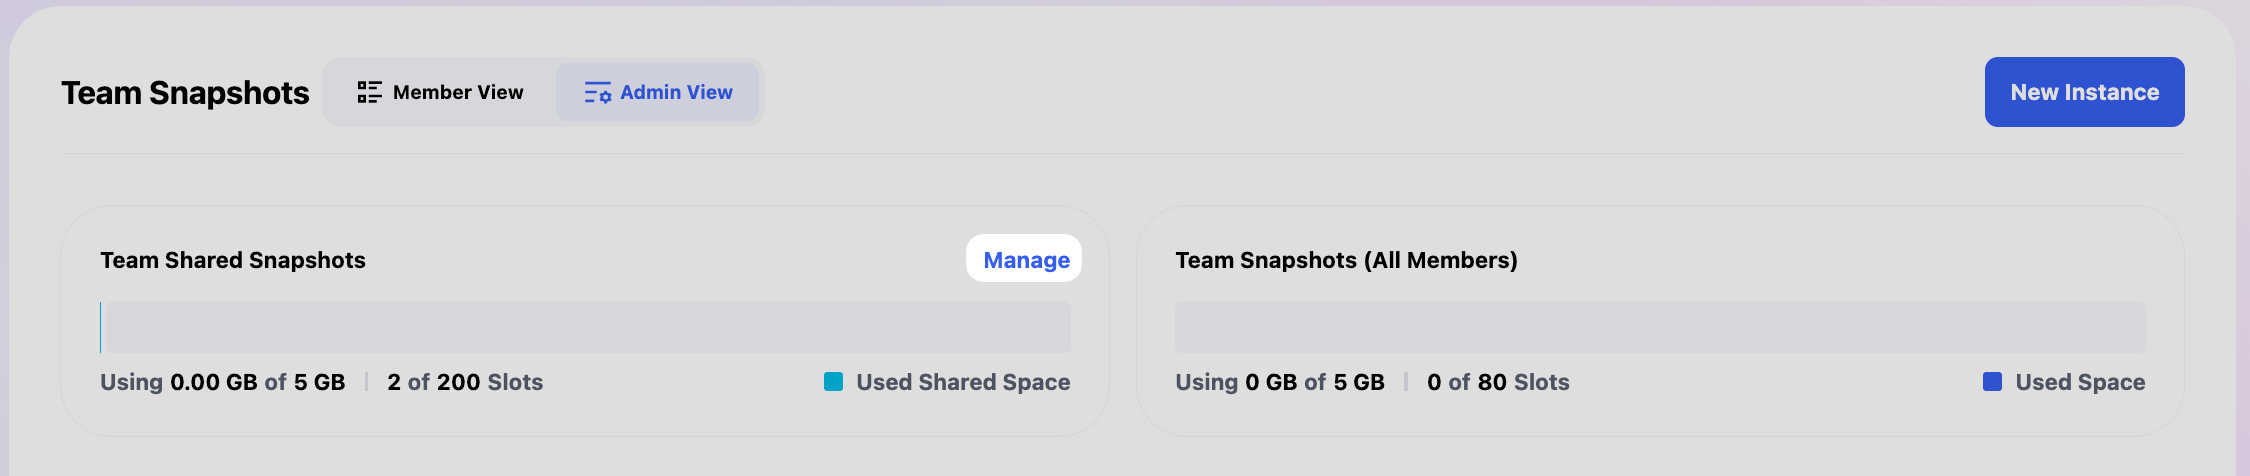
Manage Team Snapshots
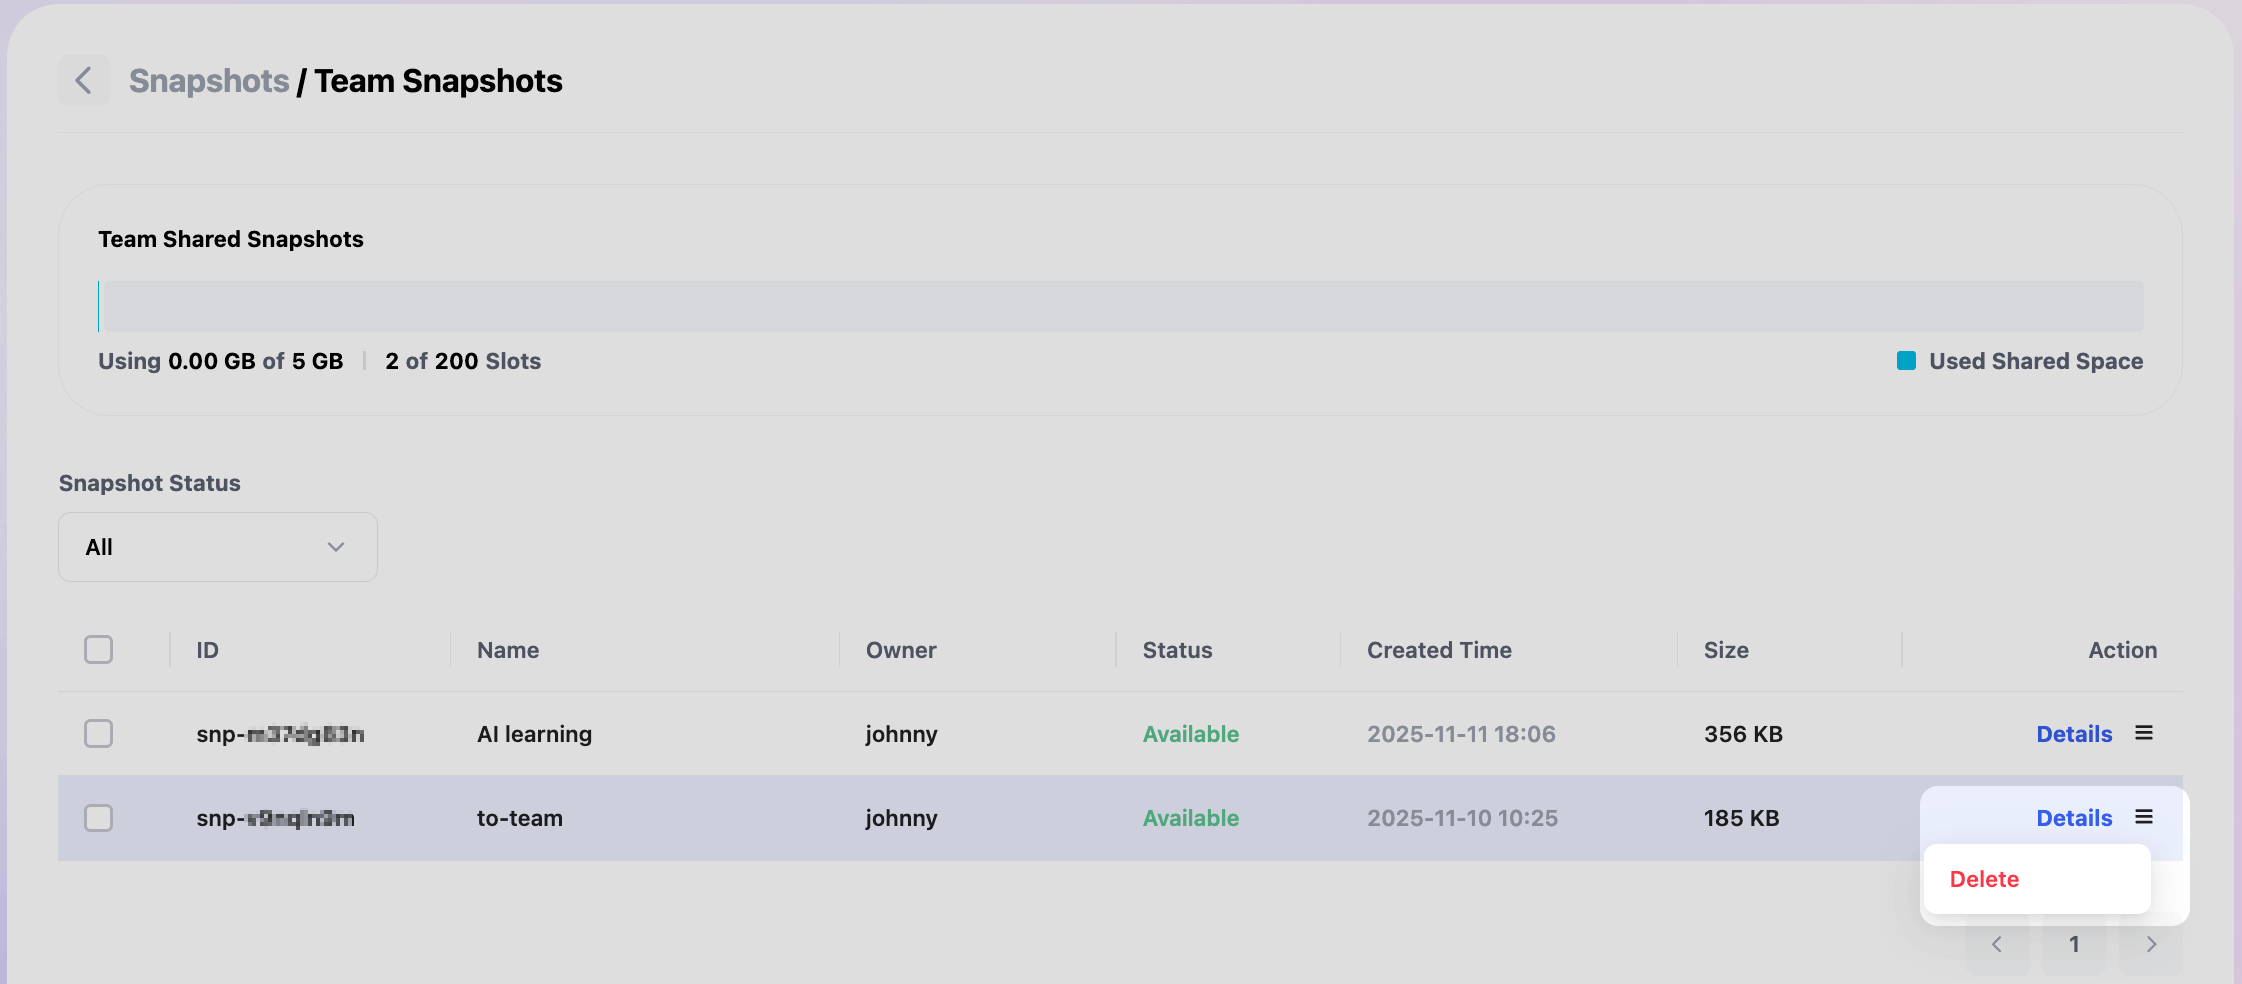
In Snapshots, after selecting Admin View, click Manage in the upper right corner of the Team Shared Snapshots module to access the team Snapshot management.
All team snapshots are listed in this interface. Currently, the only supported operation is deletion. To delete a snapshot, select the item and choose Delete from the Action menu.
Note: Deleting a team snapshot is a permanent action and cannot be restored. Please operate with caution.
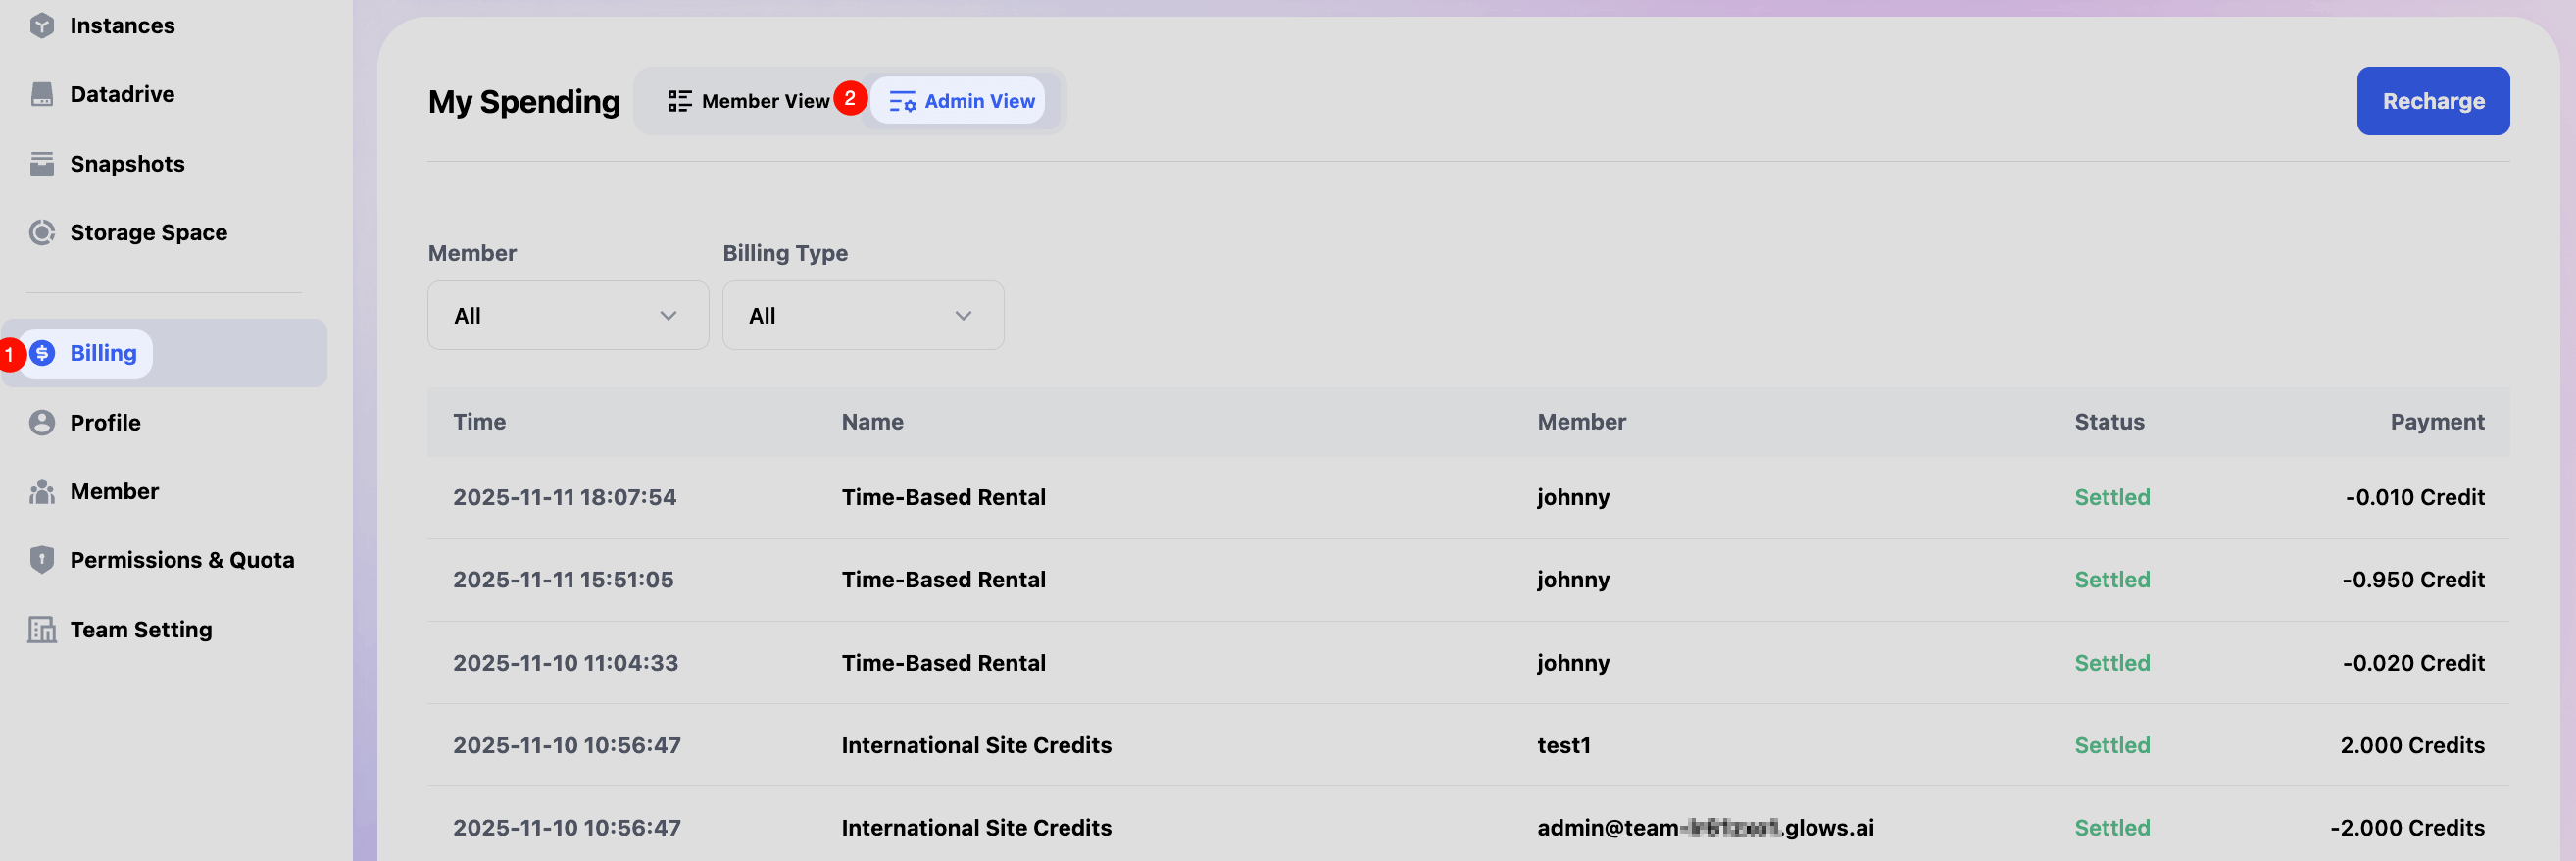
Billing Management
In the Billing interface, switch to Admin View to view the billing data for all team members. The billing query supports filtering by member and billing type.
Additionally, in the Billing interface, you can click the Recharge button to add funds. It supports direct transfers from the main account, and you need to select USD for the Select Your Payment Currency.
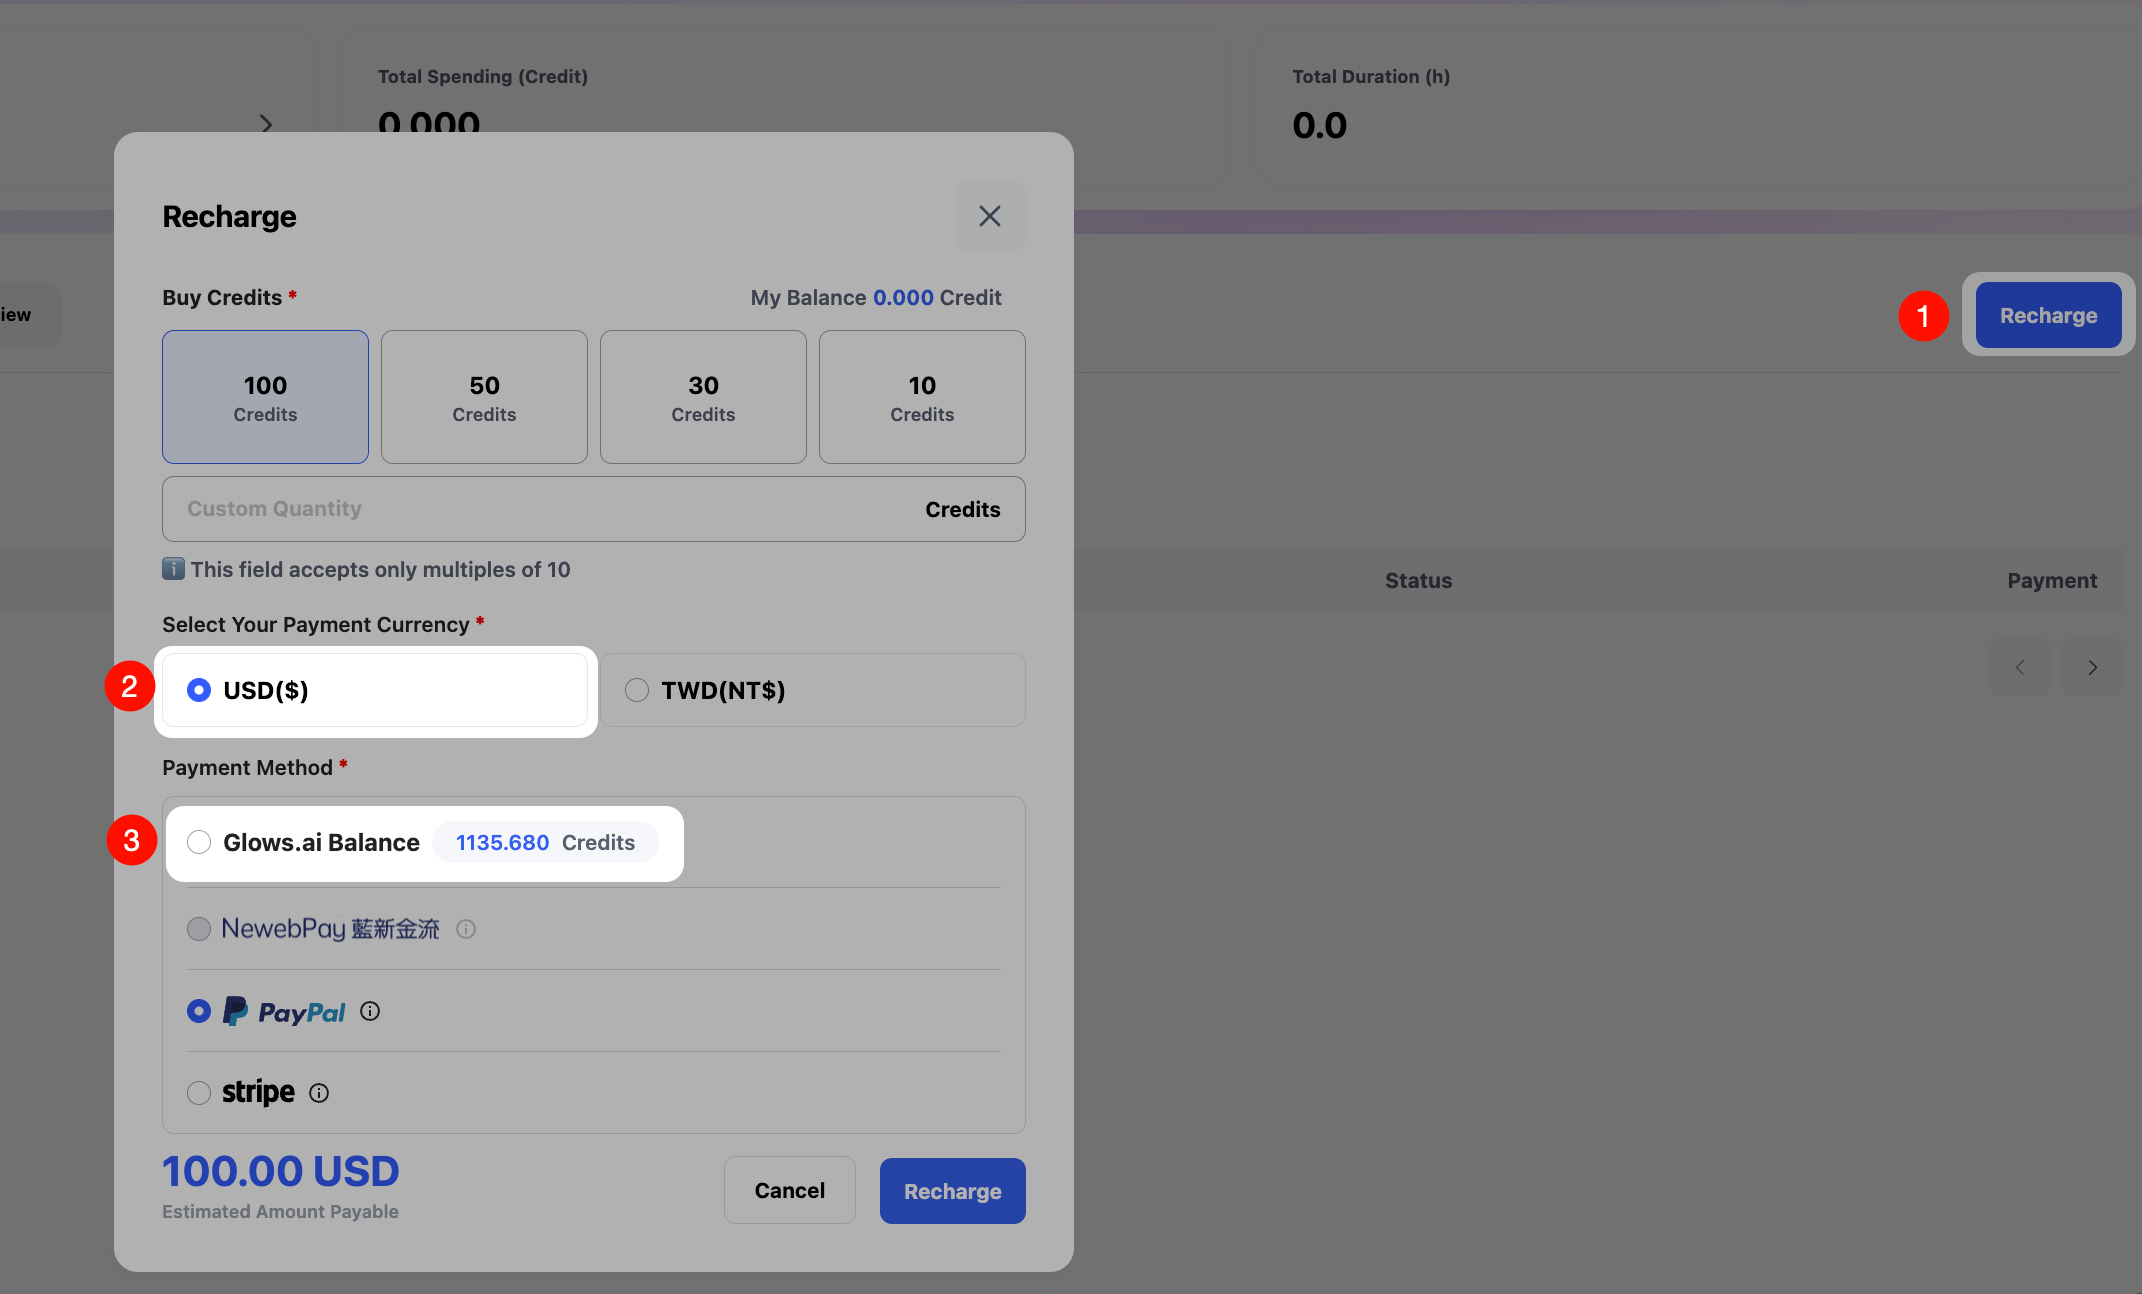
Note: Currently, the recharge function is only available to the team creator. The team creator must add funds first and then distribute them to team managers and regular members.
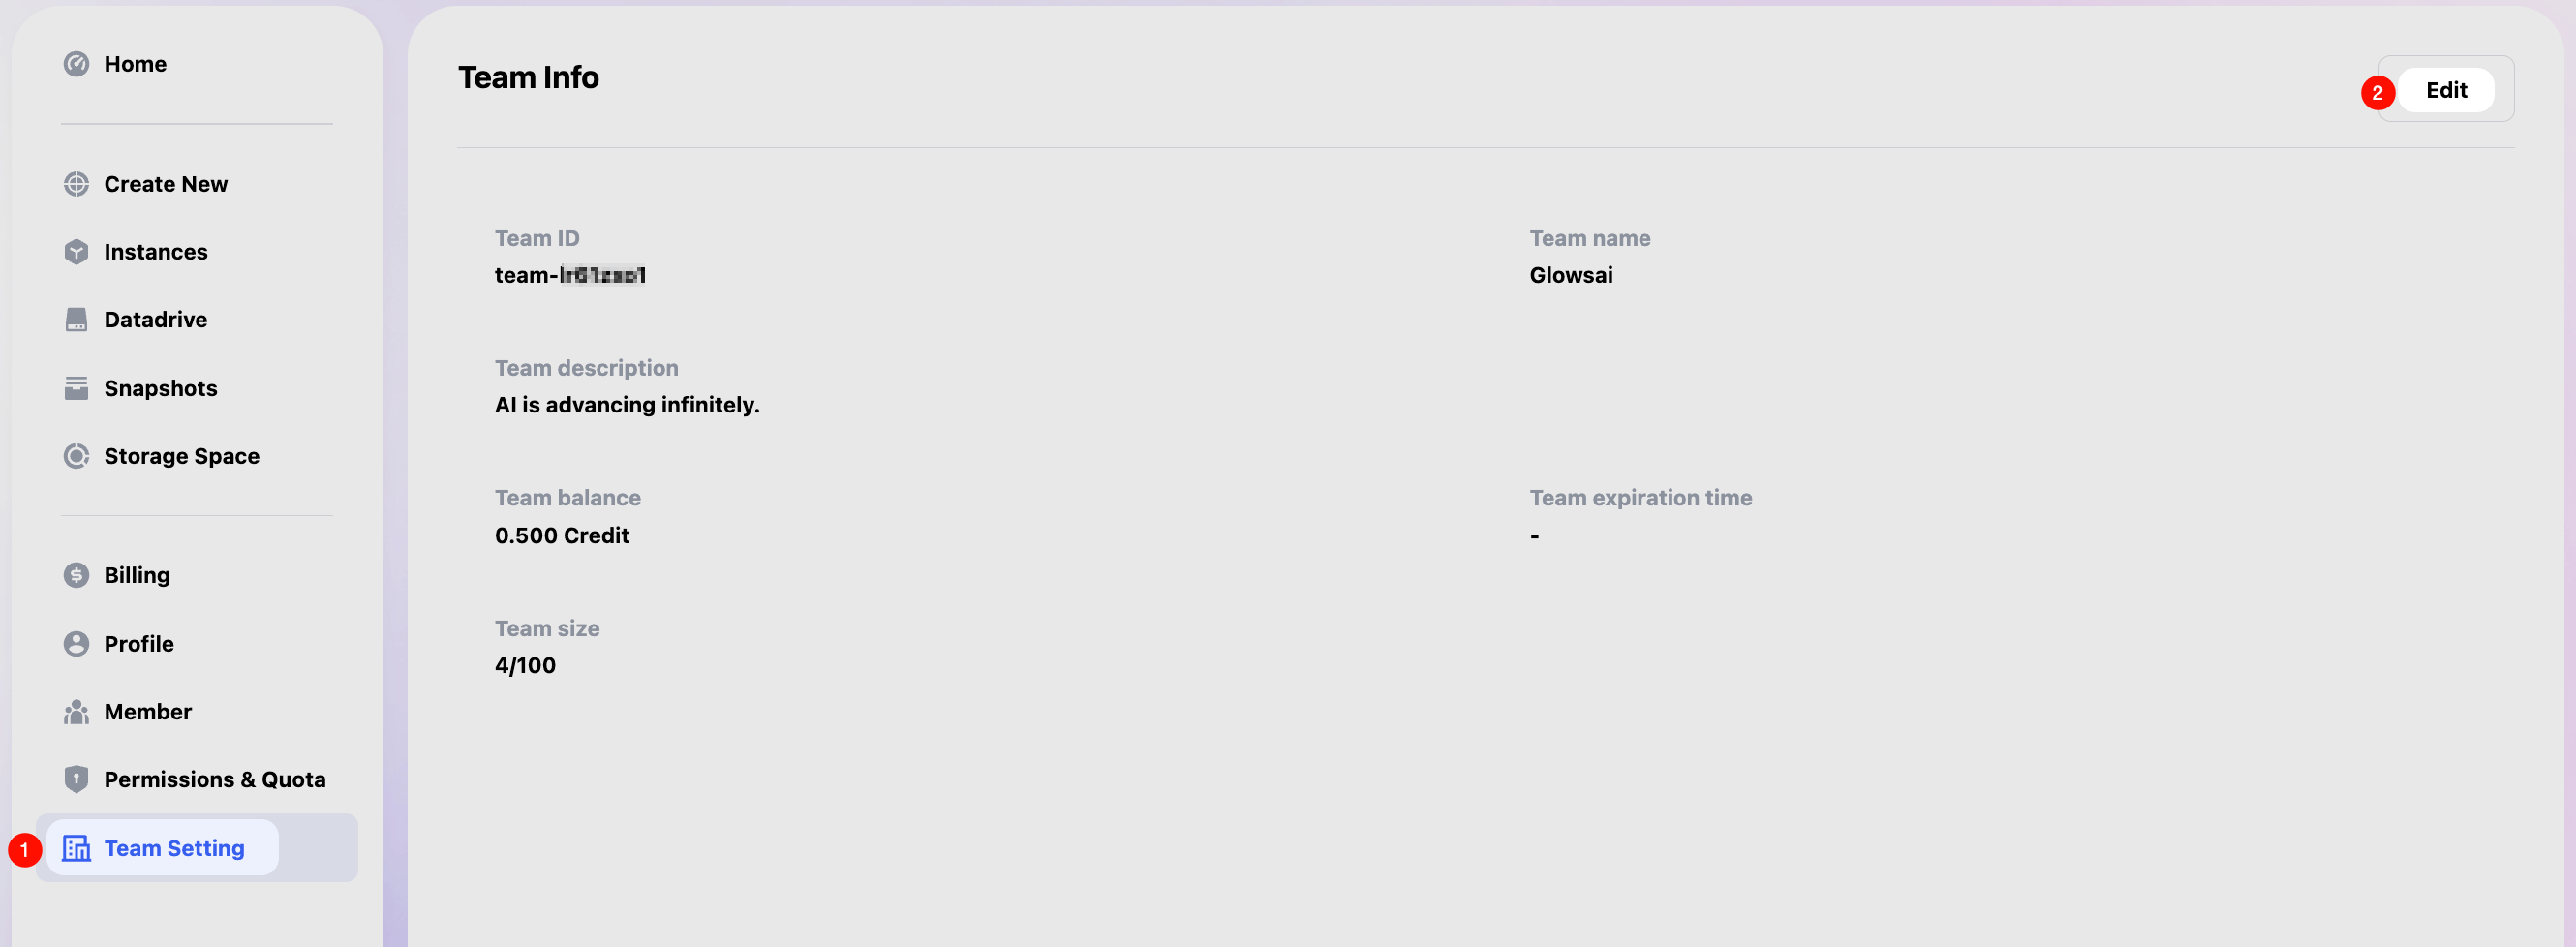
Edit Team Information
Go to Team Setting and click Edit to modify the team name and description.
Administrator Guide
Administrators have the same permissions as the owner, except they cannot create teams or perform recharges. For more detailed instructions, please refer to the Owner Guide.
Member Guide
Members can access the following functions: Create Instance (Create New), Instance Management (Instances), Datadrive Management (Datadrive), Snapshot Management (Snapshots), Storage Management (Storage Space), Billing (Billing), Profile Editing (Profile).
All actions work the same as on the Glows.ai platform. For more details, please refer to Glows.ai User Guide
Join a Team
After receiving credentials from the team owner or admin, members can join a team via the following methods.
1. Login via Team Link
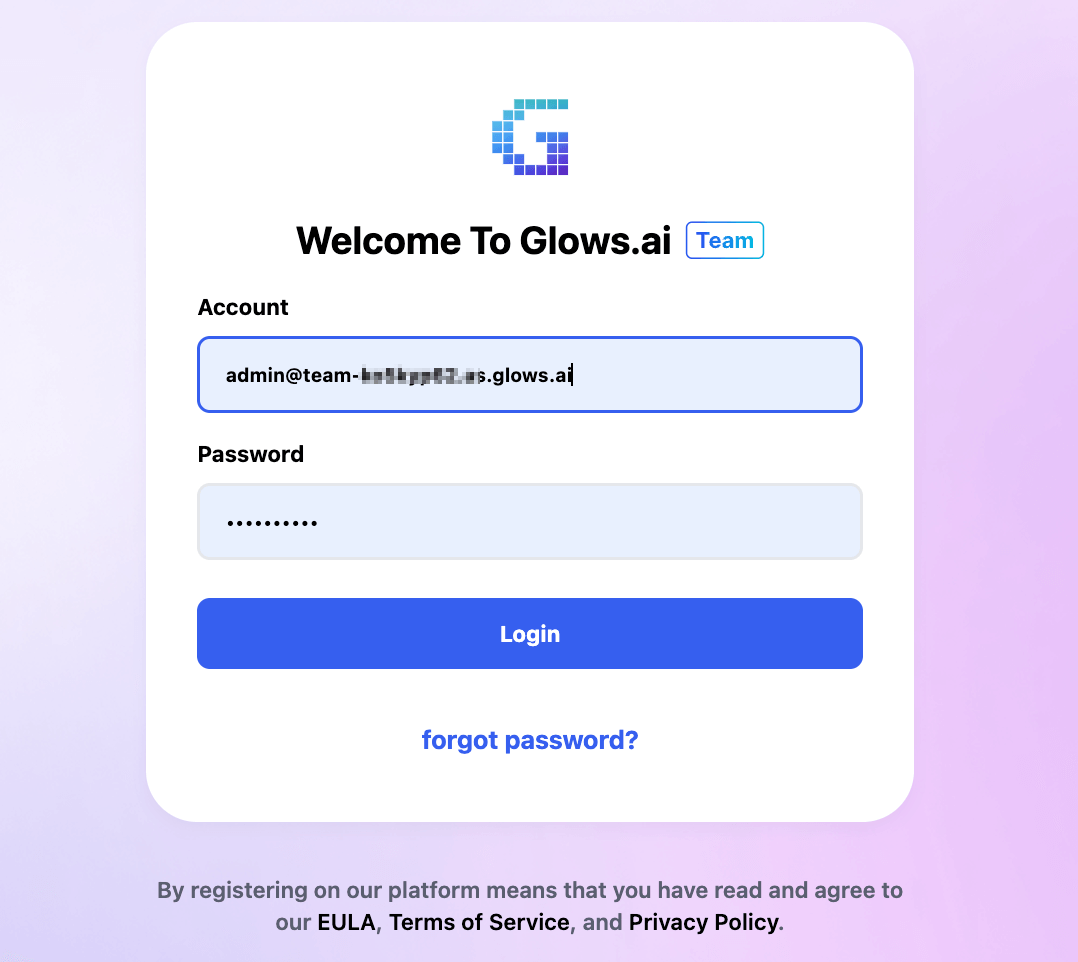
Visit the Glows.ai team workspace login page in your browser, then enter your team account and password.
https://platform.glows.ai/team/login
2. Join via Glows.ai Platform
Log in Glows.ai platform, click your avatar, and select Teams → Join Team.
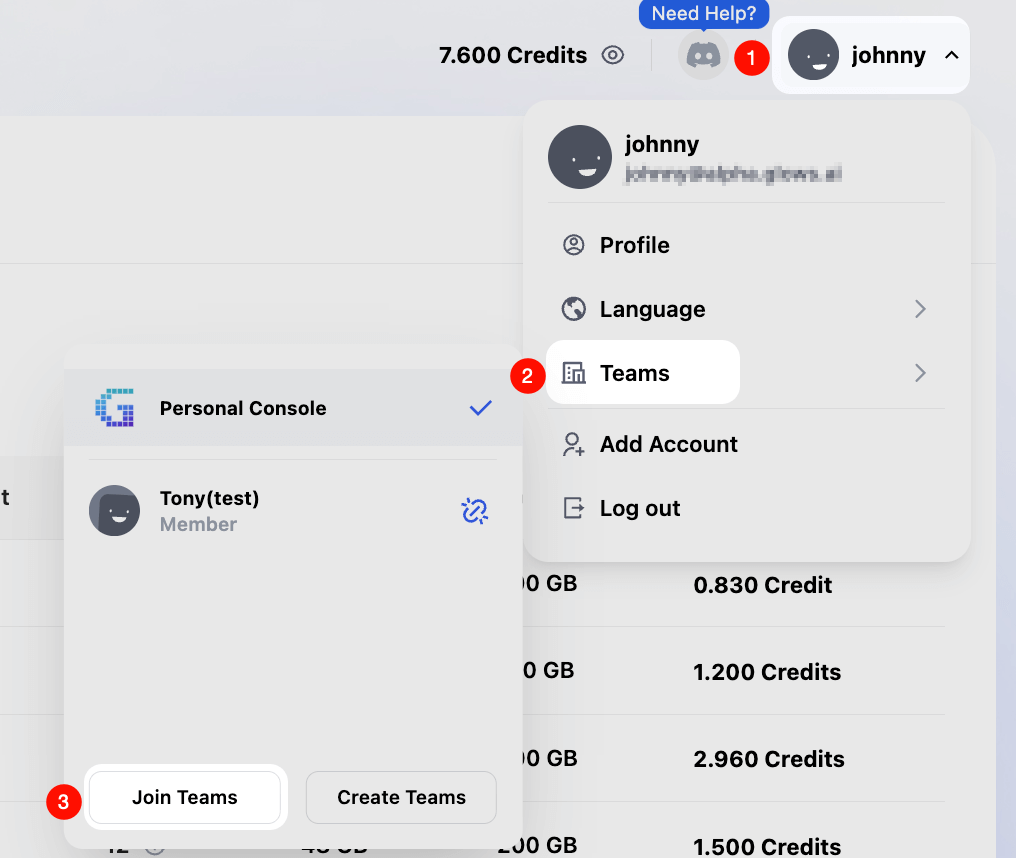
Enter the team account and password to link your main account with the team. You can later switch between the Glows.ai platform account and Glows.ai team account directly.
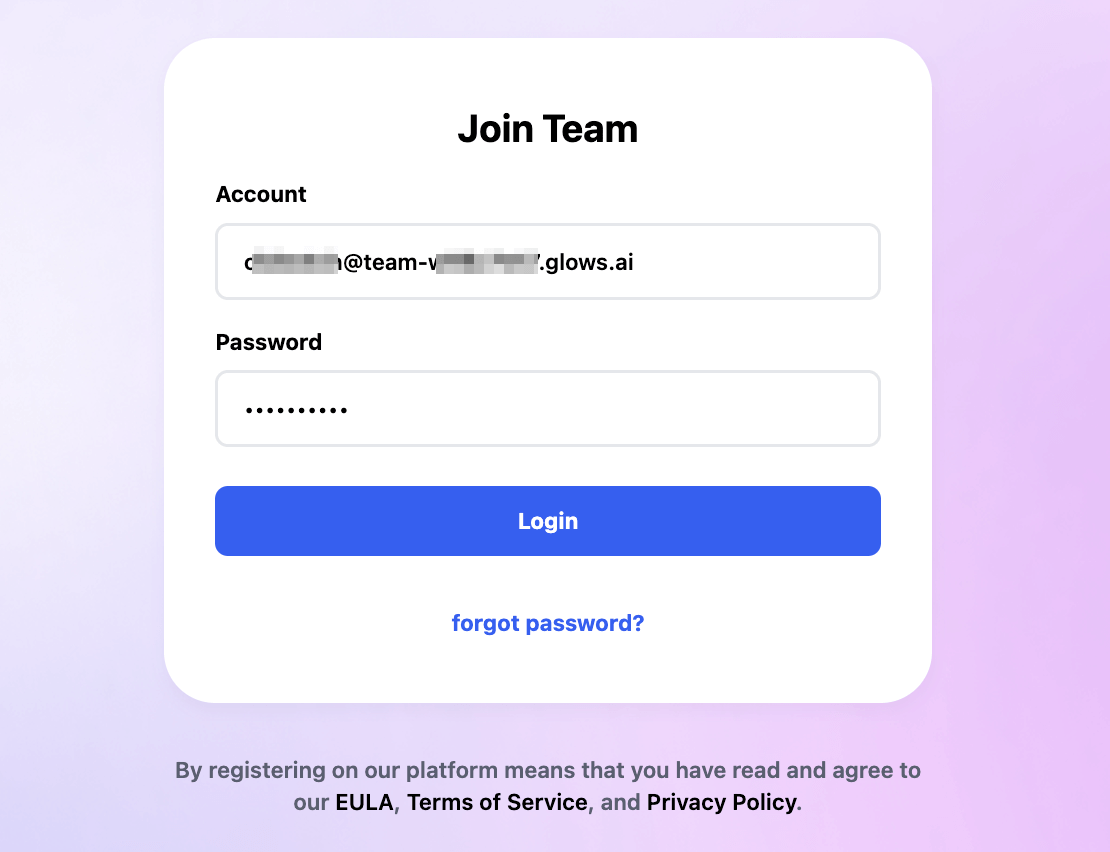
Whichever login method you choose, a password reset is required upon your initial login.
Request Credits
Members who need credits need to apply to the owner or administrator.
Create an Instance
Click Create New, select the GPU type and environment.
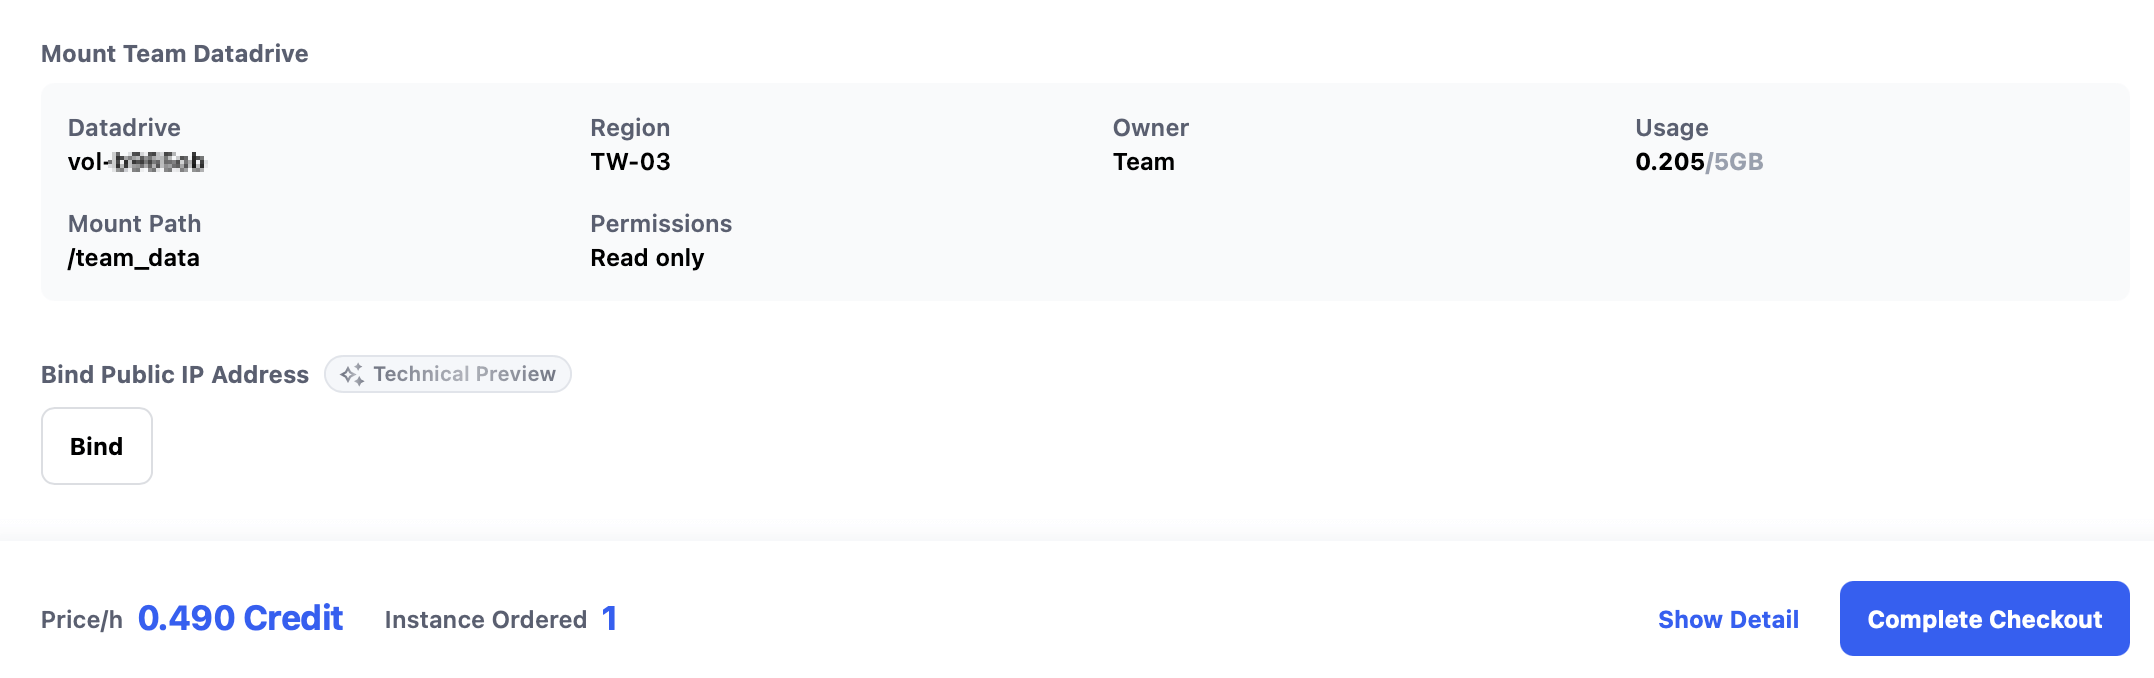
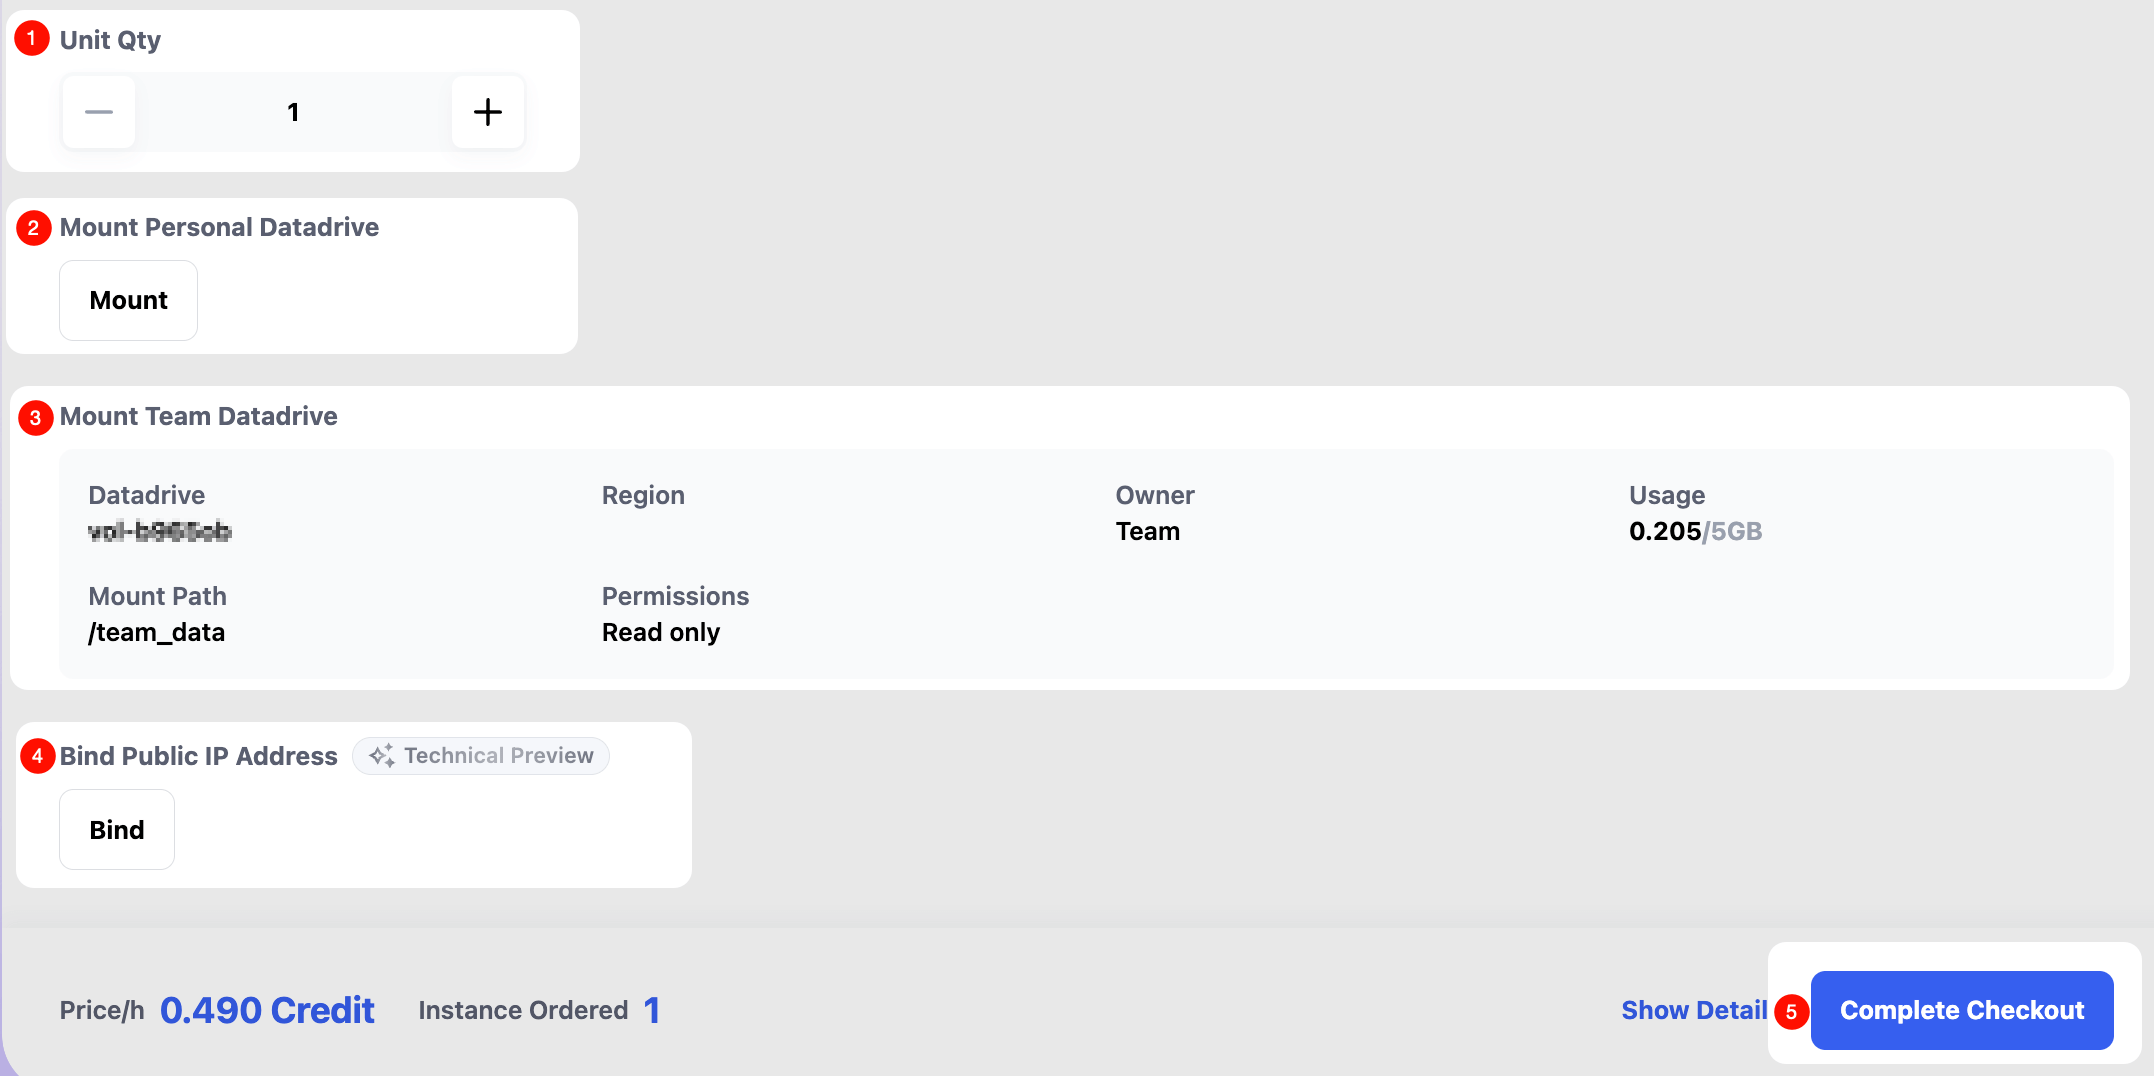
Scroll down to configure Datadrive settings, then click Complete Checkout.
- Unit Qty: Number of GPUs to rent (e.g.,
2means two GPUs). - Mount Personal Datadrive: (Optional) You can choose whether to mount your personal Datadrive.
- Mount Team Datadrive: (Default) The team Datadrive is automatically mounted to
/team_datadirectory in the instance, and members have read-only access. - Bind Public IP Address: Contact Glows.ai support if you need to bind public IP address.
Manage Instances
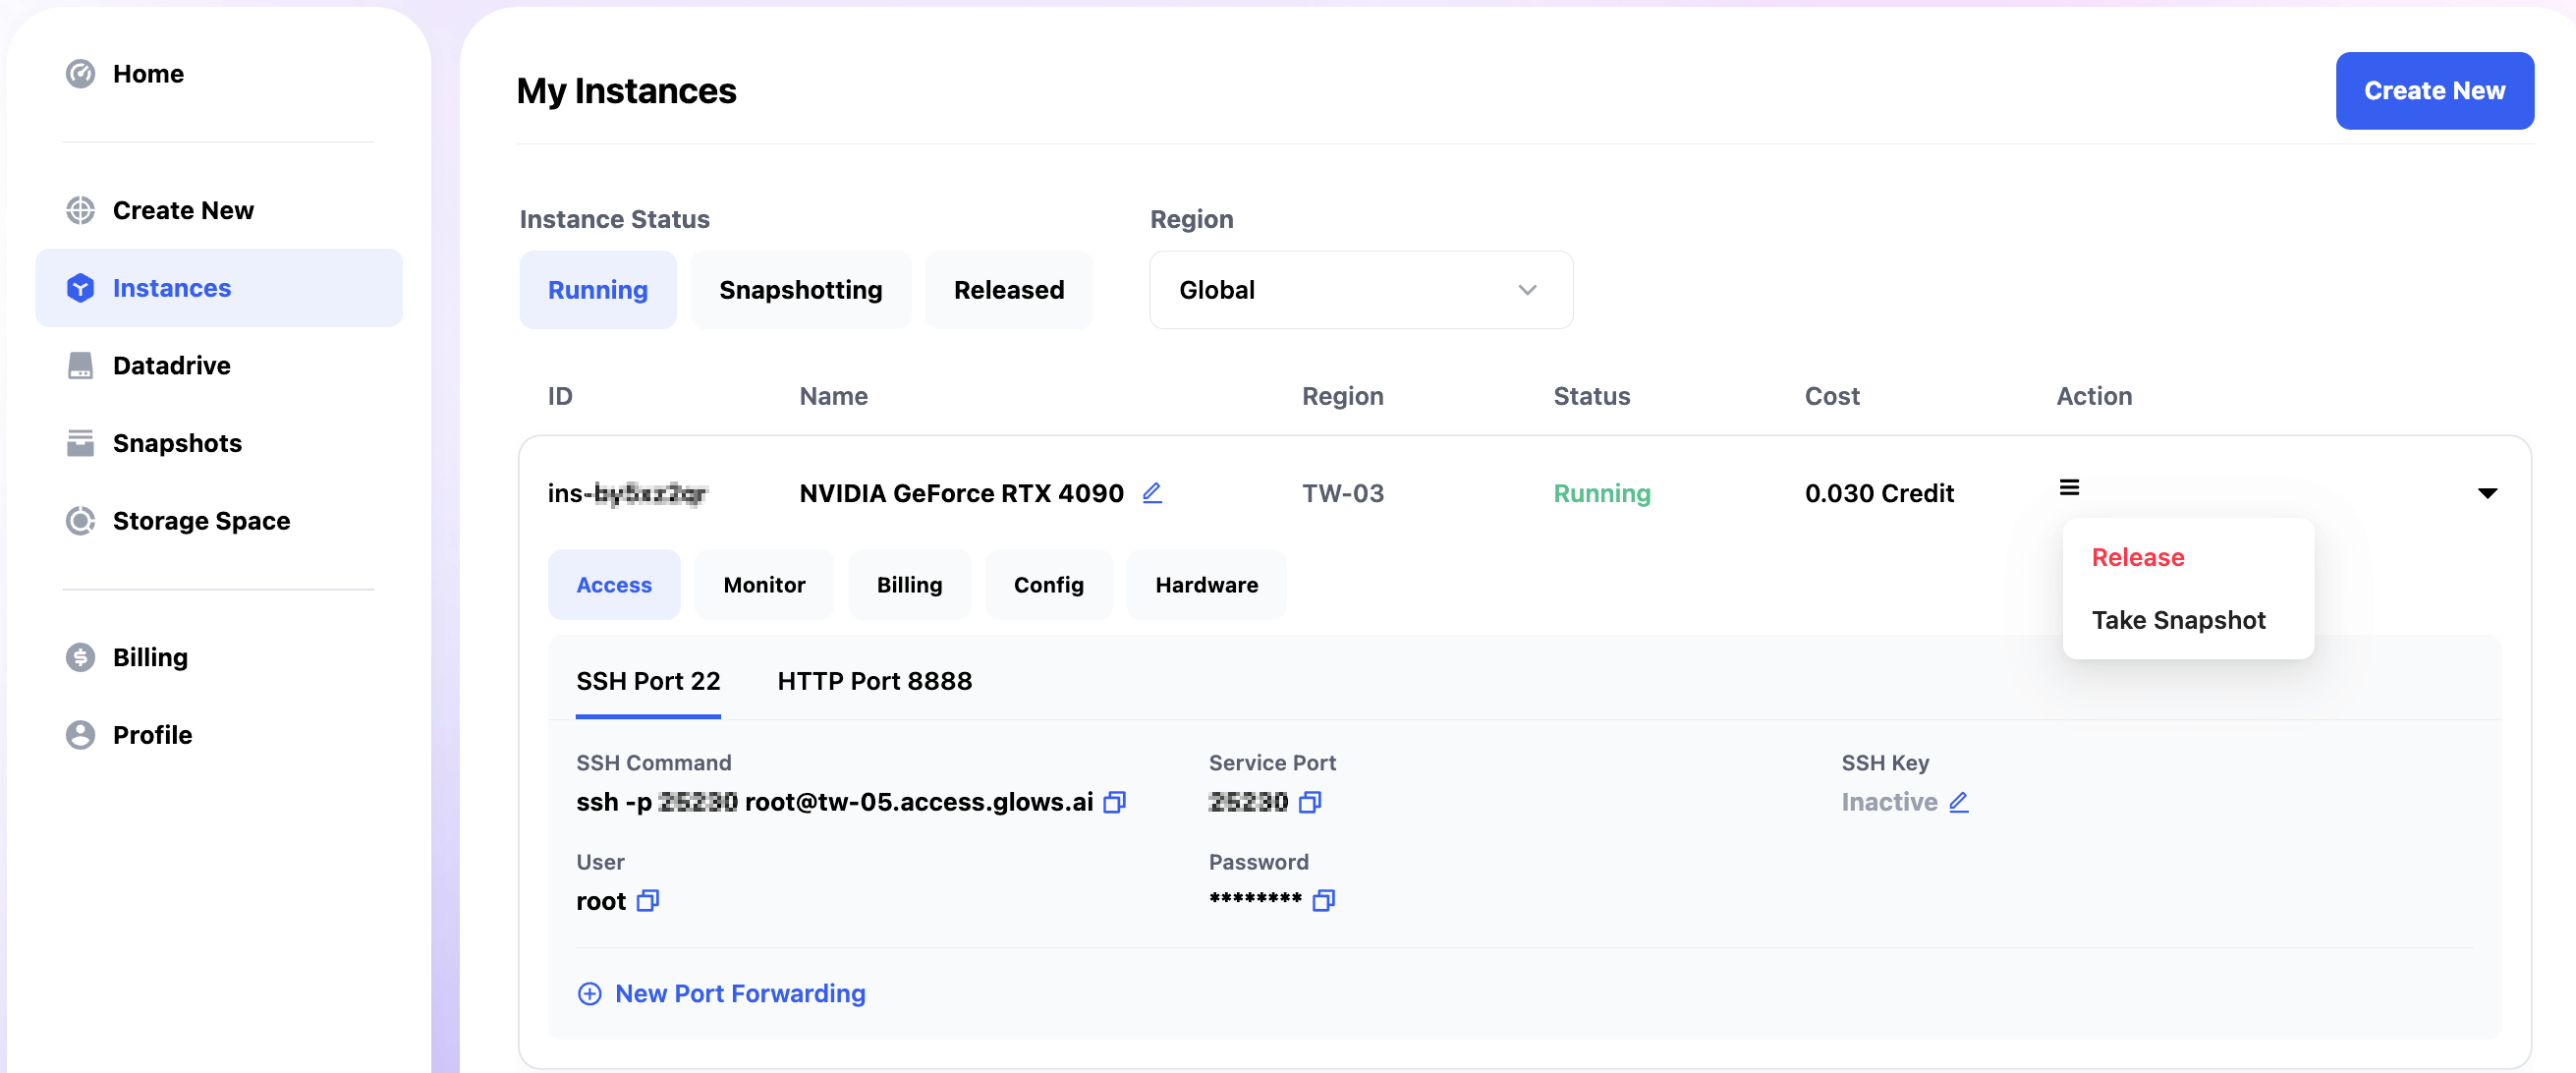
After launching, view instance details in Instances.
- Access: Instance configuration details, commonly used options include SSH (Port 22) / JupyterLab (Port 8888).
- Monitor: CPU/GPU metrics for the instance.
- Billing: Detailed billing information for the instance.
- Config: Instance configuration details, including software information for the startup image.
- Hardware: Hardware specifications of the instance.
After you finish using the instance, you can choose Release in the Action menu to release the instance, or select Take Snapshot to create a snapshot.
Other Features
Management of Datadrive, Snapshots, Storage Space, Billing, and Profile is identical to the main Glows.ai site, please refer to the Glows.ai User Guide
Contact Us
If you have any questions or suggestions while using Glows.ai, please reach out via email, Discord, or Line.
Email: support@glows.ai
Discord: https://discord.com/invite/glowsai
Line: https://lin.ee/fHcoDgG