 Speed up your innovation with Glows.ai, Scale up your large model training
 Glows.ai Remote PostgreSQL Database Matrix0 Usage Guide
Feature Overview
What is the Remote PostgreSQL Service?
Glows.ai provides a managed PostgreSQL database service with the following features:
| Feature | Description |
|---|---|
| Relational Storage | Standard PostgreSQL functionality for storing user data, configurations, etc. |
| Vector Storage | Built-in pgvector extension supporting storage and retrieval of vector data |
| Maintenance-Free | No need to install, configure, or maintain the database |
| High Performance | Dedicated instances with low latency and high throughput |
| Automatic Backup | Data is automatically backed up, ensuring safety and reliability |
Applicable Scenarios
- AI Agent projects (RAG, vector retrieval)
- Large Language Model applications (conversation memory, knowledge base)
- Data analytics projects
- Any project requiring a database
Service Activation
During the beta testing, the service is only available to users who have purchased a Public IP. If you need testing, you can [reach out to us](#Contact Us) to enable access.
Creating an Instance
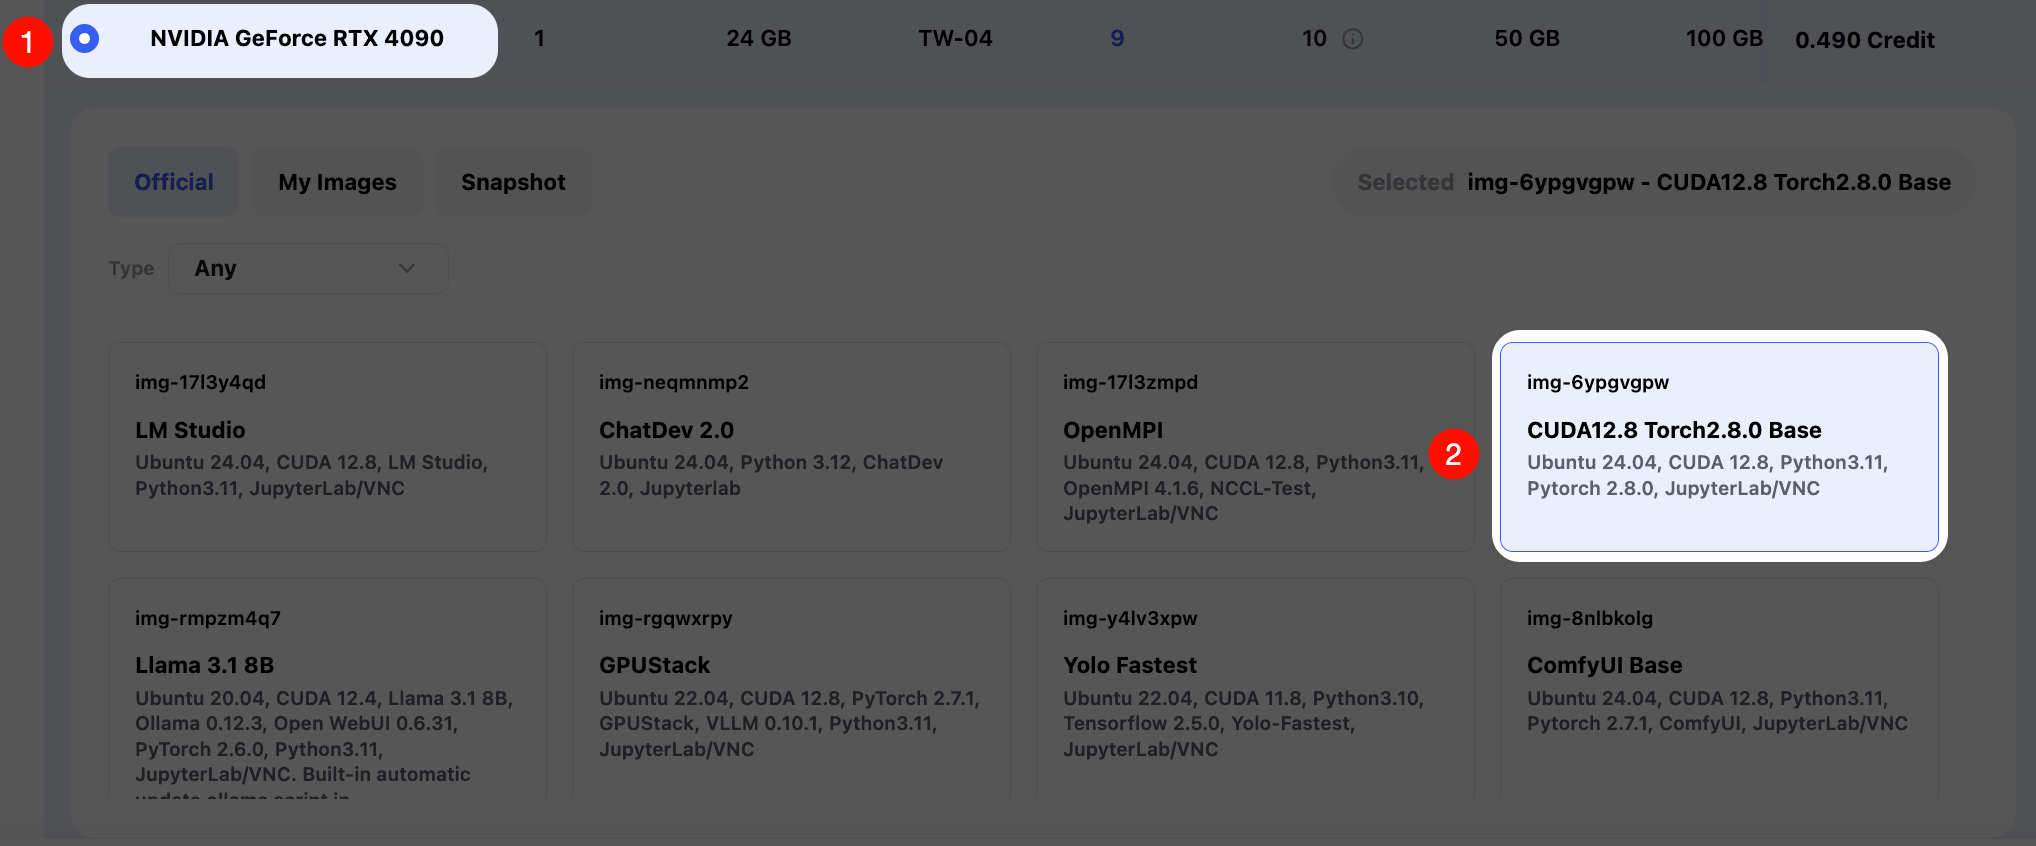
Create instances on-demand in Glows.ai. You can refer to the tutorial. This guide uses the CUDA12.8 Torch2.8.0 Base (img-6ypgvgpw) image.
In Create New, select Workload Type as Inference GPU -- 4090. First select the image CUDA12.8 Torch2.8.0 Base, which has been preconfigured by the official team with the basic environment required for AI projects (CUDA, PyTorch, etc.).
You can configure Unit Qty (number of GPUs) and Mount Datadrive (Glowsai cloud storage) as needed. If you need to use database functionality, you need to click the Bind button under Bind Public IP Address to configure a static IP.
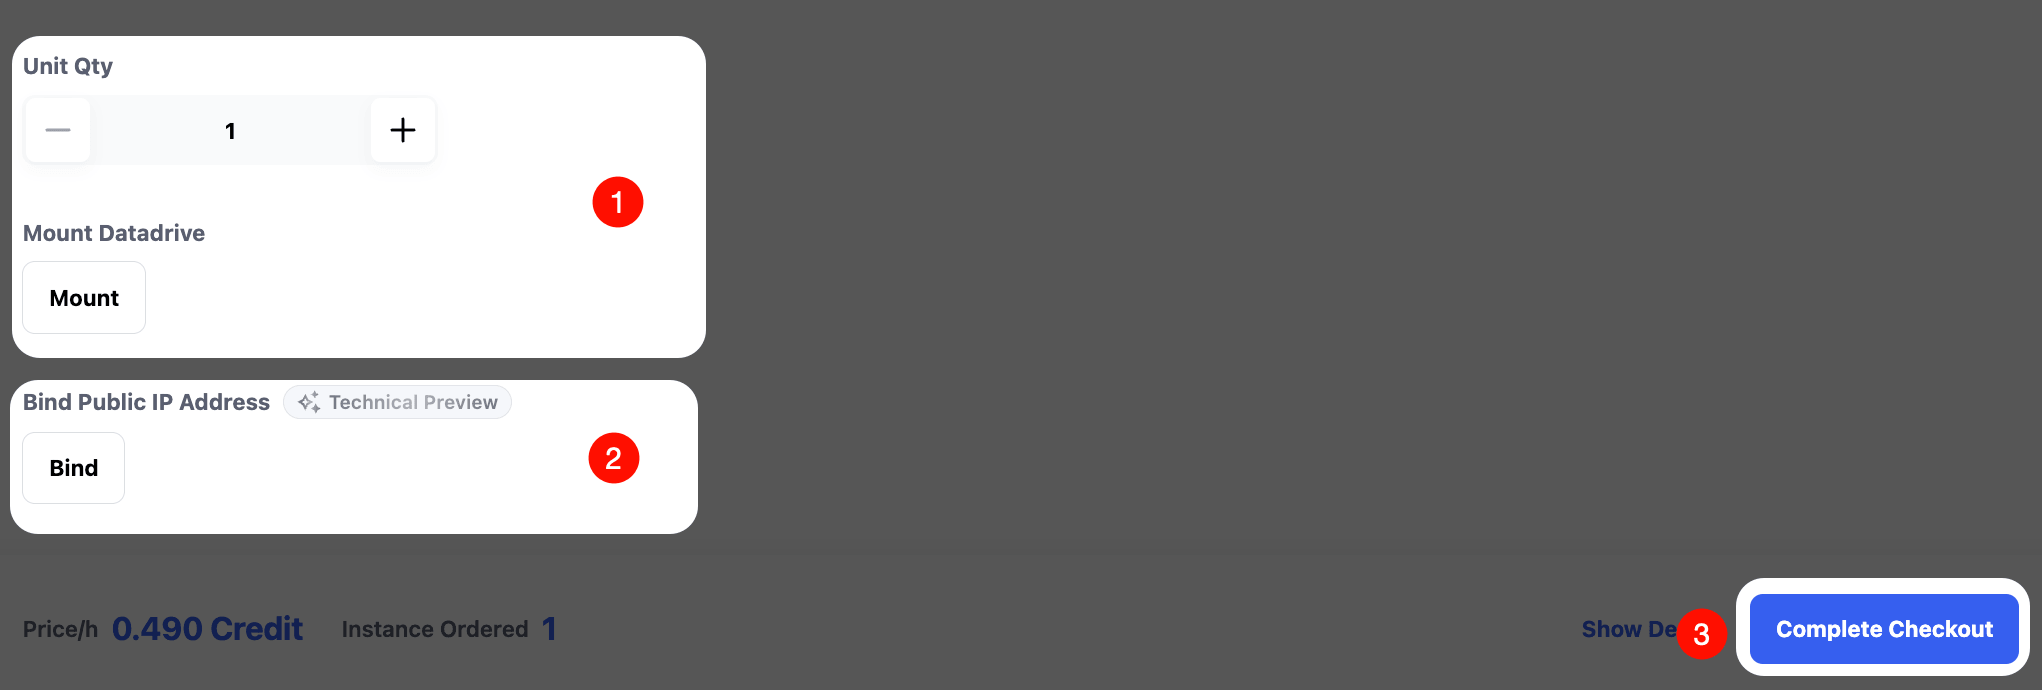
After the instance is started, send the instance ID (ins-xxxx) to glows assistant. Our engineers to configure it for you and then provide the internal database connection method.
You will receive the following information:
| Parameter | Description | Example |
|---|---|---|
HOST | Database address | 172.172.1.1 |
PORT | Database port | 3306 |
USER | Username | glowsai |
PASSWORD | Password | ******** |
DATABASE | Default database | postgres |
Basic Usage
Install Connection Tool
To connect directly to the database, you can use the postgresql-client tool. After SSH connecting to the instance, enter the following commands to install the tool package.
# Install PostgreSQL client
apt-get update && apt-get install -y postgresql-client
# Verify installation
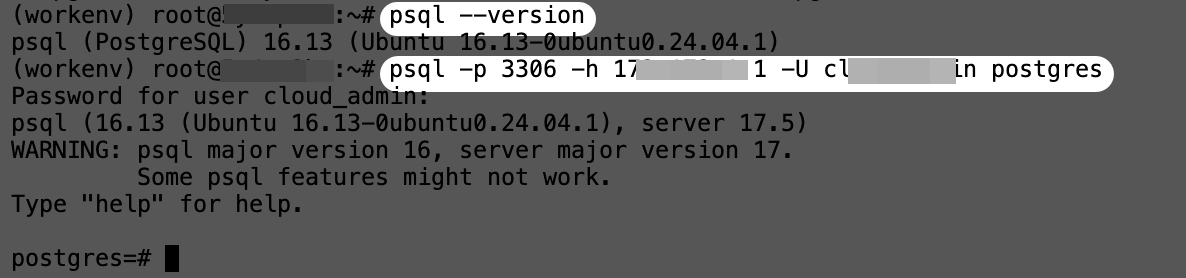
psql --version

Connect to Database
Use the psql command line to connect. Follow the instructions below.
# Basic connection command
psql -h <HOST> -p <PORT> -U <USER> -d <DATABASE>

# Example (replace with actual information provided by the assistant)
psql -h 172.172.1.1 -p 3306 -U glowsai -d postgres
Create Database
-- Create a new database
CREATE DATABASE my_project_db;

-- Connect to the new database
\c my_project_db

Basic Vector Data Operations
Same as standard database operations. The following demonstrates create, delete, query, and update operations.
Create Vector Table
-- Install vector extension
CREATE EXTENSION IF NOT EXISTS vector;
-- Create a table with a vector column
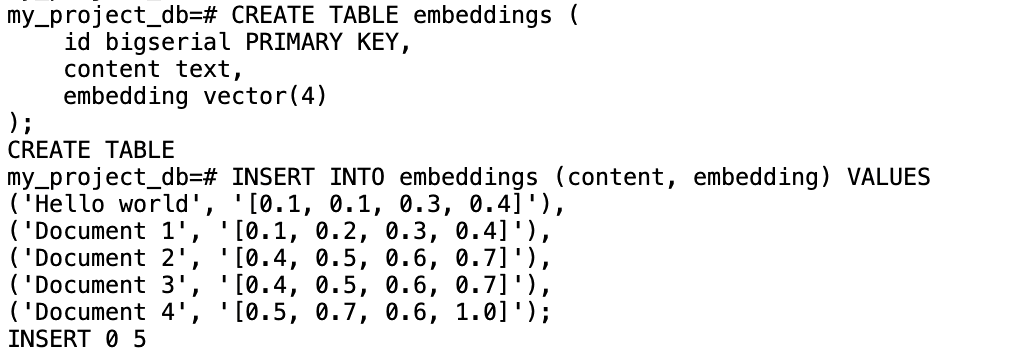
CREATE TABLE embeddings (
id bigserial PRIMARY KEY,
content text,
embedding vector(4)
);
Insert Vector Data
-- Insert test data (simulated vectors)
INSERT INTO embeddings (content, embedding) VALUES
('Hello world', '[0.1, 0.1, 0.3, 0.4]'),
('Document 1', '[0.1, 0.2, 0.3, 0.4]'),
('Document 2', '[0.4, 0.5, 0.6, 0.7]'),
('Document 3', '[0.4, 0.5, 0.6, 0.7]'),
('Document 4', '[0.5, 0.7, 0.6, 1.0]');
Vector Similarity Search
-- Cosine distance (recommended for text embeddings)
SELECT id, content, embedding <=> '[0.1, 0.2, 0.3, 0.3]'::vector as distance
FROM embeddings
ORDER BY embedding <=> '[0.1, 0.2, 0.3, 0.3]'::vector
LIMIT 2;
Description:
<=>is the cosine distance operator1 - distanceconverts to similarity (range 0–1, higher means more similar)

Update Vector Data
-- Update vector of a specific record
UPDATE embeddings
SET embedding = array_fill(0.5, ARRAY[4])::vector
WHERE id = 1;

-- Verify update
SELECT id, content, embedding FROM embeddings WHERE id = 1;

Delete Vector Data
-- Delete specified record
DELETE FROM documents WHERE id = 3;

-- Check remaining records
SELECT COUNT(*) FROM embeddings;

-- Delete all records
DELETE FROM embeddings;
Python Connection Example
You can use system tools for direct connection, or configure it in a Python program. First, run the following command to install the connection library.
pip install psycopg2-binary
Test reading from the database:
import psycopg2

conn = psycopg2.connect(
    host="172.172.1.1",
    port=3306,
    user="glowsai",
    password="xxxxx",
    dbname="my_project_db"
)

cur = conn.cursor()
cur.execute("SELECT * FROM embeddings;")
rows = cur.fetchall()

for row in rows:
    print(row)

cur.close()
conn.close()

Project Practice: LiteLLM + Glows.ai Matrix0 db
LiteLLM is a unified proxy and tool layer for interacting with multiple large models (such as OpenAI, Anthropic, etc.), all through OpenAI-compatible APIs for seamless switching and management.
In production environments, LiteLLM is commonly paired with PostgreSQL for its stability, high concurrency, and powerful querying capabilities. With pgvector, it can efficiently store logs and embeddings for downstream analysis and retrieval.
Deploy LiteLLM Using Docker
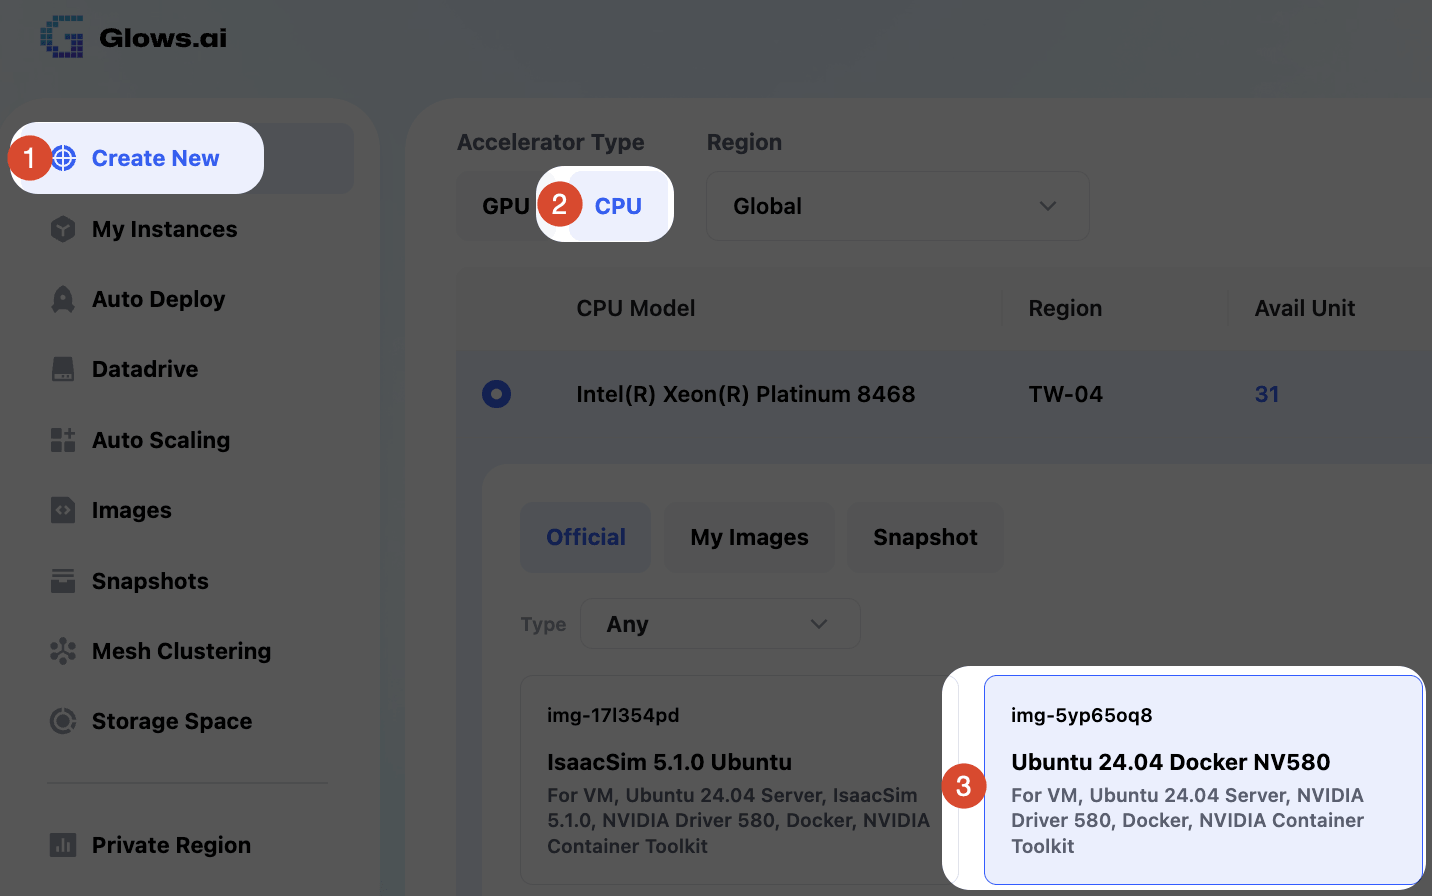
Create a CPU VM that supports Docker. The easiest way is to deploy LiteLLM directly via Docker. On the Glowsai platform, follow the diagram and select:
Create New → CPU → Ubuntu 24.04 Docker NV 580 image
Start LiteLLM
After the instance is successfully started and connected, you only need to create the following three files to quickly start LiteLLM:
docker-compose.yml: service startup configuration.env: environment variable configurationconfig.yaml: LiteLLM configuration file
docker-compose.yml Configuration
This file is used to define the container image and startup parameters:
services:
  litellm:
    image: docker.litellm.ai/berriai/litellm:main-stable
    container_name: litellm-gateway
    restart: unless-stopped
    env_file:
      - .env
    volumes:
      - ./config.yaml:/app/config.yaml:ro
    command: ["--config", "/app/config.yaml", "--port", "4001", "--num_workers", "4"]
    ports:
      - "0.0.0.0:4001:4001"
.env Environment Variables
Before starting the service, add the following content to the .env file:
# API master key (used for API calls and LiteLLM WebUI login)
LITELLM_MASTER_KEY=sk-glowsai

# PostgreSQL database connection string
DATABASE_URL=postgresql://glowsai:xxxxxxx@172.172.1.1:3306/postgres

# Whether to store model data in the database
STORE_MODEL_IN_DB=True
config.yaml Configuration
Add the following settings in config.yaml:
general_settings:
  master_key: os.environ/LITELLM_MASTER_KEY
  store_model_in_db: true
Start Service
After completing the above configuration, execute the following commands to start LiteLLM:
# Start service
docker compose up -d

# View container logs
docker logs -f litellm-gateway
LiteLLM will automatically connect to the database according to the DATABASE_URL in .env, and initialize and create the relevant tables.

Verify Database
At this point, reconnect to the remote database and enter \dt to see that many LiteLLM-related tables have been created in the database.
\dt

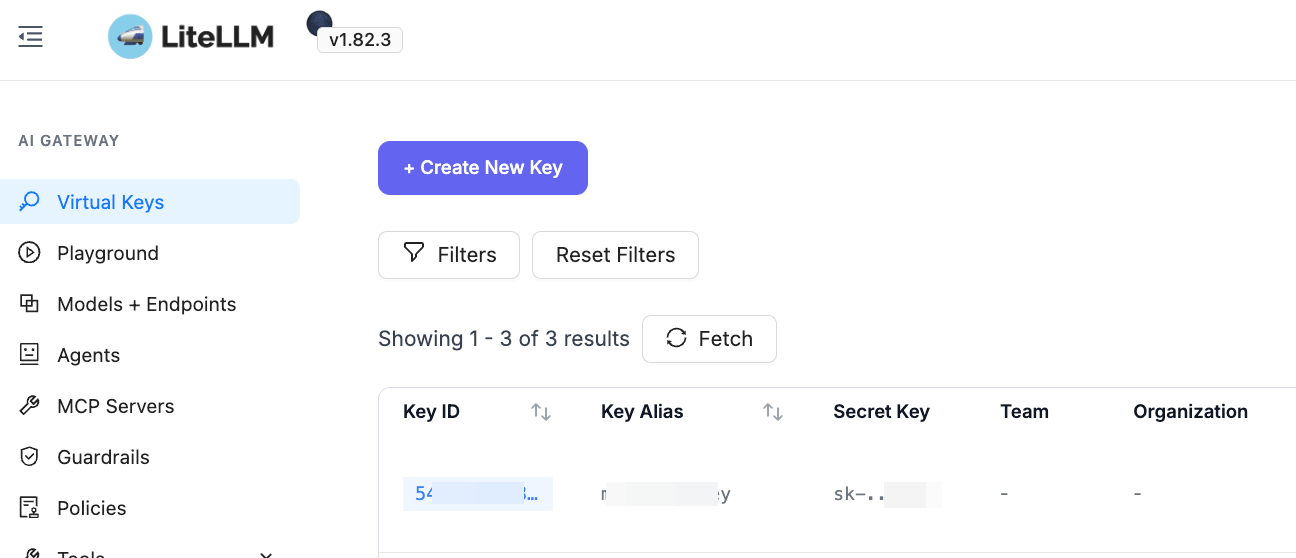
After the service is started, you can also log in normally to view LiteLLM backend data, create API keys, configure model providers and models, and perform other operations.
FAQs
1、How do I use the Matrix0 DB service on Glows.ai?
To use the Matrix0 DB service on Glows.ai, follow these steps:
Contact us to enable Matrix0 DB access (requires a Glows.ai Public IP) Start an instance Configure Bind Public IP based on the tutorial Provide your instance ID to our team Our engineers will configure the internal database connection You will receive the database connection details inside your instance
This process ensures a secure and correctly configured database environment.
2、Can I customize the IP and port for the remote database connection?
Yes, Glows.ai allows custom IP and port configuration for remote database connections. This flexibility helps match your existing infrastructure or deployment requirements. Simply provide your preferred IP and port, and we will configure it for you.
3、How do I access the LiteLLM WebUI after deployment?
By default, LiteLLM runs on port 4001 within your instance. To access the WebUI from the public network:
Go to the instance interface Click New Port Binding Enter:
- Instance Service Port (e.g., 4001)
- Public IP Port
Click
Create. Once configured, you can access the service within the instance via Glows.ai Public IP + Public IP Port from the public network.
If you have any questions or suggestions while using Glows.ai, feel free to contact us via email, Discord, or Line.
Email: support@glows.ai
Discord: https://discord.com/invite/glowsai
Line: https://lin.ee/fHcoDgG